With this dialog, you can influence several general aspects of the Buyer Side. We recently completely reworked this dialog and added explanations and screenshots to make these powerful customization options easier to understand.
Notice: Most of the settings here are document-wide properties (can be different per document), so make sure you have the correct Buyer Side document selected while changing settings. Some settings are also duplicated from the Buyer Side or Document tab.
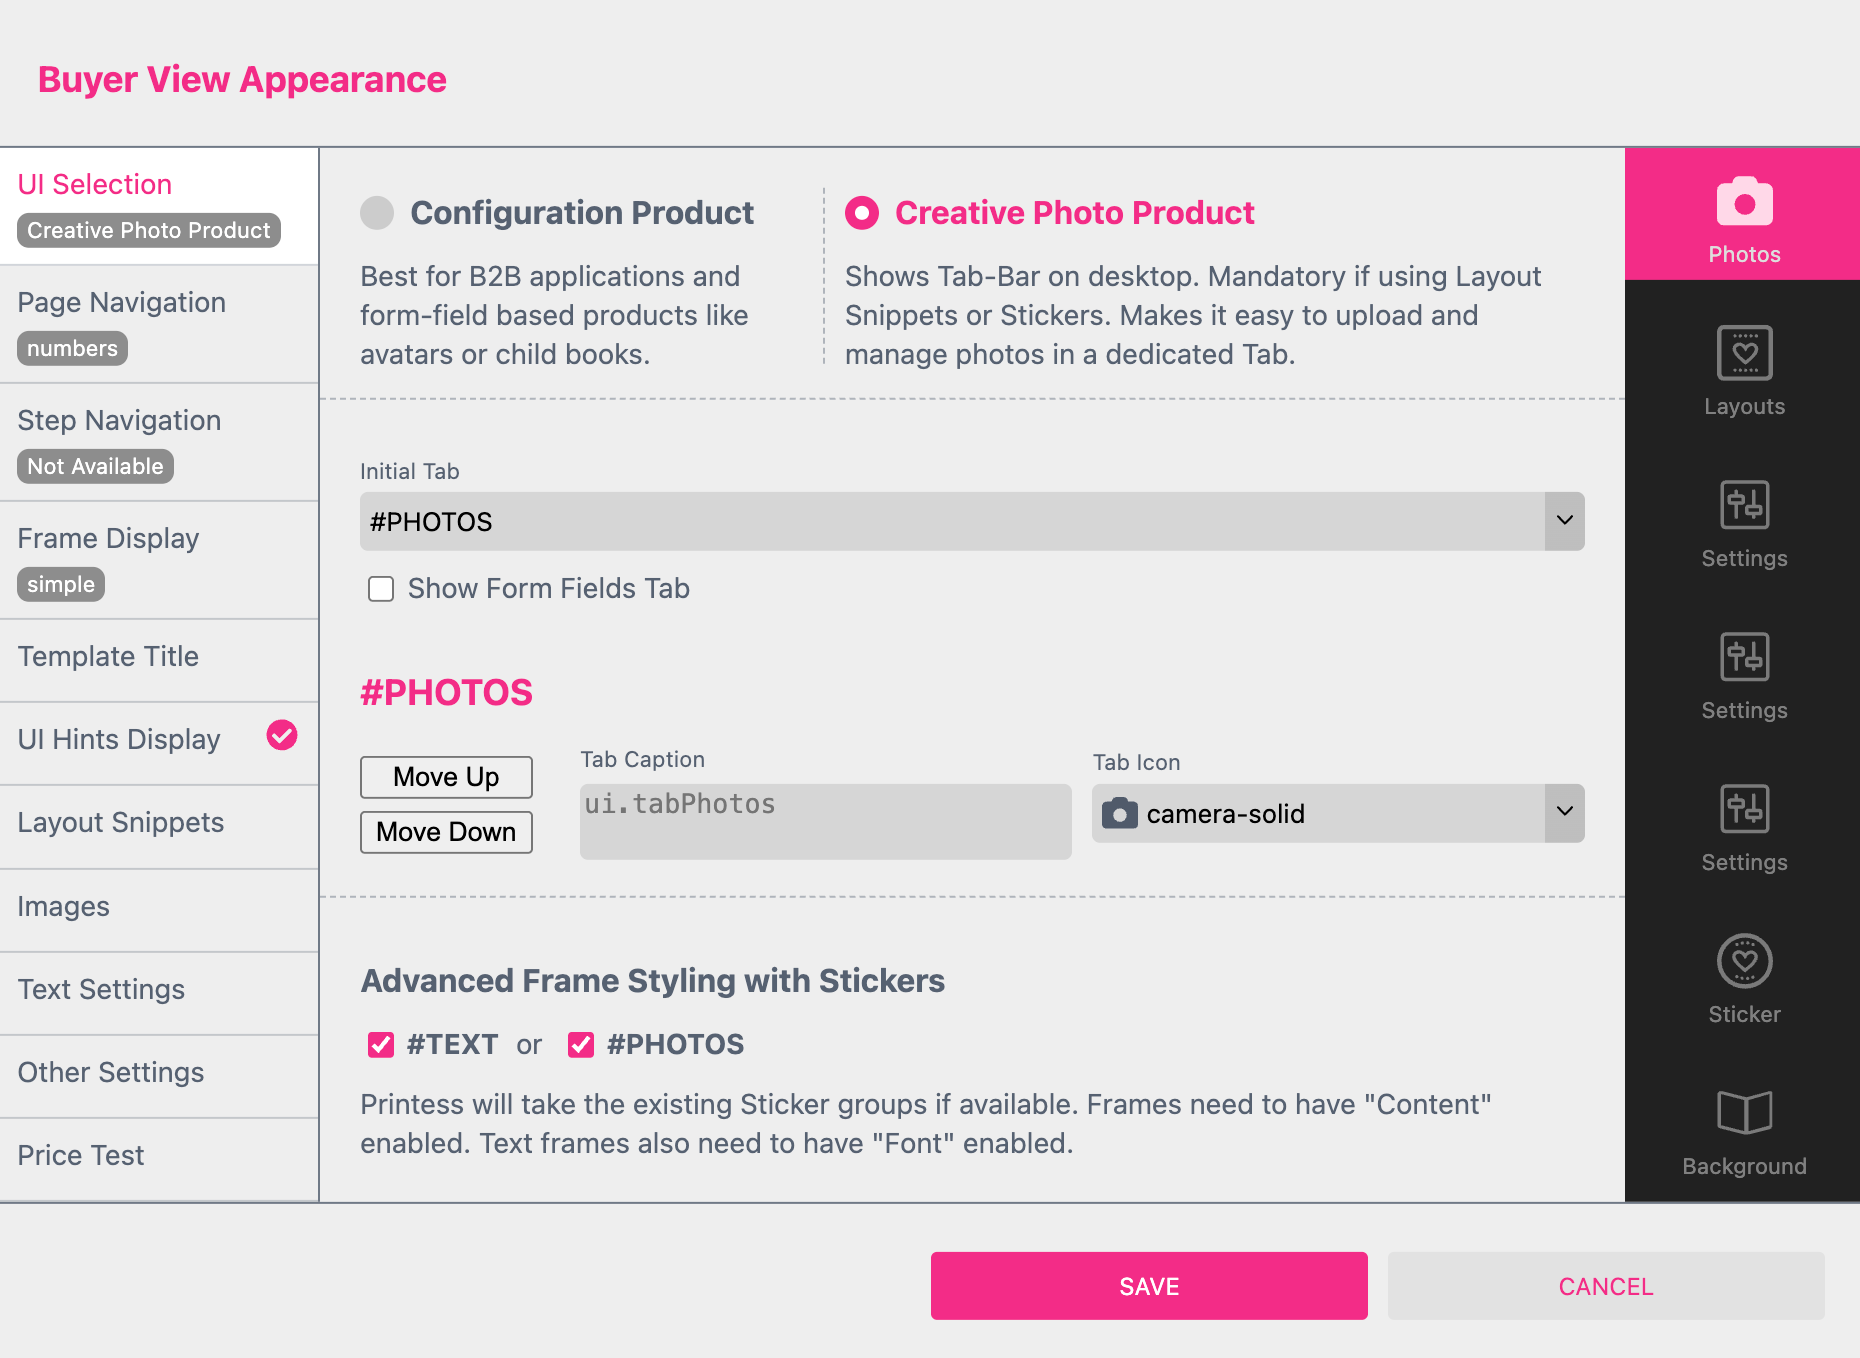
Here you set the general type of UI the Buyer will see. By default the Creative Photo Product UI is selected.
You can select between a form-based Configuration Product where the settings for the Template are located to the right of the document view, or a Creative Photo Product which has a well-sorted tab on the left with the Layout Snippet- and Sticker Snippet-Selection. This allows the Buyer to edit more freely. Here you can also create new custom tabs for the Buyer Side.
If Creative Photo Product is enabled, a Photo tab is shown at the Buyer Side. This is especially useful for crowded user interfaces or whenever you want to let users create beyond simple configurations.
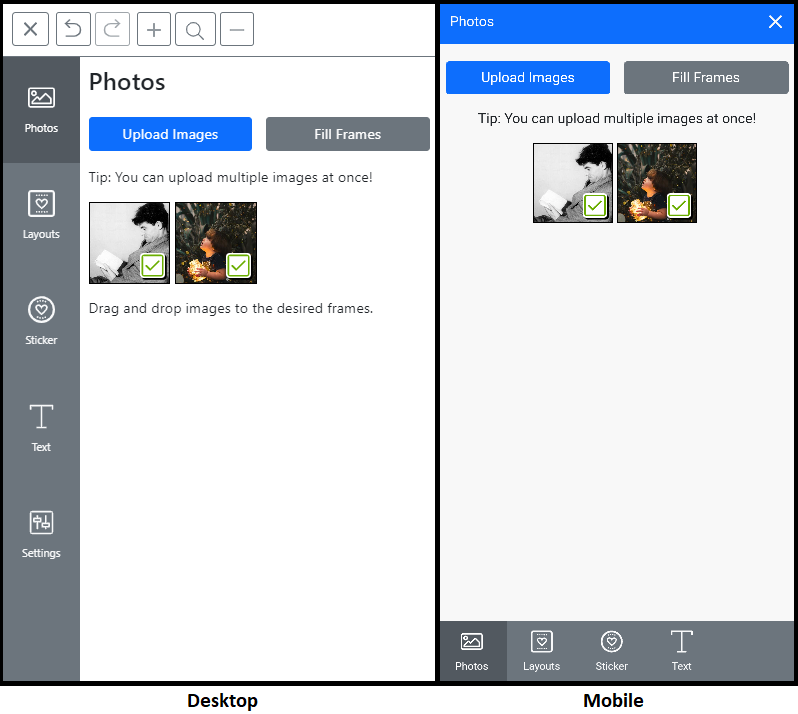
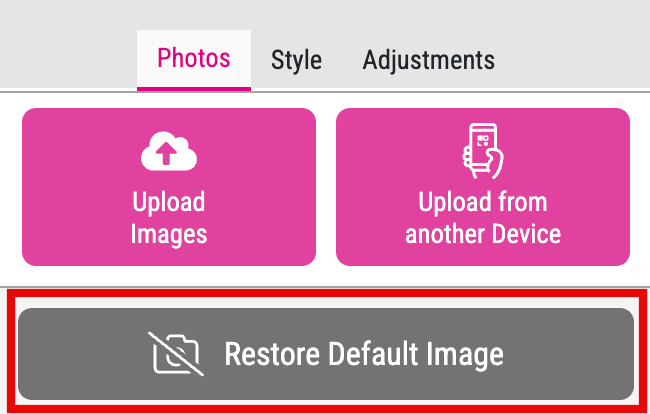
Whenever a changeable image frame exists, Printess shows a Tab where all uploaded images are visible. Clicking on one of the uploaded images will instantly put it into the image frame on the page. If several image placeholders are present, selecting another image will fill the second placeholder, and so on.
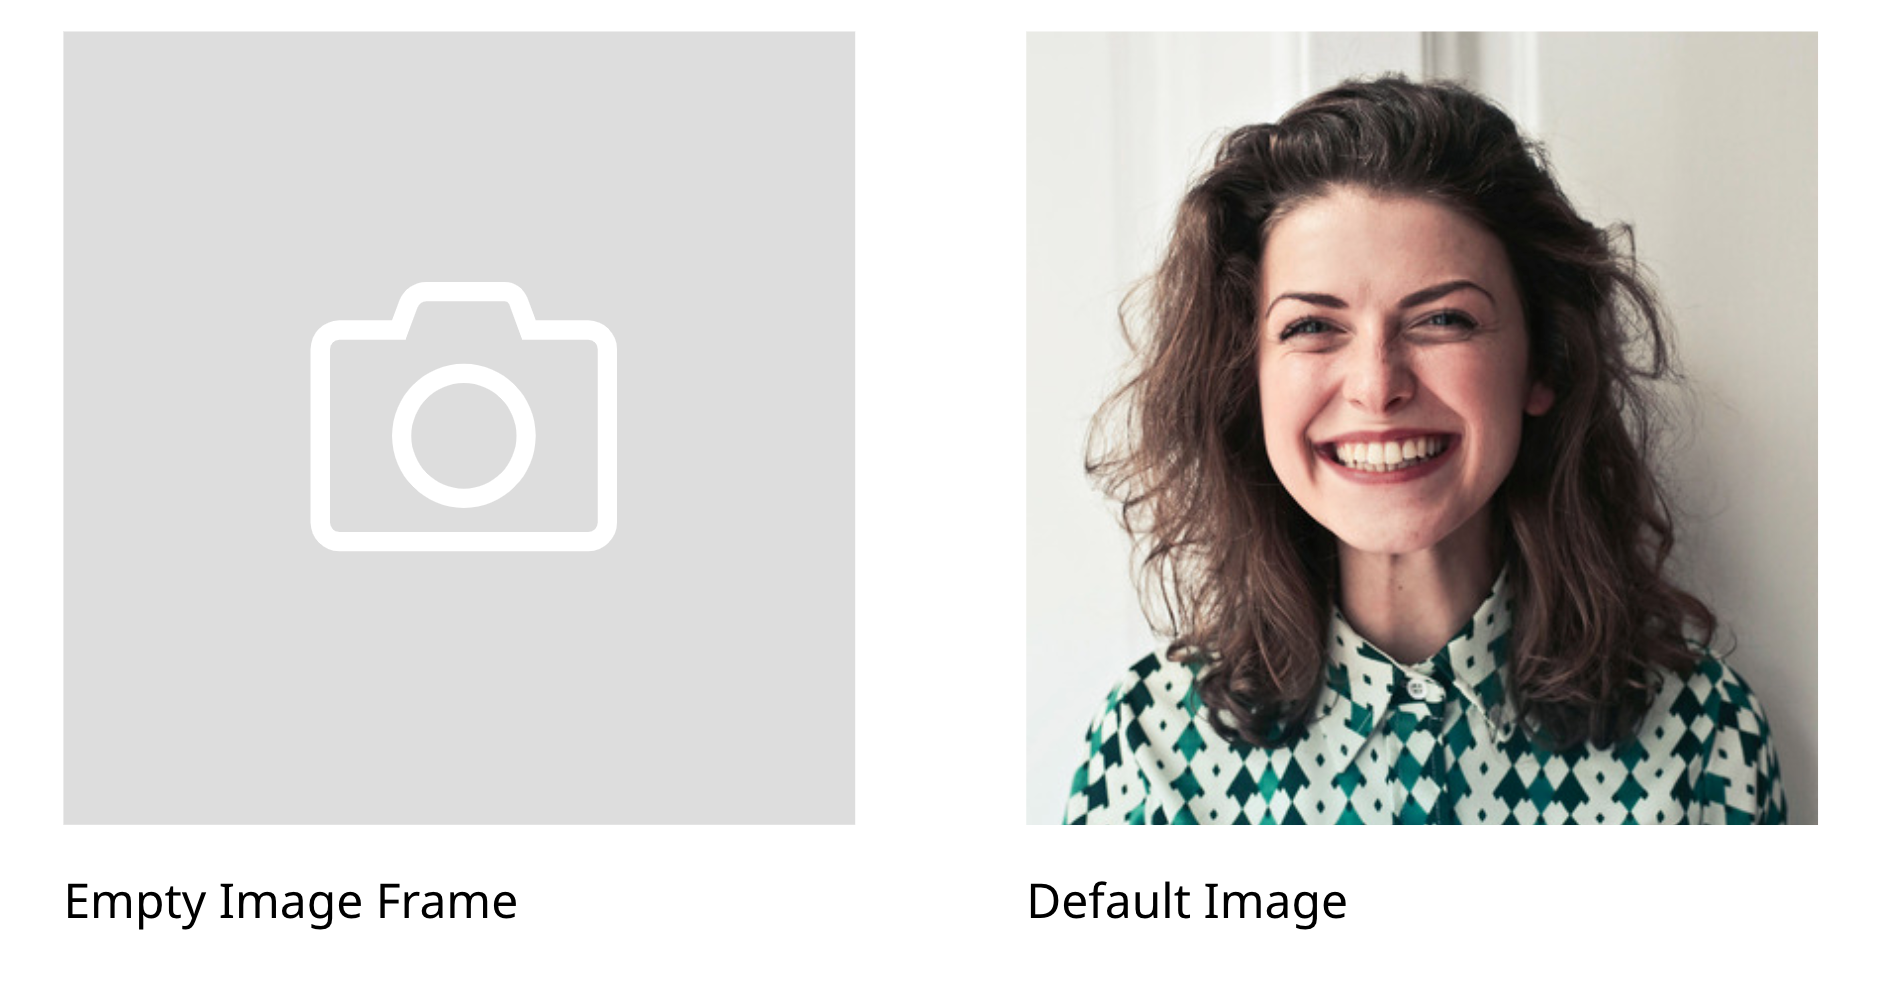
Depending on the UI settings (with or without groups), a button or thumbnail will appear on the Buyer Side Photo Frame Tab to restore the image back to a default image.

But this feature only works if you have a default image placed at the Designer Side. Just an empty image frame isn’t a default image!
To activate this default image setting, select Content on the Buyer Side frame features tab. This will cause additional options to appear, allowing you to select Reset to Default:

To enable this setting for groups, simply select the groups to include (or All). You must have image groups created for this setting to appear.


At the Panel UI a button will be displayed to restore the default image.
Tabs are present depending on further configuration and appear automatically for some elements, like the Photos, Layout Snippets, Sticker Snippets or Form Fields.

If Layout Snippets are present on a page a Layouts Tab will appear. Layout Snippets cannot appear in other Tabs.
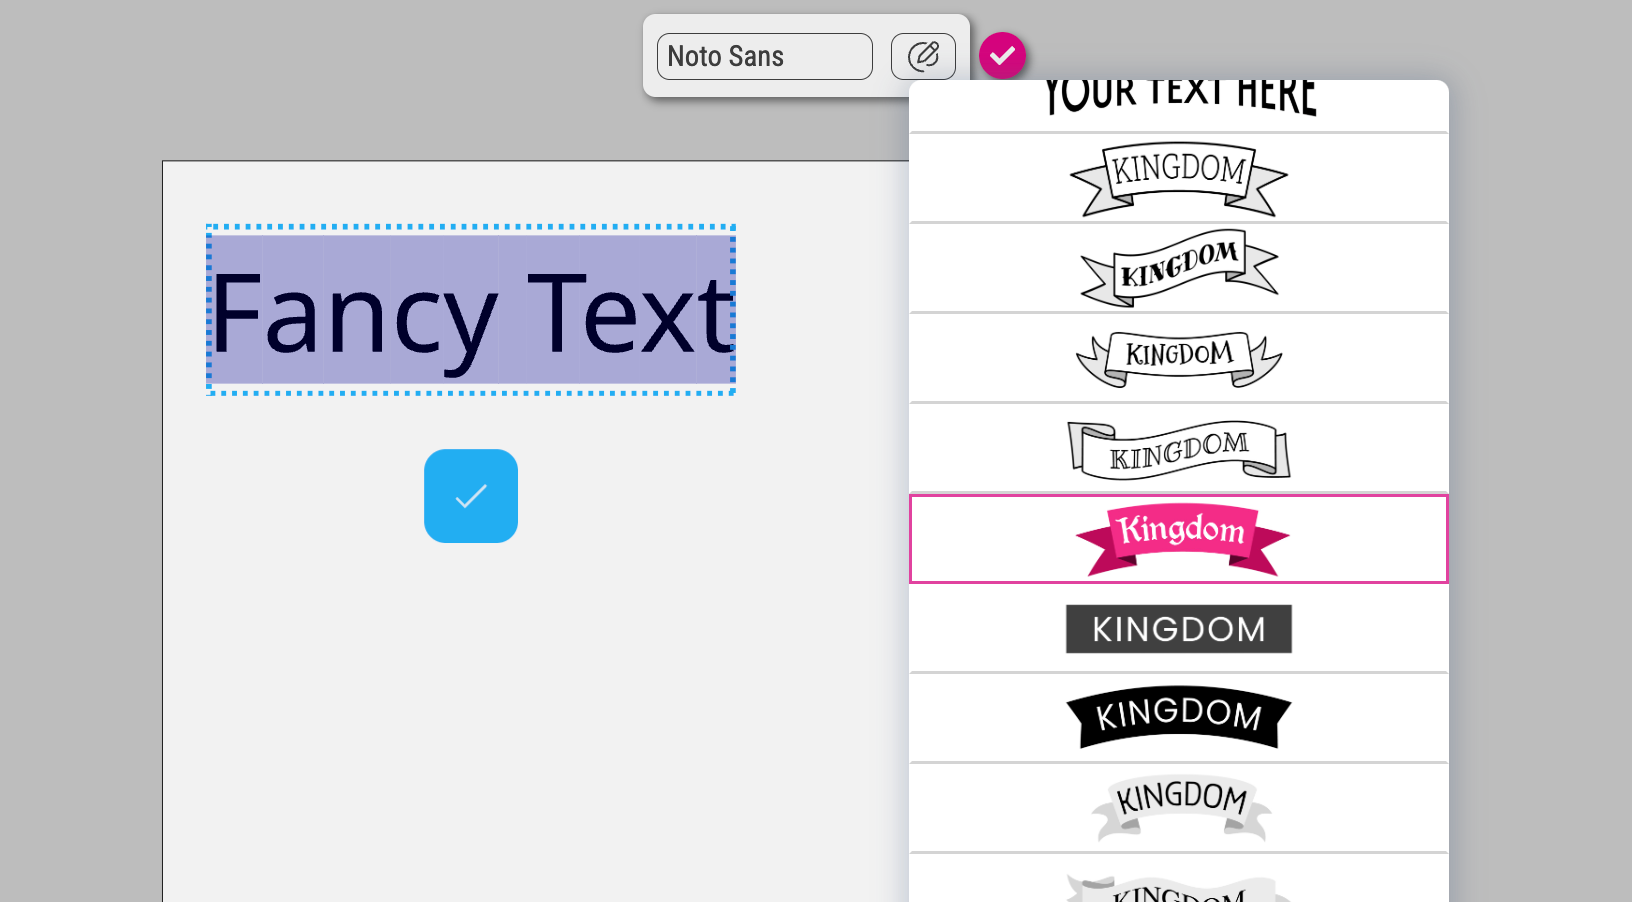
Sticker Snippets can be assigned to one of the standard available Tabs (Text, Stickers, Elements, Images) or you can define your own name and icon for a tab.

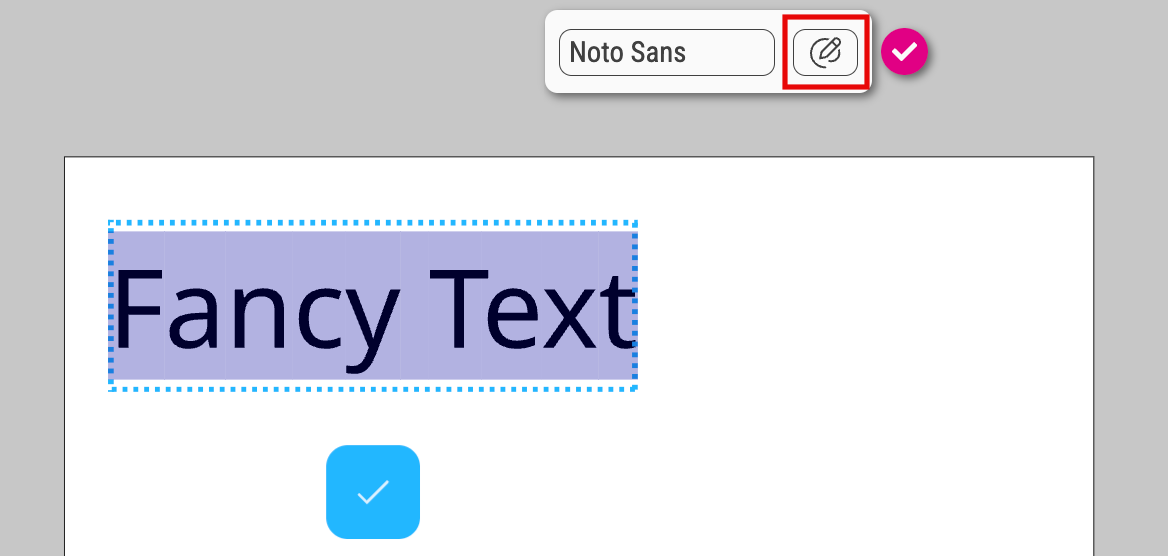
To set your own caption and icon choose custom in the drop down. This allows you to select an icon and overwrite the caption “custom” with your own.
On the right hand side you find a preview of the Tab Panel at the Buyer Side with the current settings. Including the order of all Tabs from top down. If the Icon of a Tab is white it is available in your Template - if its grey its not. Any setting changed in the Tab Navigation will be directly displayed here. You can select any Tab here to change it’s settings.
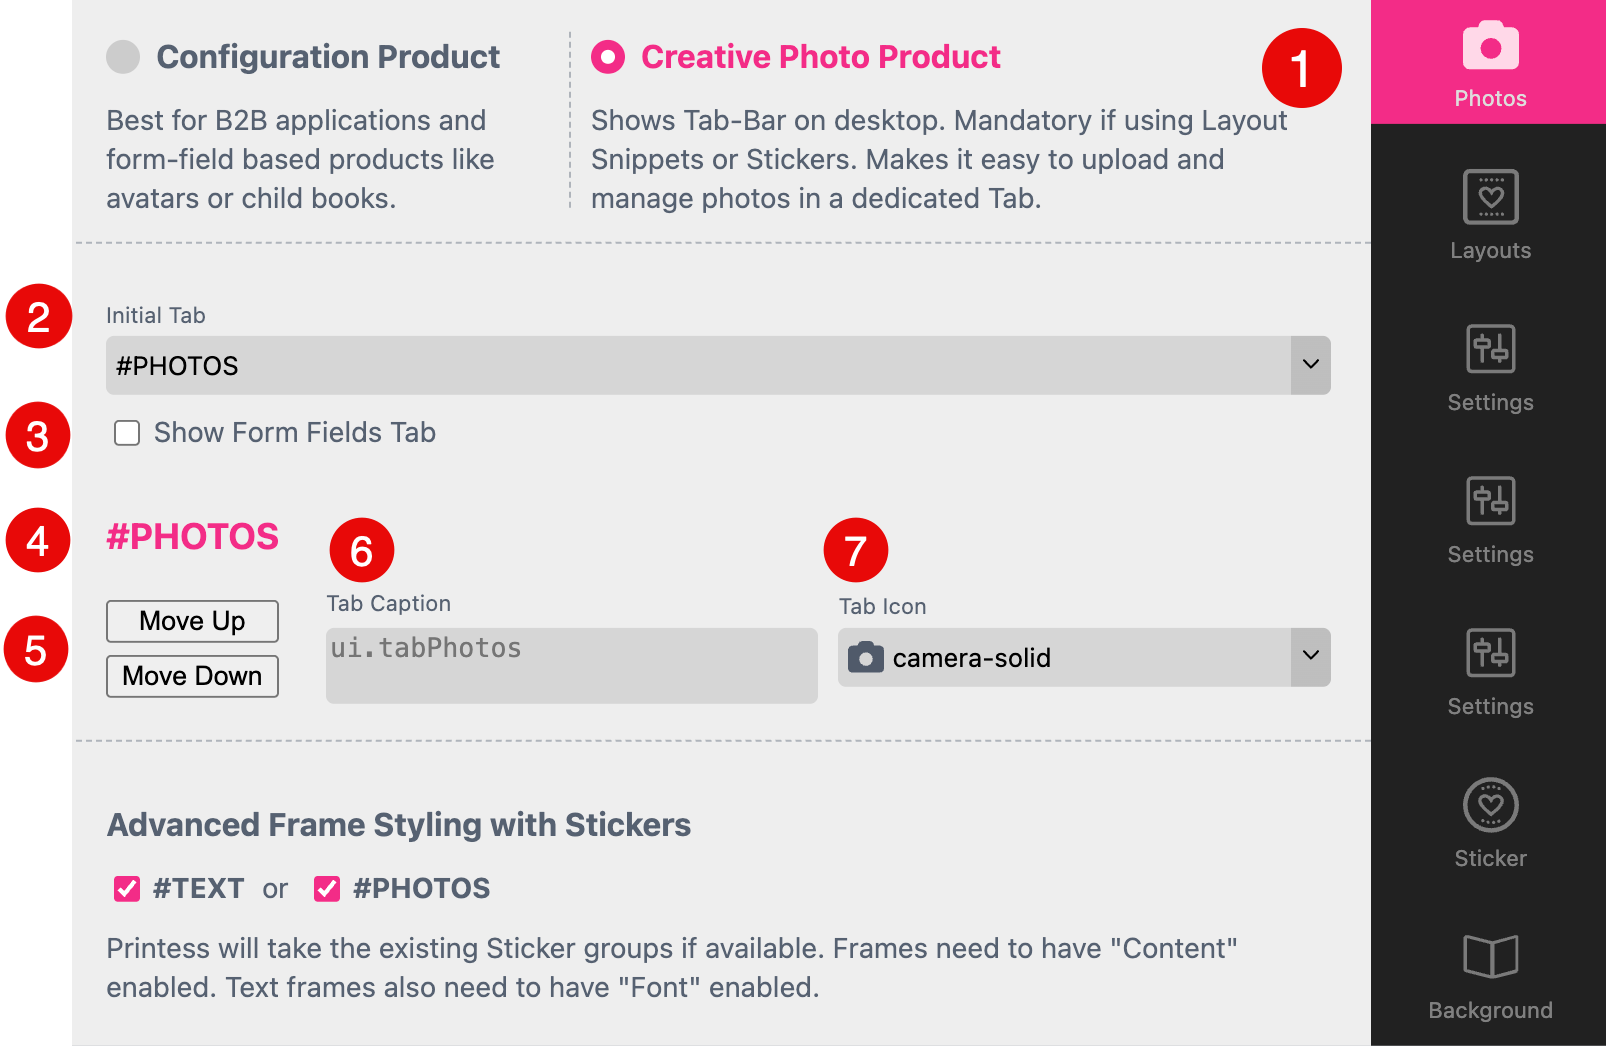
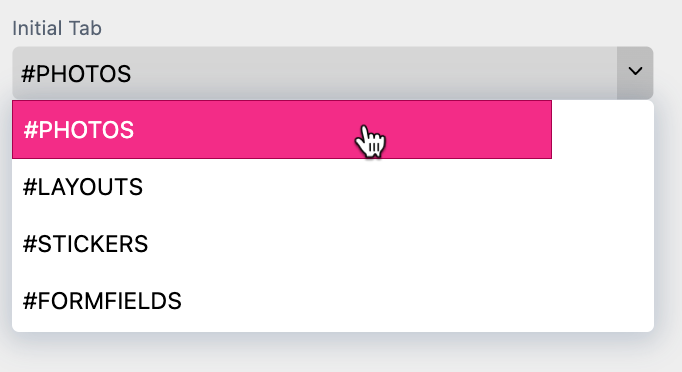
By default the “Photo” Tab is defined as the Initial Tab. So as soon as the Printess Buyer Side is loading, this Tab will be automatically selected - it doesn’t has to be the Tab on top of the Tab order! Here you can select any Tab available in your Printess Template.

Activate the checkbox to display a Form Field Tab. To display a large number of Form Fields they can be organized across three different Tabs. Each Form Field must be assigned to a specific “Tab No.” to facilitate this distribution. This method streamlines the organization and enhances usability.
Learn how to define a Tab No. here.
Here you get the name of the Tab displayed which is currently selected.
Just use the option “Move up” and “Move Down” to move the selected Tab to change the order.
The Tab Caption accepts static text or an entry from the Translation Table.
Learn more about the Translation Table.
Note: Sticker Snippets Caption and Icon can only be changed at the Sticker Snippet Tab. Please read here
You can choose from a large range of icons available to replace the default Icon of a Tab. Click on the small triangle of the option “Tab Icon” to choose a different one.
Note: This feature is only available at the Panel UI!
By default the two options TEXT and PHOTOS are turned on.
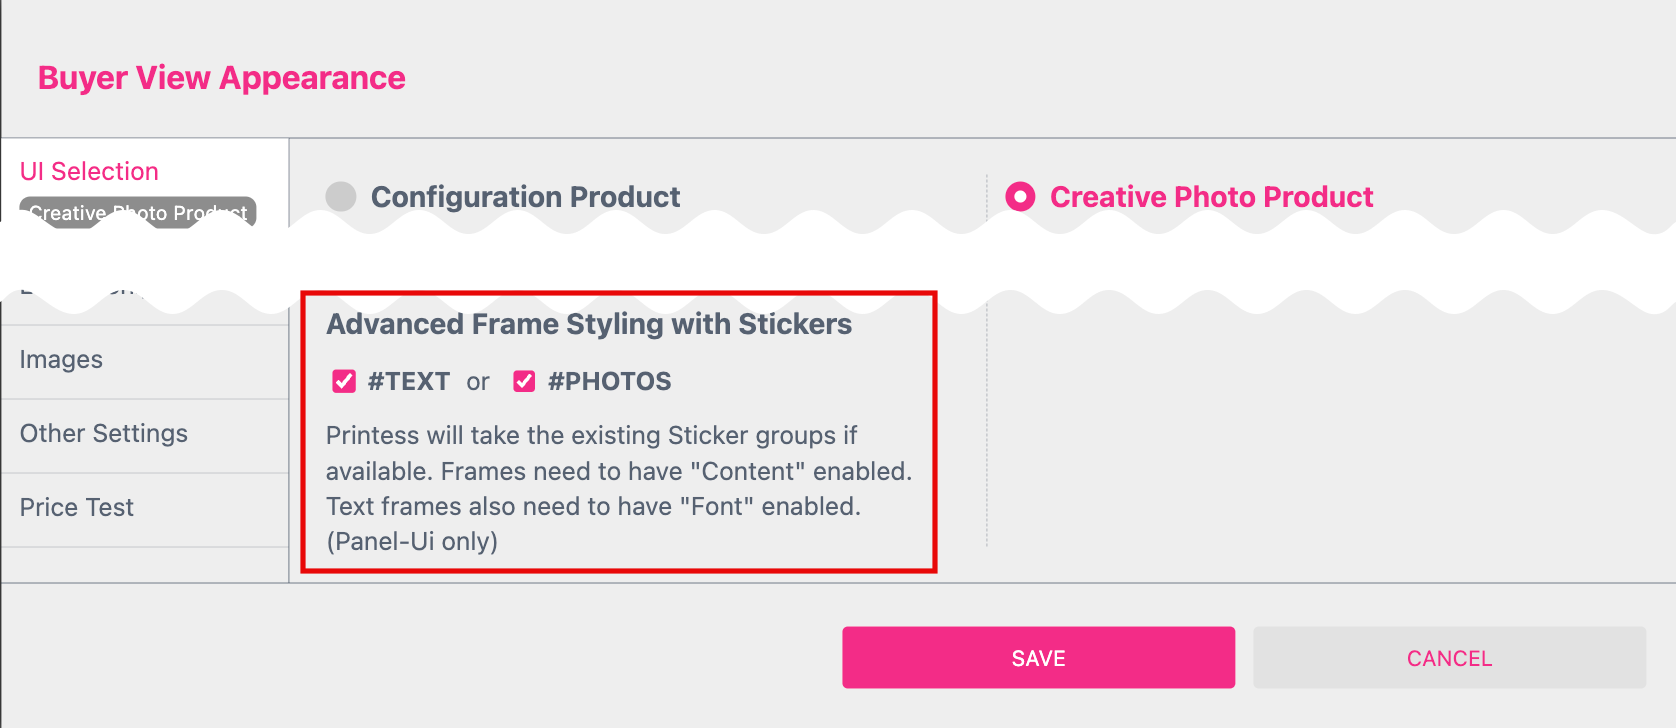
In this case the local Sticker Snippet groups for TEXT and PHOTOS will be shown at the Buyer Side. If there are no local groups available, they fall back to the system Sticker Snippets.
For the TEXT Sticker Snippets option to appear at the Buyer Side as soon as the Buyer selects a Text Frame, that Text Frame must have the Buyer Side Setting “Fonts” enabled.
If you like to add these groups to your Template you just need to press the buttons “Add Text Frames” and “Add Photo Frames” at the Sticker Snippet Tab of the Resources Panel.
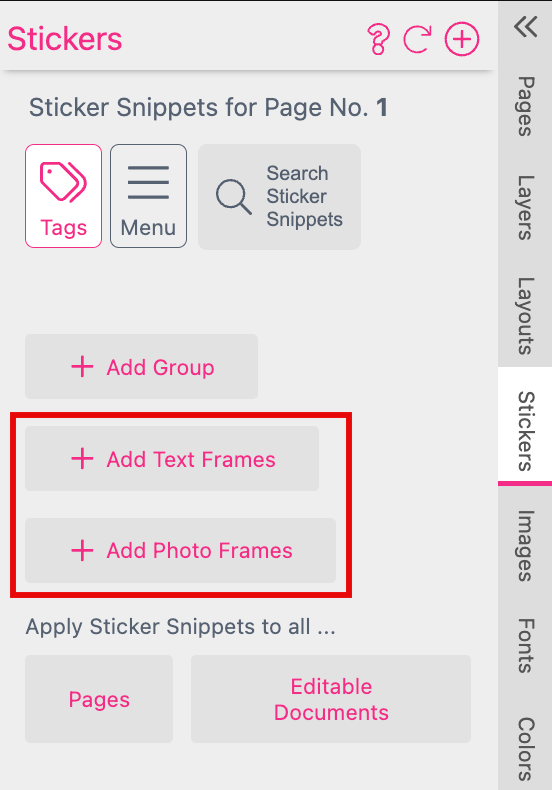
By default there is a Sticker Snippet Group defined for each option.
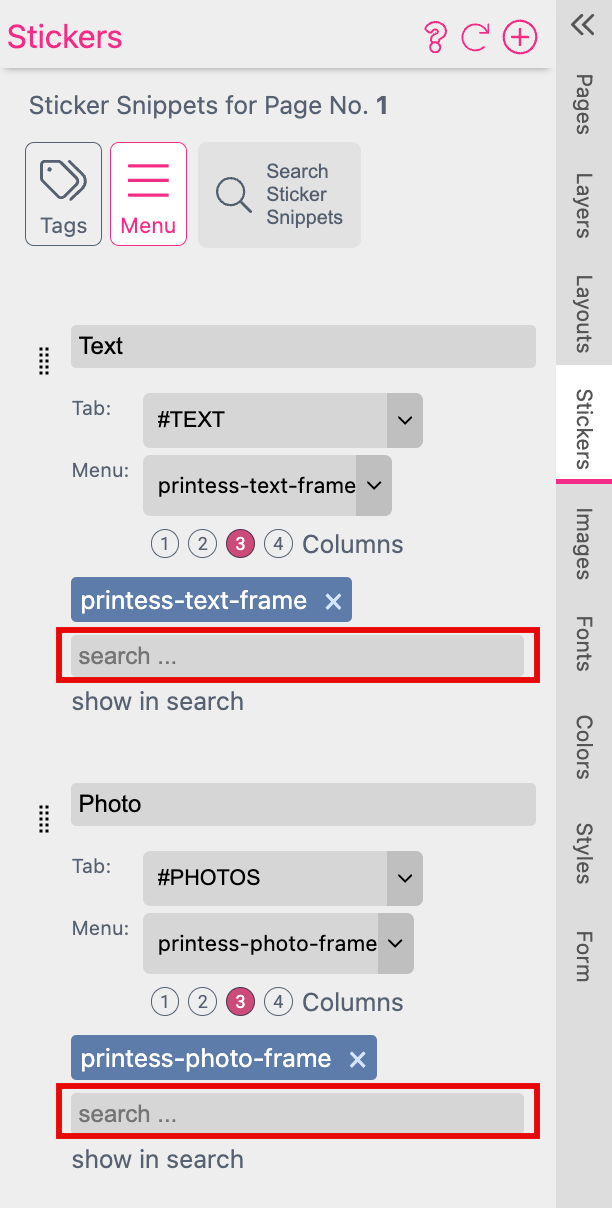
You can assign additional Sticker Snippet Tags if you click into the search input field. To remove the predefined group just click the cross at the right of the blue bar.
At the Buyer Side two small icons will appear in the Tab Bar.
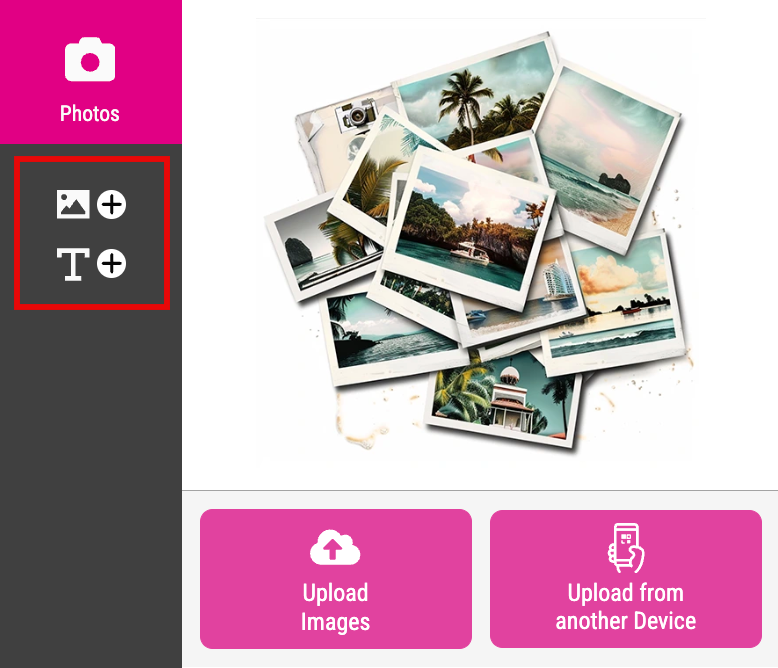
If the Buyer clicks on one of these the available Sticker Snippets will be displayed.
The Sticker Snippets are displayed sorted by their Topics. The Buyer can browse through these topics to select from the various Sticker Snippets available.
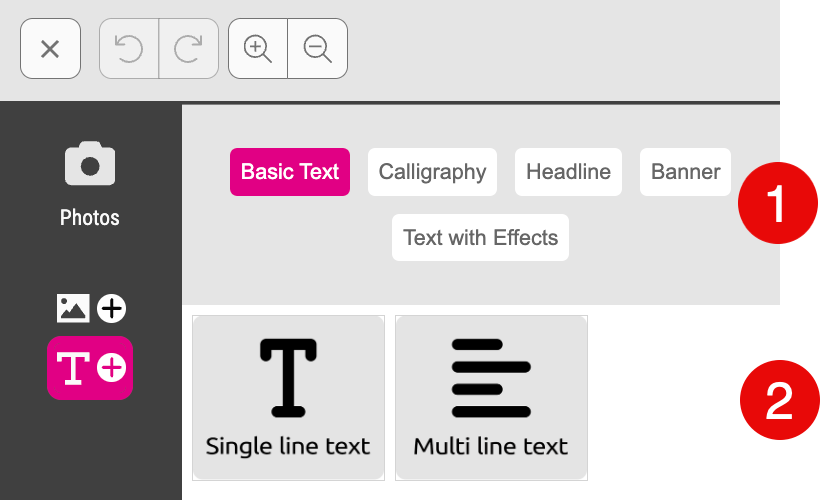
The Sticker Snippets “Single line text” and “Multi line text” are the only way to enable the Buyer to add basic text frames to a Printess Template!
As soon as the Buyer is placing a Text Sticker Snippet, the Text Frame Style button will be displayed at the Frame Bar or the Properties Panel.
If the Buyer clicks it, the Text Sticker Snippets will be displayed again to replace the current one selected.
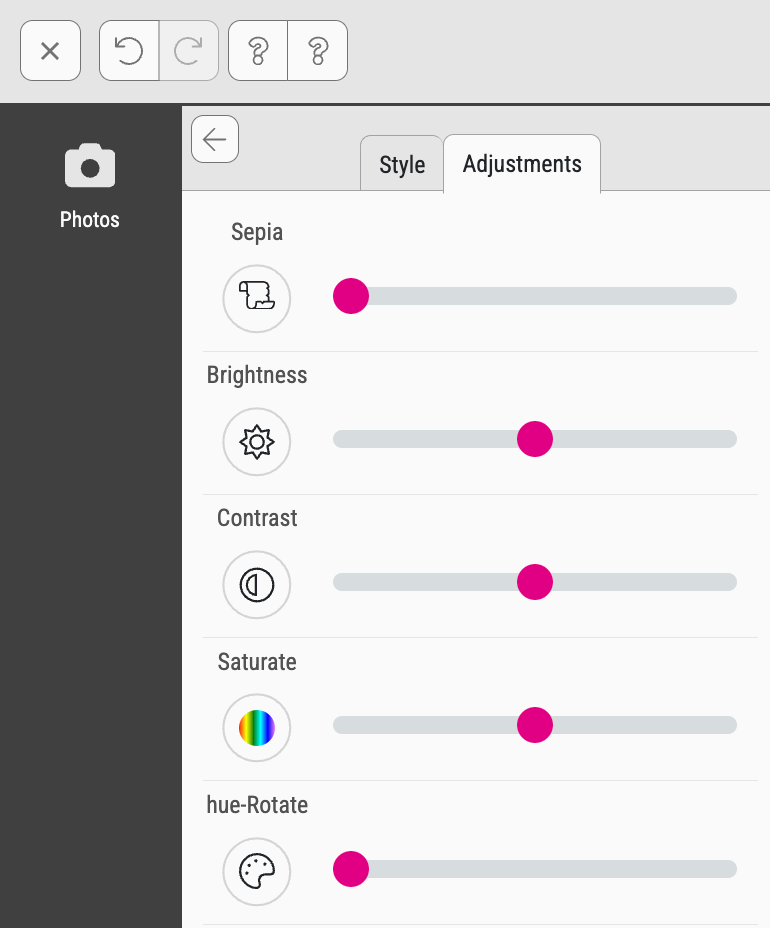
After the Buyer placed a Photo Sticker Snippet and uploaded an image, the Image Tools will be displayed at the Properties Panel and/ or the Frame Bar.
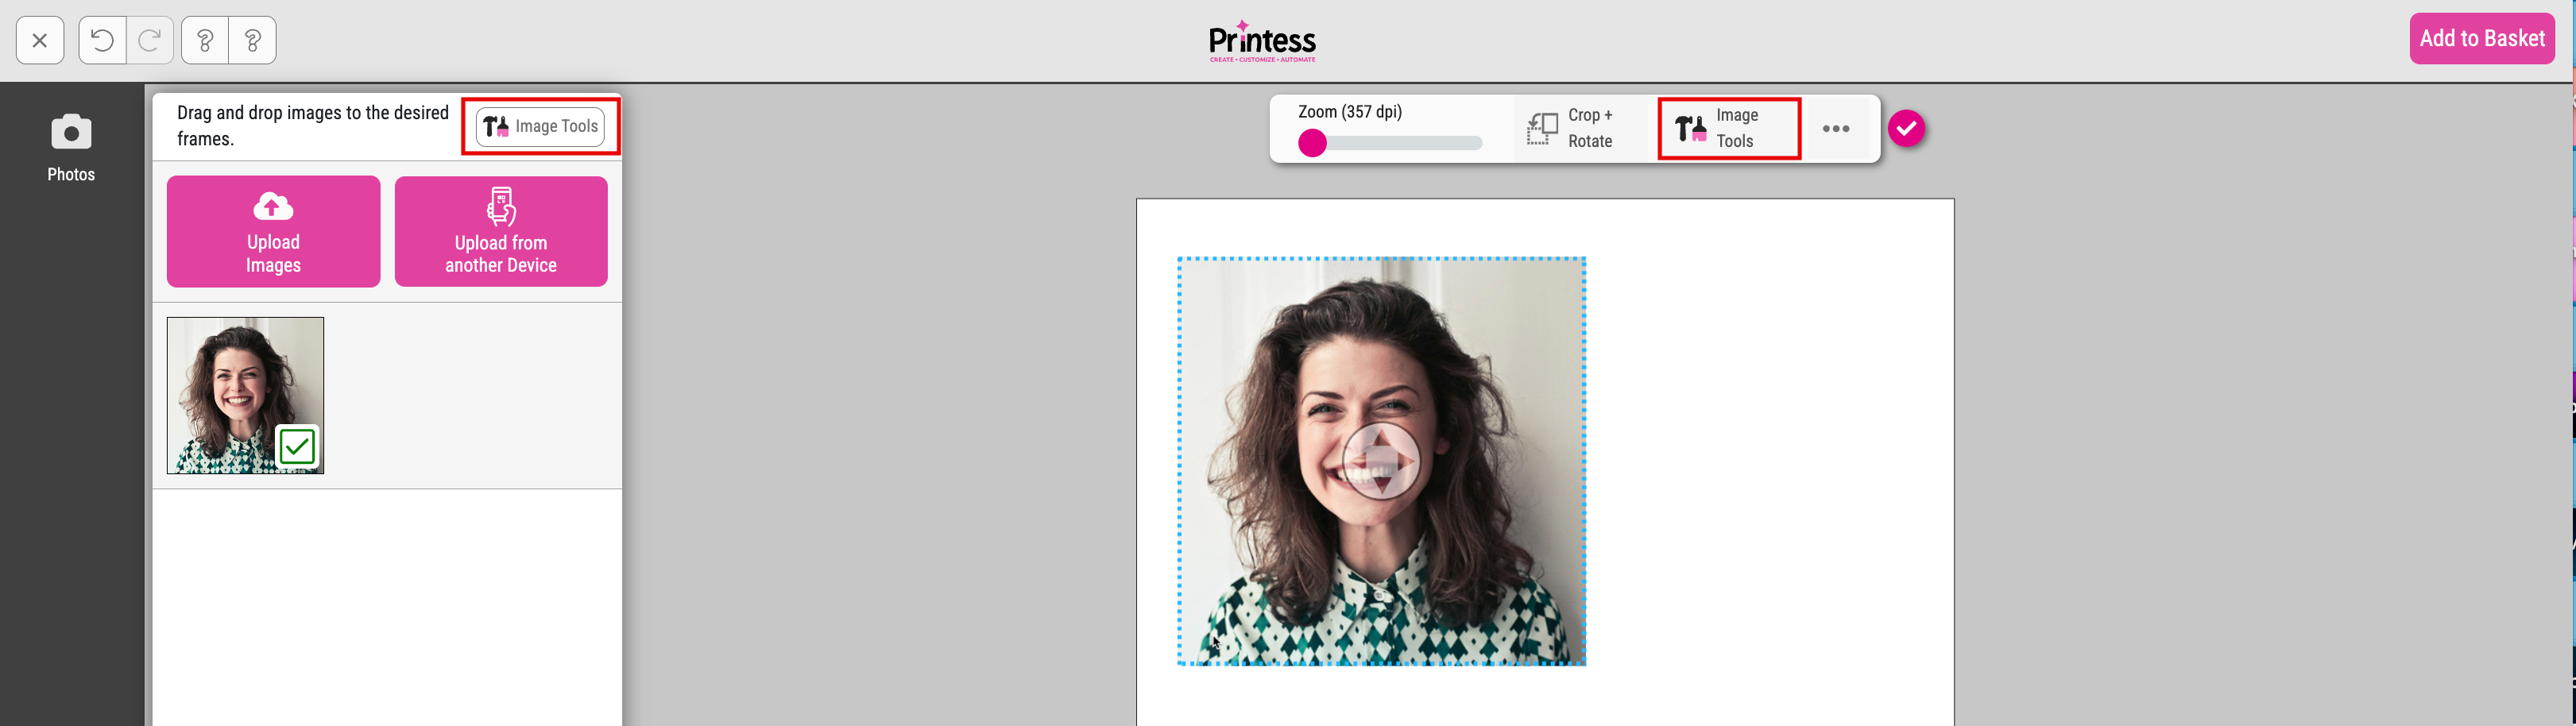
If the Buyer clicks on the Image Tool button the available Photo Sticker Snippets will be displayed again at the Style Tab. Here another Photo Sticker Snippet could be selected to replace the current one.
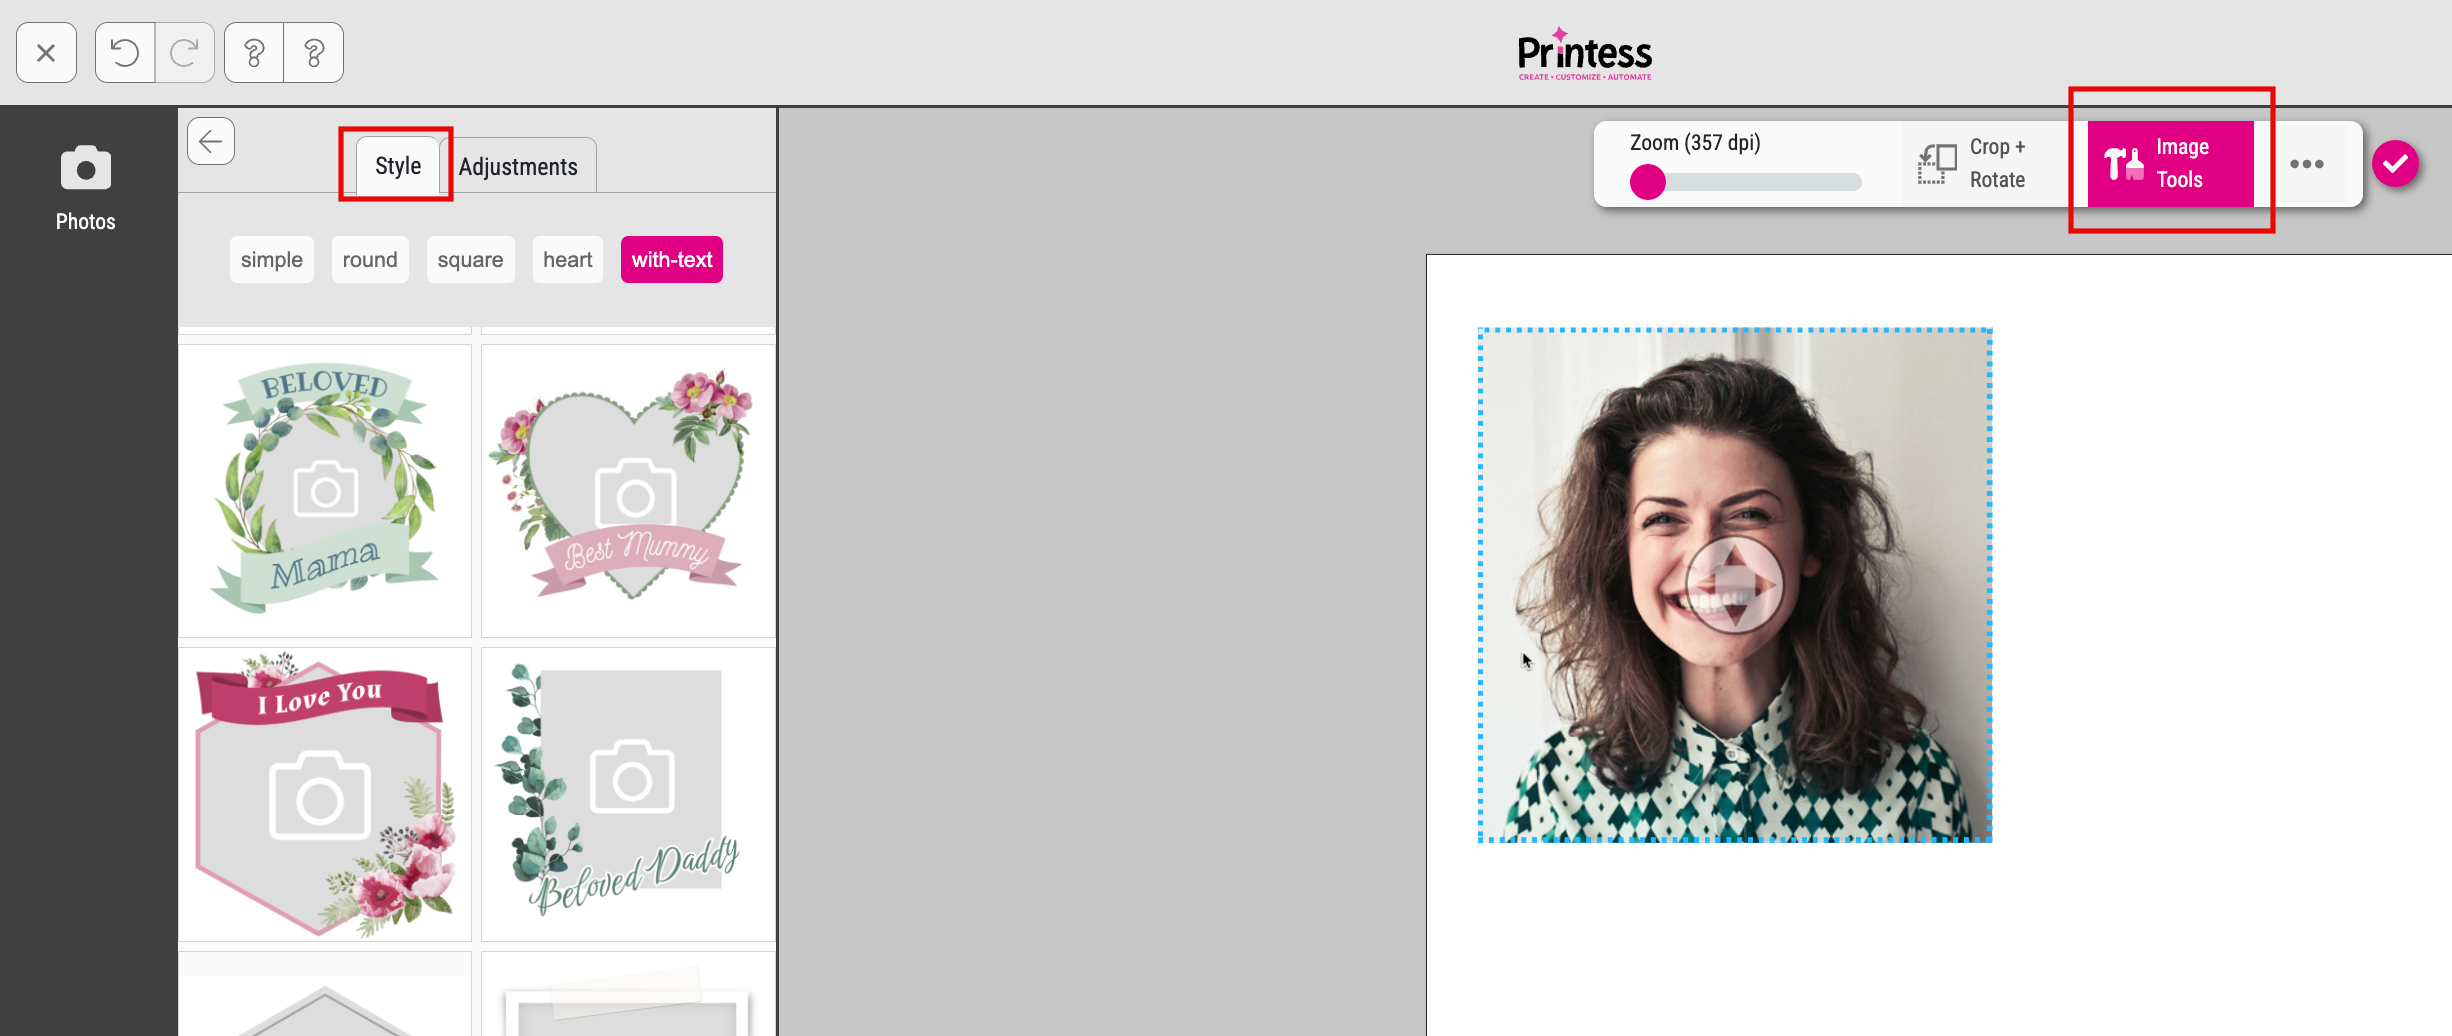
And at the Adjustments Tab the Buyer can adjust the Image Settings.

These settings control how the Buyer can navigate between pages and documents within your Template.
Single Document Pages When enabled, the Buyer can navigate the pages by directly selecting a page or by clicking the previous or next page arrows. If pages are named then the page name will be shown instead of the page number.
Multiple Documents and Page Icons Enables page & document navigation with thumbnails of the respective pages/documents. Additionally, you can enable live updating of the thumbnails whenever a page’s content is changed. This mode disables step headers and will show the pages of all editable documents within the Template. This setting is required to add and remove pages, and is the recommended mode for Buyer-created documents such as books.

Always Zoom to Single Page on Mobile Device If this option is activated the Page Navigation will always show a Single Page on the Mobile View instead of Spreads.
Please read more about our Book Mode in the Buyer Side general concepts chapter
Multiple Documents as Tabs This option will allow you to display documents as tabs without using steps or Page Icons to navigate through single page documents. This is an enhancement to previous versions where the only other option was to use a step workflow.
Hide Page and Document Navigation
Hides all navigation elements to have more space for the document. This is useful for single page documents.
Show Page Buttons This enables back and forth page navigation buttons on the right and left of the document viewport. Page buttons can be configured to appear only on desktop, mobile, both platforms, or never.
You can define three different kinds of steps to lead the Buyer through the configuration of a Printess Template.
By default this dialog looks like this:
To define Form Field Tab Steps you have to turn on this option.

And you need at least two activated Form Field Tabs. Then the Next-Button will be displayed at the Buyer Side on the upper right.
Learn how to activate more than one Form Field Tab
To distribute the Form Fields across different Tabs you need to use the Tab-No. option. How this works is explained here
To use Frame Steps or Document Steps you first have to define any Steps for Frames or Documents of your Printess Template. Please read here how this works.
As soon as you have defined any Steps this dialog will look like this:

These settings influence how steps are annotated on the Buyer Side.

Here you can control the appearance and available options of editable frames.
In the Buyer View there are two ways a frame can be positioned, resized, and changed:
1. Super Simple This mode presents frames in a minimalistic way which shows one resize point on the bottom right and (when allowed) a trashcan icon on the top left for deleting the frame. Right-clicking the frame will show the context menu for more advanced manipulation tools such as arrange, align, duplicate, and mirroring.

2. With all Options This mode is perfect for more advanced users. Frames are presented with the usual plethora of options found in frame-oriented graphical software. Therefore, the frame corners are not available for additional functionality, as Printess presents them in a separate menu below the frame.

Here you can select when editable frames will show a border to the buyer: Never Only the selected element will have a border. On Hover Frames will be shown when the buyer hovers over the view container (desktop only). Always All editable frames will show a border.
When switched on, editable frames on the Buyer Side will show an icon with the content type indicated on the top left of each frame.
When switched on, the selected frame on the Buyer Side will be animated with a moving dotted line to highlight the frame being configured.
The Steps Interface will by default show rounded numbers beside each frame with a Buyer-Step set. You can control this feature for the buyer side Template-wide with this setting. On Design-Side the step number will be always visible but appear grey when its turned of for Buyer Side.

Here you can influence the way the buyer is informed about various validation issues such as low-resolution images, overflowing text or missing characters. Besides showing no warning (none), you have the option to show a warning icon (sign) and/or a warning text (hint) on top of the frame.
Info: Only frames that have buyer-editable content will show warnings.
Below is the outcome of the settings shown for a low-resolution warning (sign and hint, sign only, hint only):

The following situations will generate error messages with warning signs & hints:
Error message at the time of checkout:
By default the Expert Mode is enabled for the Desktop and Mobile view - because it is set to both. You can change this to:
This option displays a button at the Buyer Side. When the Buyer clicks this button  , the feature is unlocked
  and Expert Mode becomes active for the Buyer.
This allows the Buyer to decide whether to edit the Frames using only the settings provided through the Buyer Side Settings for each individual Frame, or to access the full set of editing capabilities for every Frame.
The same applies to Splitter Grids. In Expert Mode the Buyer can enable extended editing options for them as well.
Frames can be moved, rotated, scaled, and deleted by the Buyer. They can also be brought to the foreground or sent to the background.
Splitter Grids can be selected, moved, scaled, and deleted, as well as arranged in the foreground or background.
A Toolbar is displayed on the Buyer Side to support these actions.
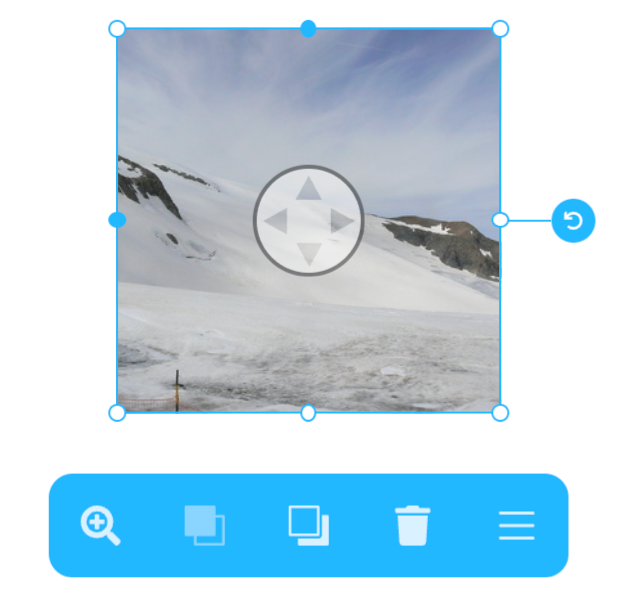
For both - Frames and Splitter Grids - the Buyer can use the Frame Menu to access additional options.
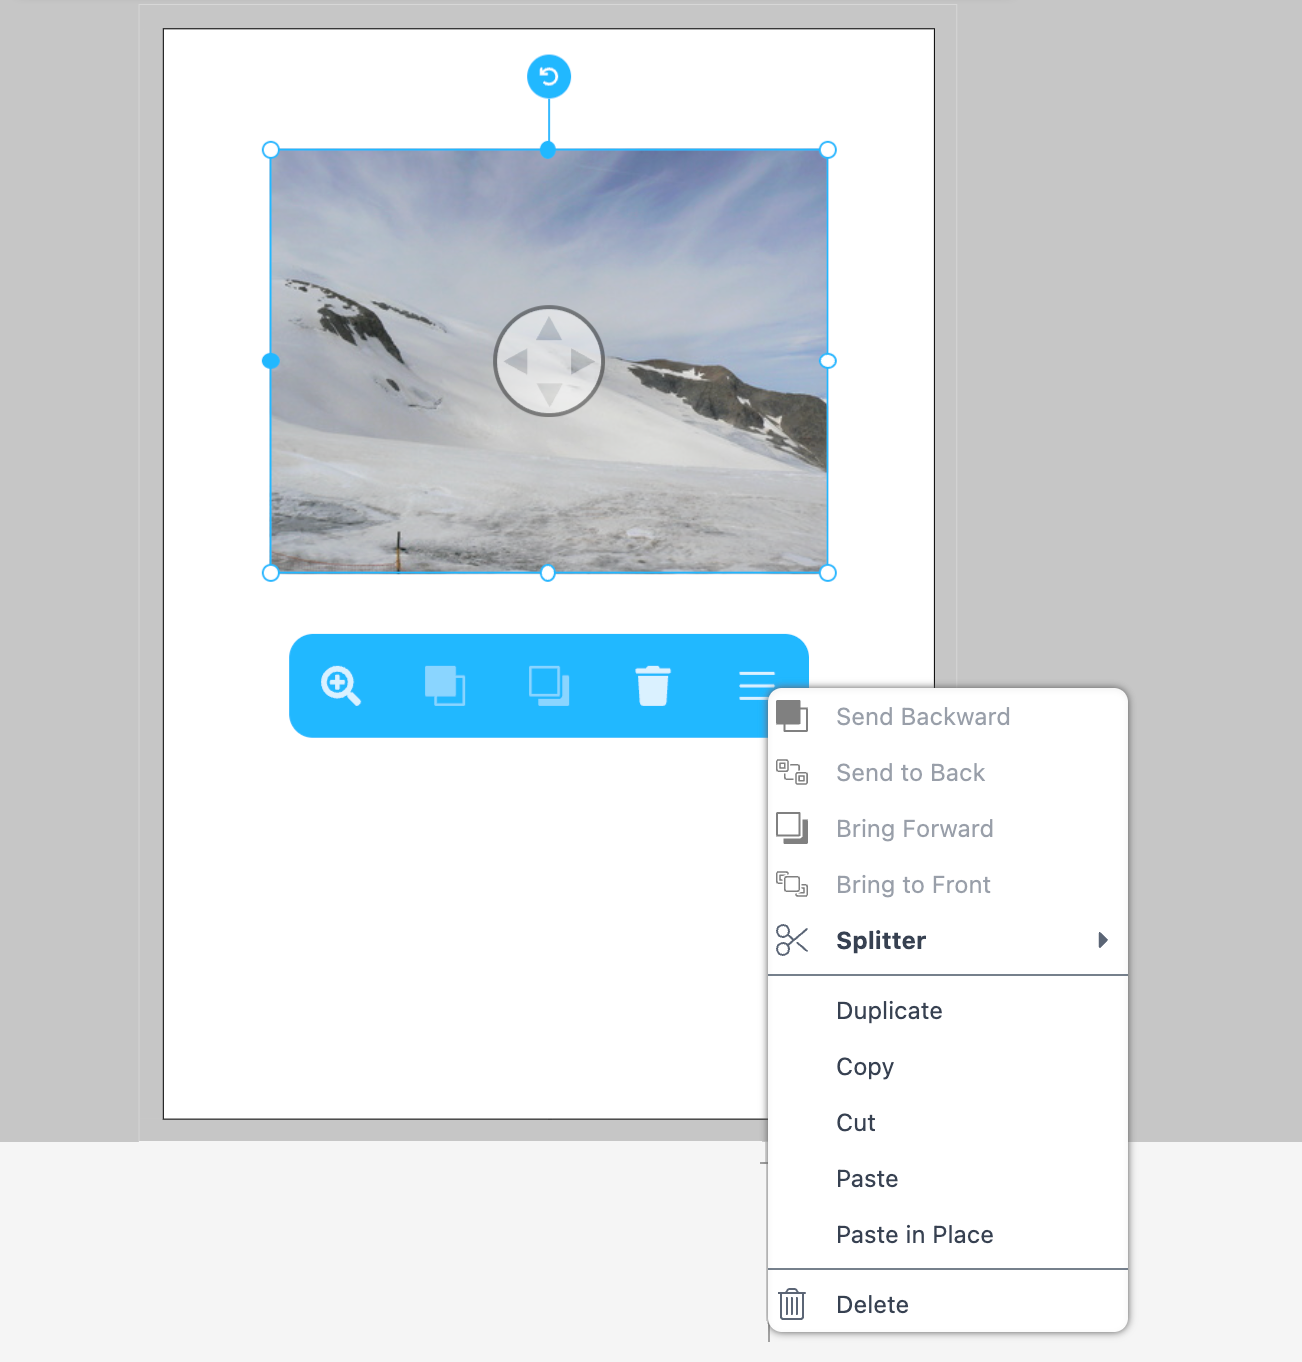
The Frame Menu can be accessed either via the toolbar or by right-clicking.
If you activate this checkbox the Expert Mode is turned on at the Buyer Side by default. If you deactivate this option the Buyer has to press the Unlock Button first to use the Expert Mode.
By default this option is turned on. When this option is enbaled the Scissor Toolbar is activated to let the Buyer fine-tune their product. Selecting a frame with Splitter enabled will display the Scissors toolbar:

To make this feature work you have to set the frame to “Splitter” and “Content”.
Learn more about the Splitter Settings here.
The cloud icon enables the Buyer to upload images. The Scissor icons enables the Buyer to cut the frames vertically or horizontally. The Grid icon enables the Buyer to set the spaces between frames. The Text icon is dynamic and allows users to switch between text frames and image frames.

Display a button to show and hide the alignment grid. This helps the Buyer place the frame with precision. For Panel UI only.

This enables the additional exit text edit button for inline editing (Only Desktop Mode).

By default this option is enabled. Then the Space Key for panning is always active in preview documents. If you disable this option all interactions, like click-actions but also edits, positioning and deleting of frames and others will come alive in the Previews!

Here you can set a title which will be shown at Buyer Side. Additionally you can provide a url to additional product info which will be displayed as overlay form.
Here you can turn on and off UI Hints for the Buyer.
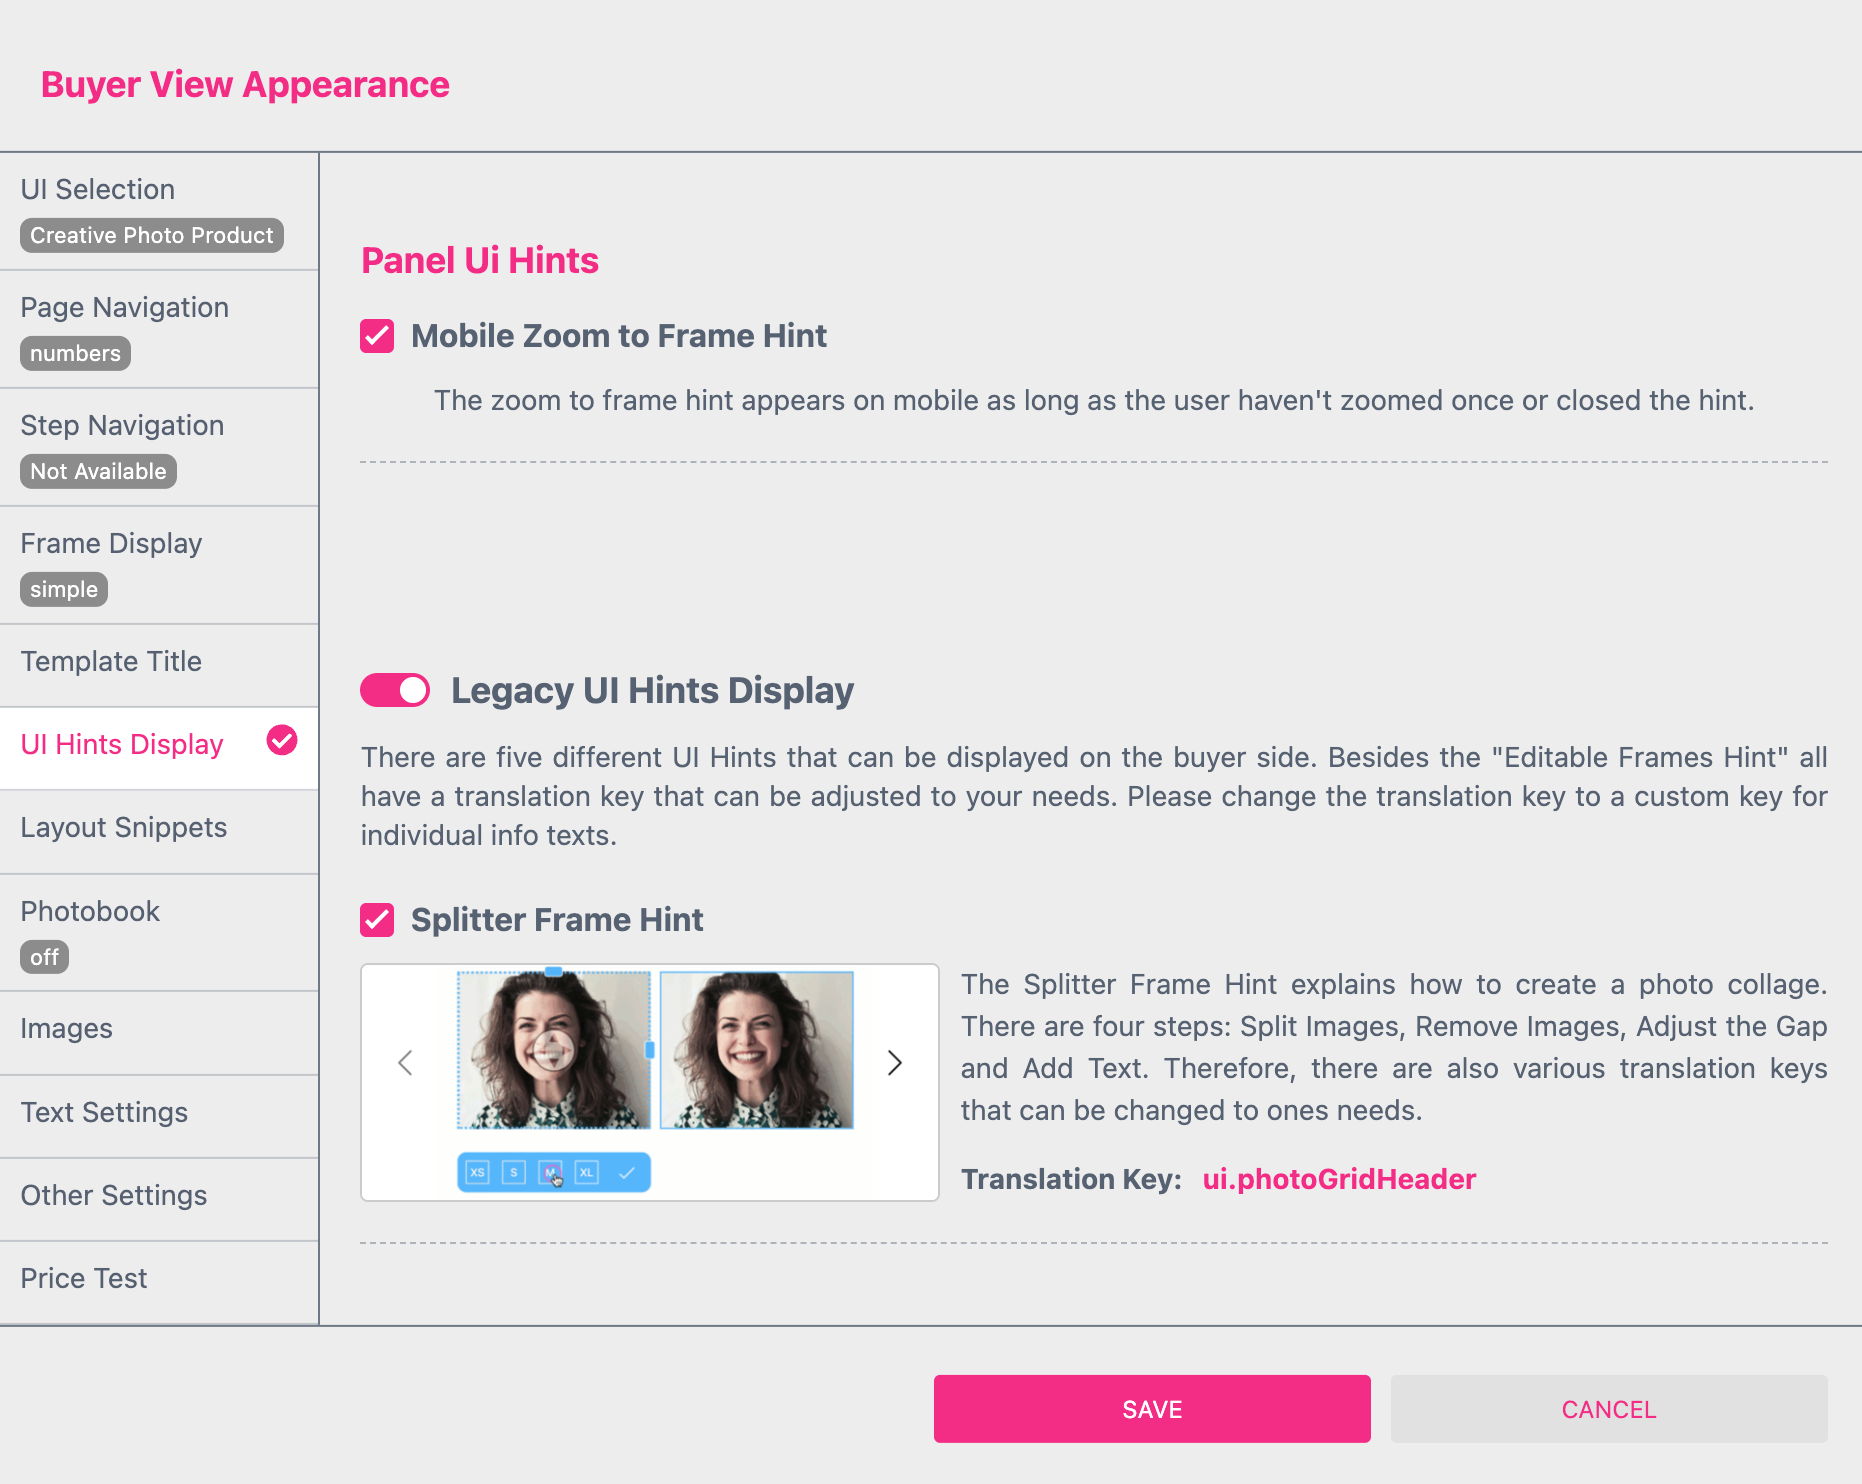
By default this feature is turned on. It will automatically zoom into the Hint on mobile view.
Attention: This chapter deals with the Legacy UI. As of summer 2026, this will no longer be supported. Please use the new UI.
When enabled, buyers will get useful hints on how to use the enabled items:
Additionally editable frames can show a ‘click-me’ icon on top.
By default it is turned on. As soon as the Buyer clicks on an image frame of a Splitter Grid this Hint will appear. A walkthrough display will explain how to effectively use the Splitter tool to create wonderful collages. In an easy-to-follow 4 steps animation it will show how to use the feature to:

By default it is turned on. The Sticker Snippet Hint refers to the plus button on mobile only. Be aware that the info text may differs depending on the content of the button (photos, layouts, sticker, etc.).
By default it is turned on. The Expert Mode Hint refers to the Expert Mode button displayed on the top left or - depending on the mobile settings - in the menu list. It shows the Buyer that the Expert Mode is available.
By default it is turned off. If you turn it on the Editable Frames Hint appears on an editable frame to make the user aware of clicking frames for editing. It contains a yellow circle with a pointer icon on top of it.
You can use the JS Name “uploadImagesHint” to control the visibility of a frame by an image upload at the Buyer Side. As soon as the Buyer is uploading an image this frame disappears.
Learn more about the Upload Image Hint
Allows to control the number of columns shown for the Layout Snippet selection.

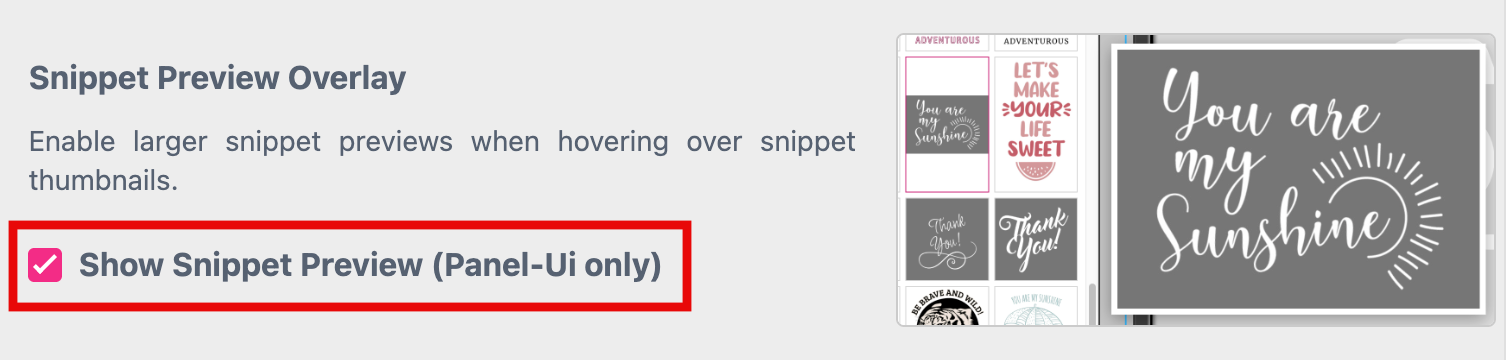
By default this option is turned on. It enable a larger Layout Snippet previews when hovering over the Layout Snippet Thumbnails.
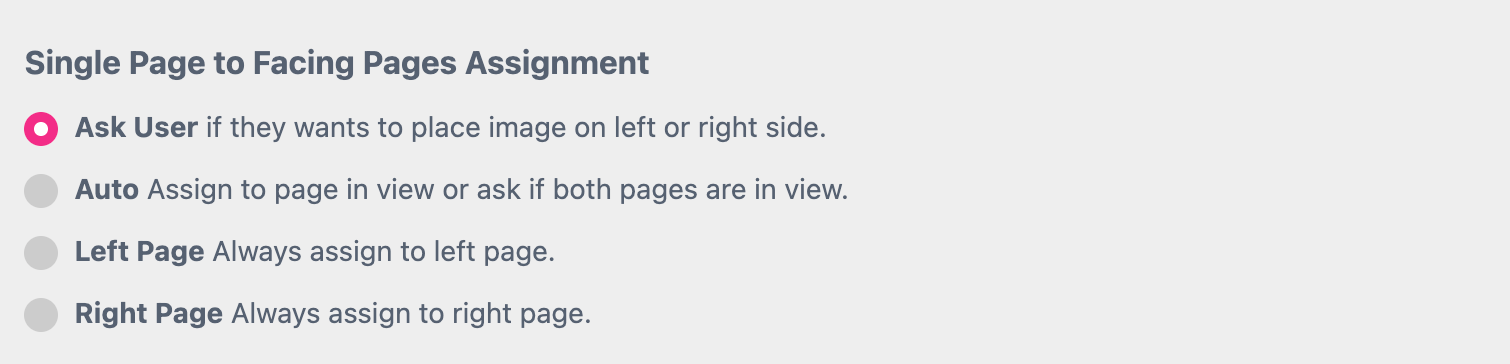
Here you define how a Single Page Layout Snippet should be placed on a spread.
Ask User: By default the Buyer will be asked if the selected Single Page Layout Snippet should be placed at the left or right side of the spread.
Auto: If the Aspect Ratio of the selected Layout Snippet matches the one of the spread, Printess will automatically place it on the entire spread. If not, the Buyer will be asked if it should be placed at the right or left side of the spread.
Left Page: Any Single Page Layout Snippet will be placed on the left side of the spread.
Right Page: Any Single Page Layout Snippet will be placed on the right side of the spread.

Controls wether or not the Image Count Filter will be shown, when Keyword Menu is enabled.
Learn more about the Keyword Menu here.
How Many Photos:
At the Buyer Side this number selection will then be displayed. Depending on the selection only the Layout Snippets with a matching number of image frames will be shown.

Treat Layout-Snippet as Single Page if Aspect-Ratio Delta is lower than…

Controls how big the difference between the aspect-ratio of the Page and the aspect-ratio of the Layout Snippets can be to make Printess treat them as “Single Page” Layouts for this document.
Example:
Page-Size: “Square Big” = 21 cm x 21 cm Layout-Snippet-Size: “DIN A4” = 21 cm x 29.7 cm
Aspect-Ratio Delta: (21 : 21) - (21 : 29.7) = 1 - 0.71 = 0.29
So for this example, you need to set the Aspect-Ratio Delta to lower than “0.3” in order to make Printess treat the Layout-Snippets as “Single Page” and auto-assign them to the selected Page.
If your Printess Template includes both a Layout Snippet selection and a Form Field Tab you can enable this option. It will automatically switch the UI to the Form Field Tab after a Layout Snippet has been selected. This saves the customer from having to switch Tabs manually.
If you display Layout Snippets at the Buyer Side which includes Color Schemes you can display small dots underneath each Layout Snippets. They represent the Color Schemes available for that Layout Snippet.

To make this feature work you have to type in the name of one color of your Color Scheme.

Learn about Color Schemes for Layout Snippets here
When active, an overlay view will open when the Buyer enters the Editor. The Buyer will be forced to select an initial Layout Snippet from the ones available. This happens for the first Page of the first Document the Buyer visits first time.

Not supported in the Panel UI.
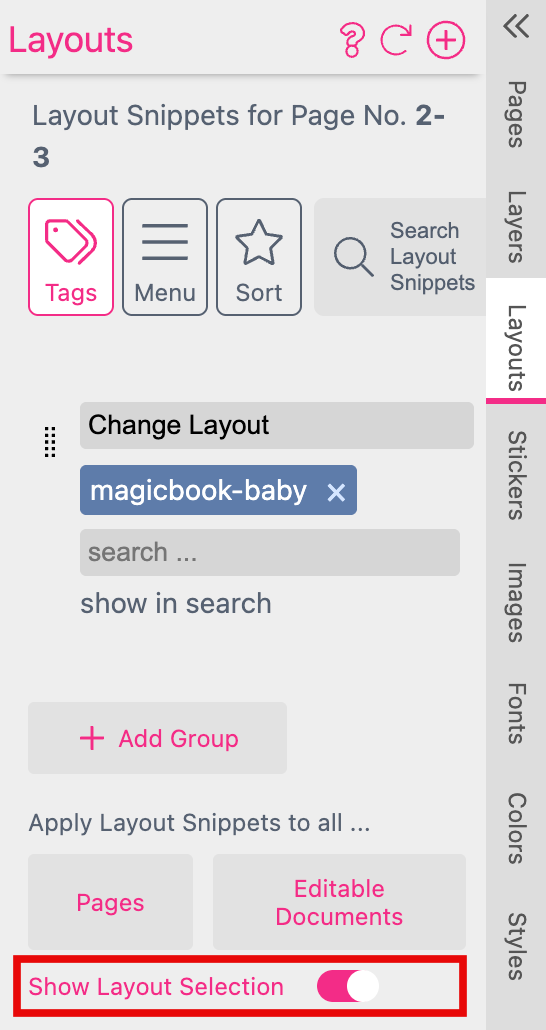
Panel UI: If you would like to get an overlay view with the available Layout Snippets in the Panel UI you have to activate the option “Show Layout Selection” at the Layouts Tab.
Note:
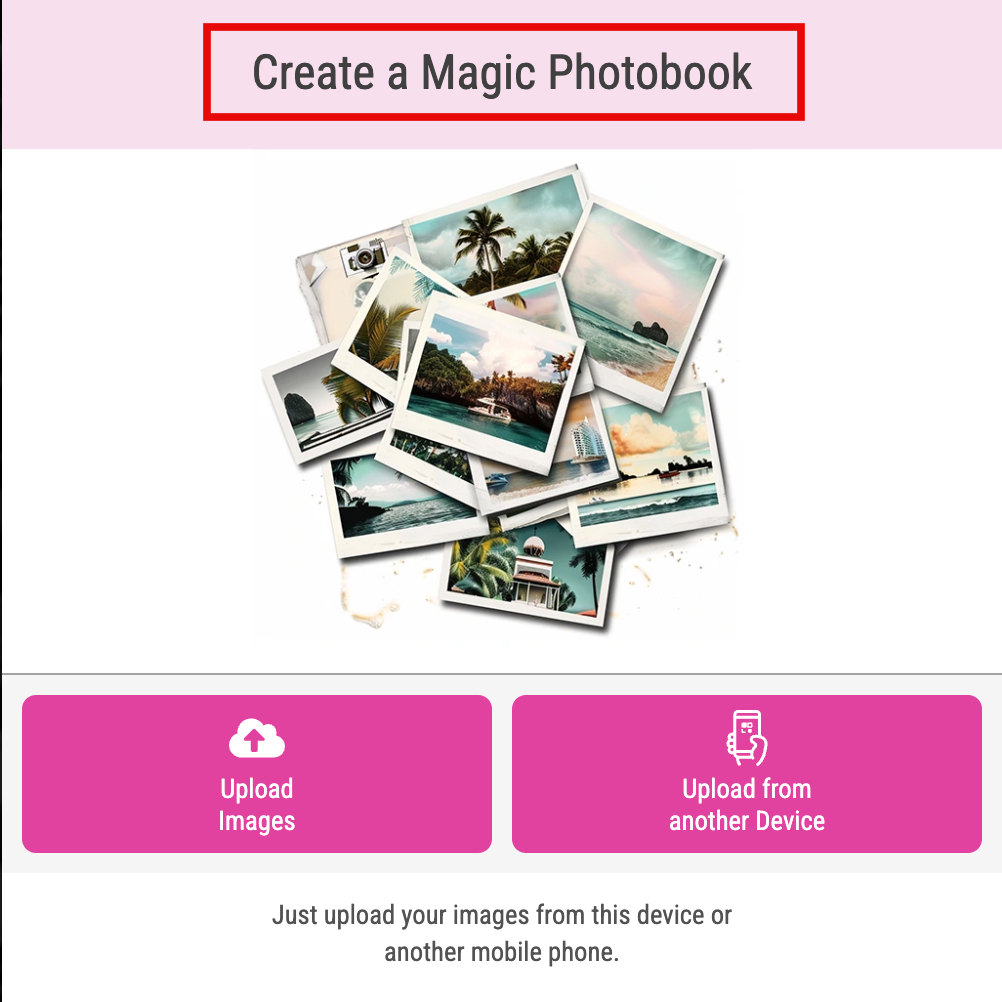
Turn on the Show Magic Photobook Wizard feature to build a Magic Photobook. It allows the Buyer to create a photo book with just a few mouse clicks. This feature automatically activates the option Image Collage Creation as well. You can not turn it off because it is essential for each Magic Photobook!
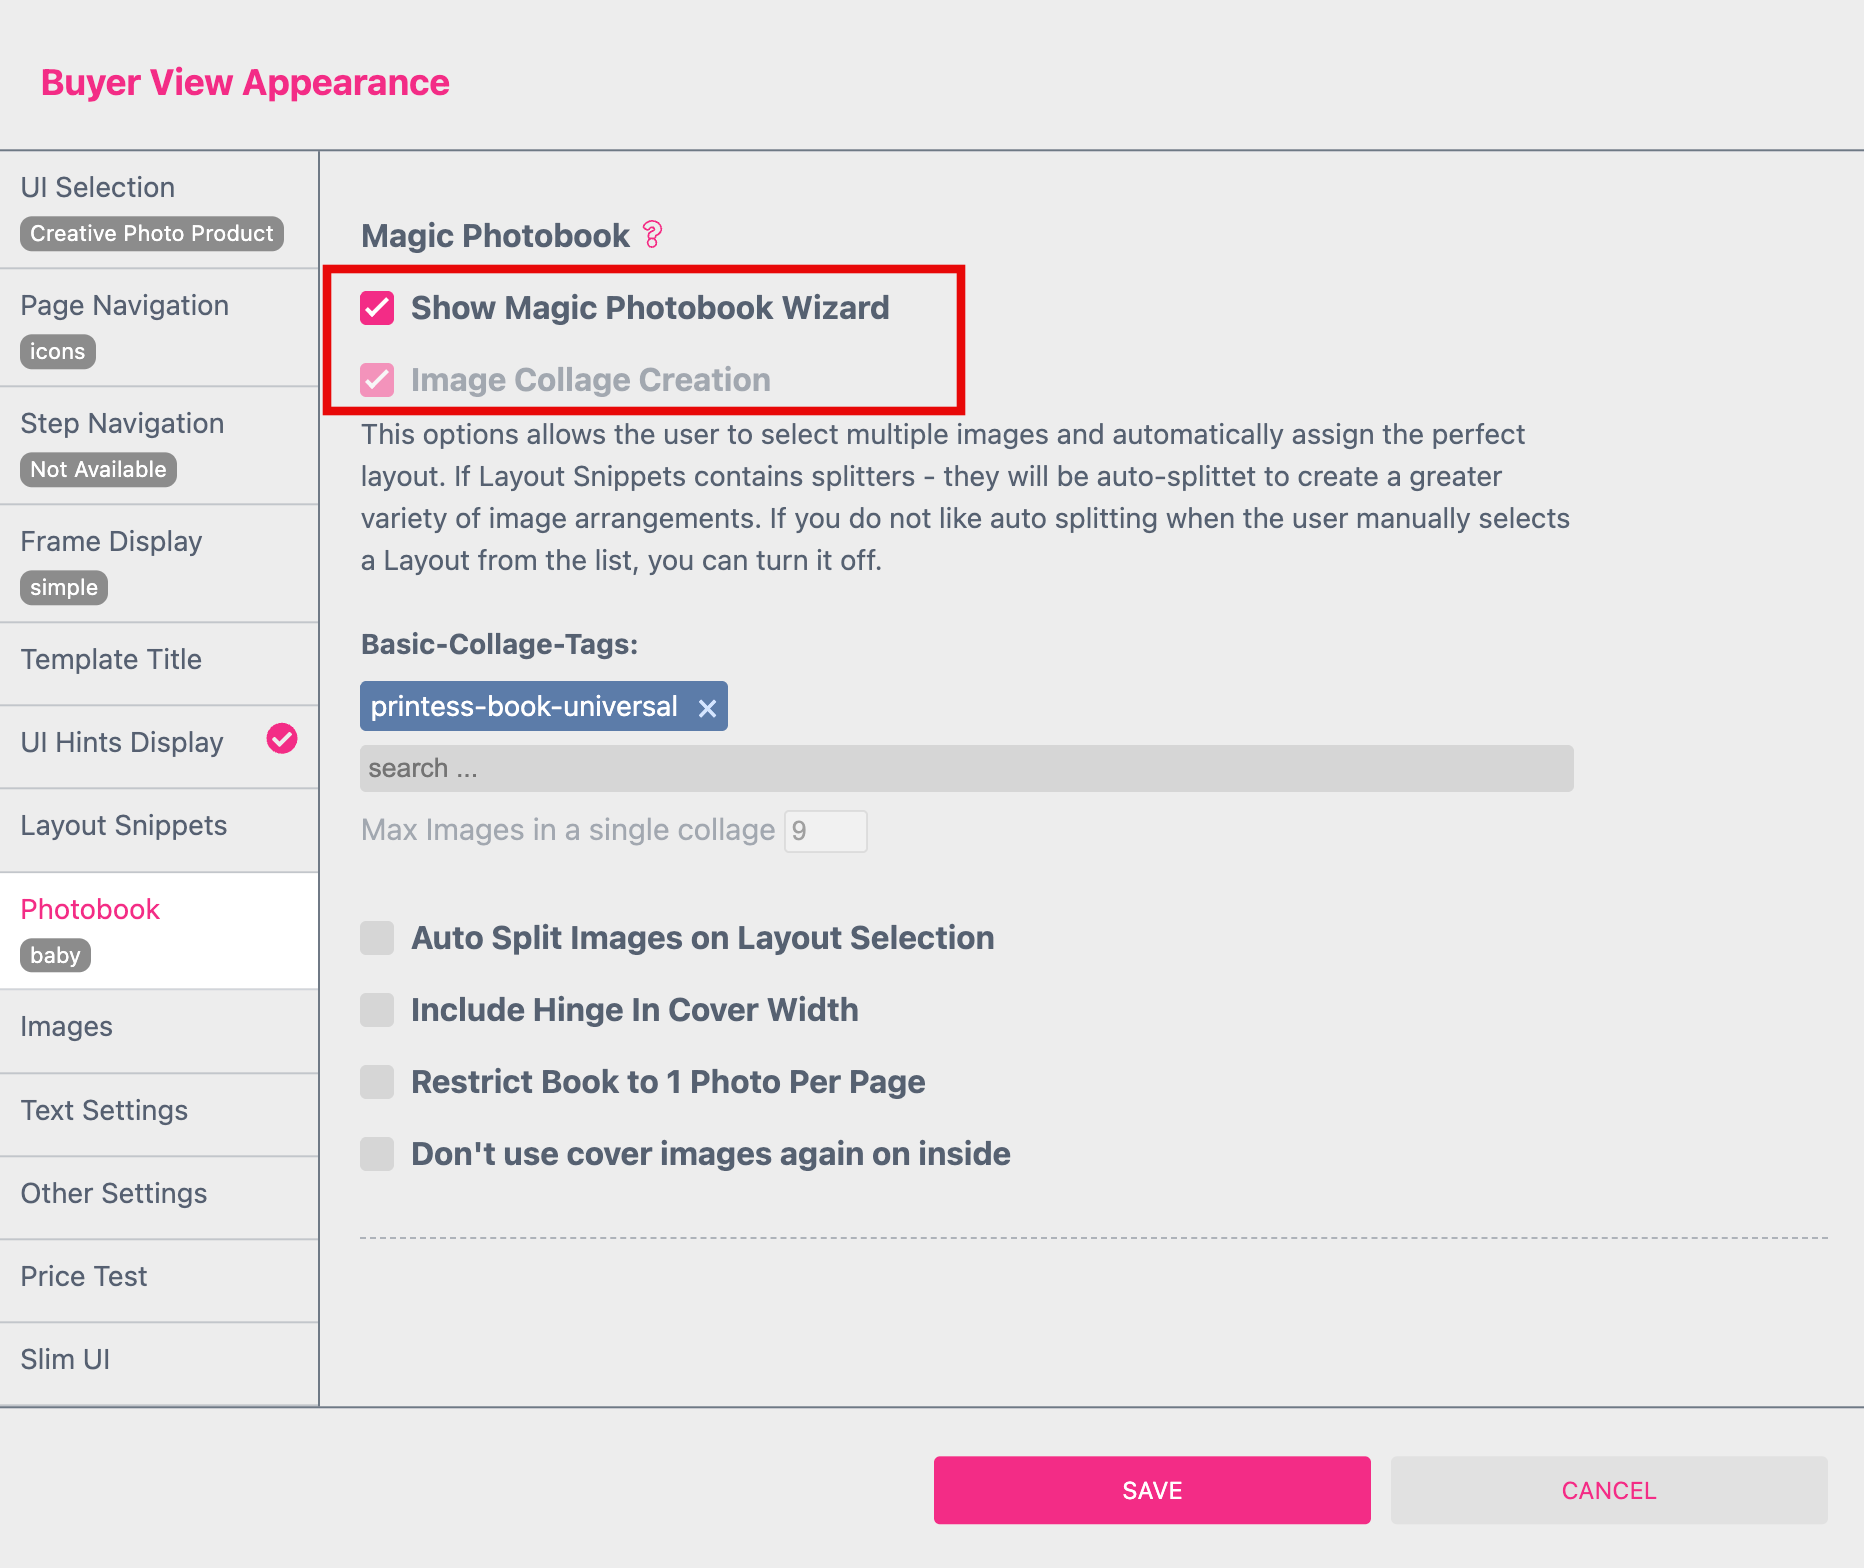
Learn how to create a Magic Photo Book
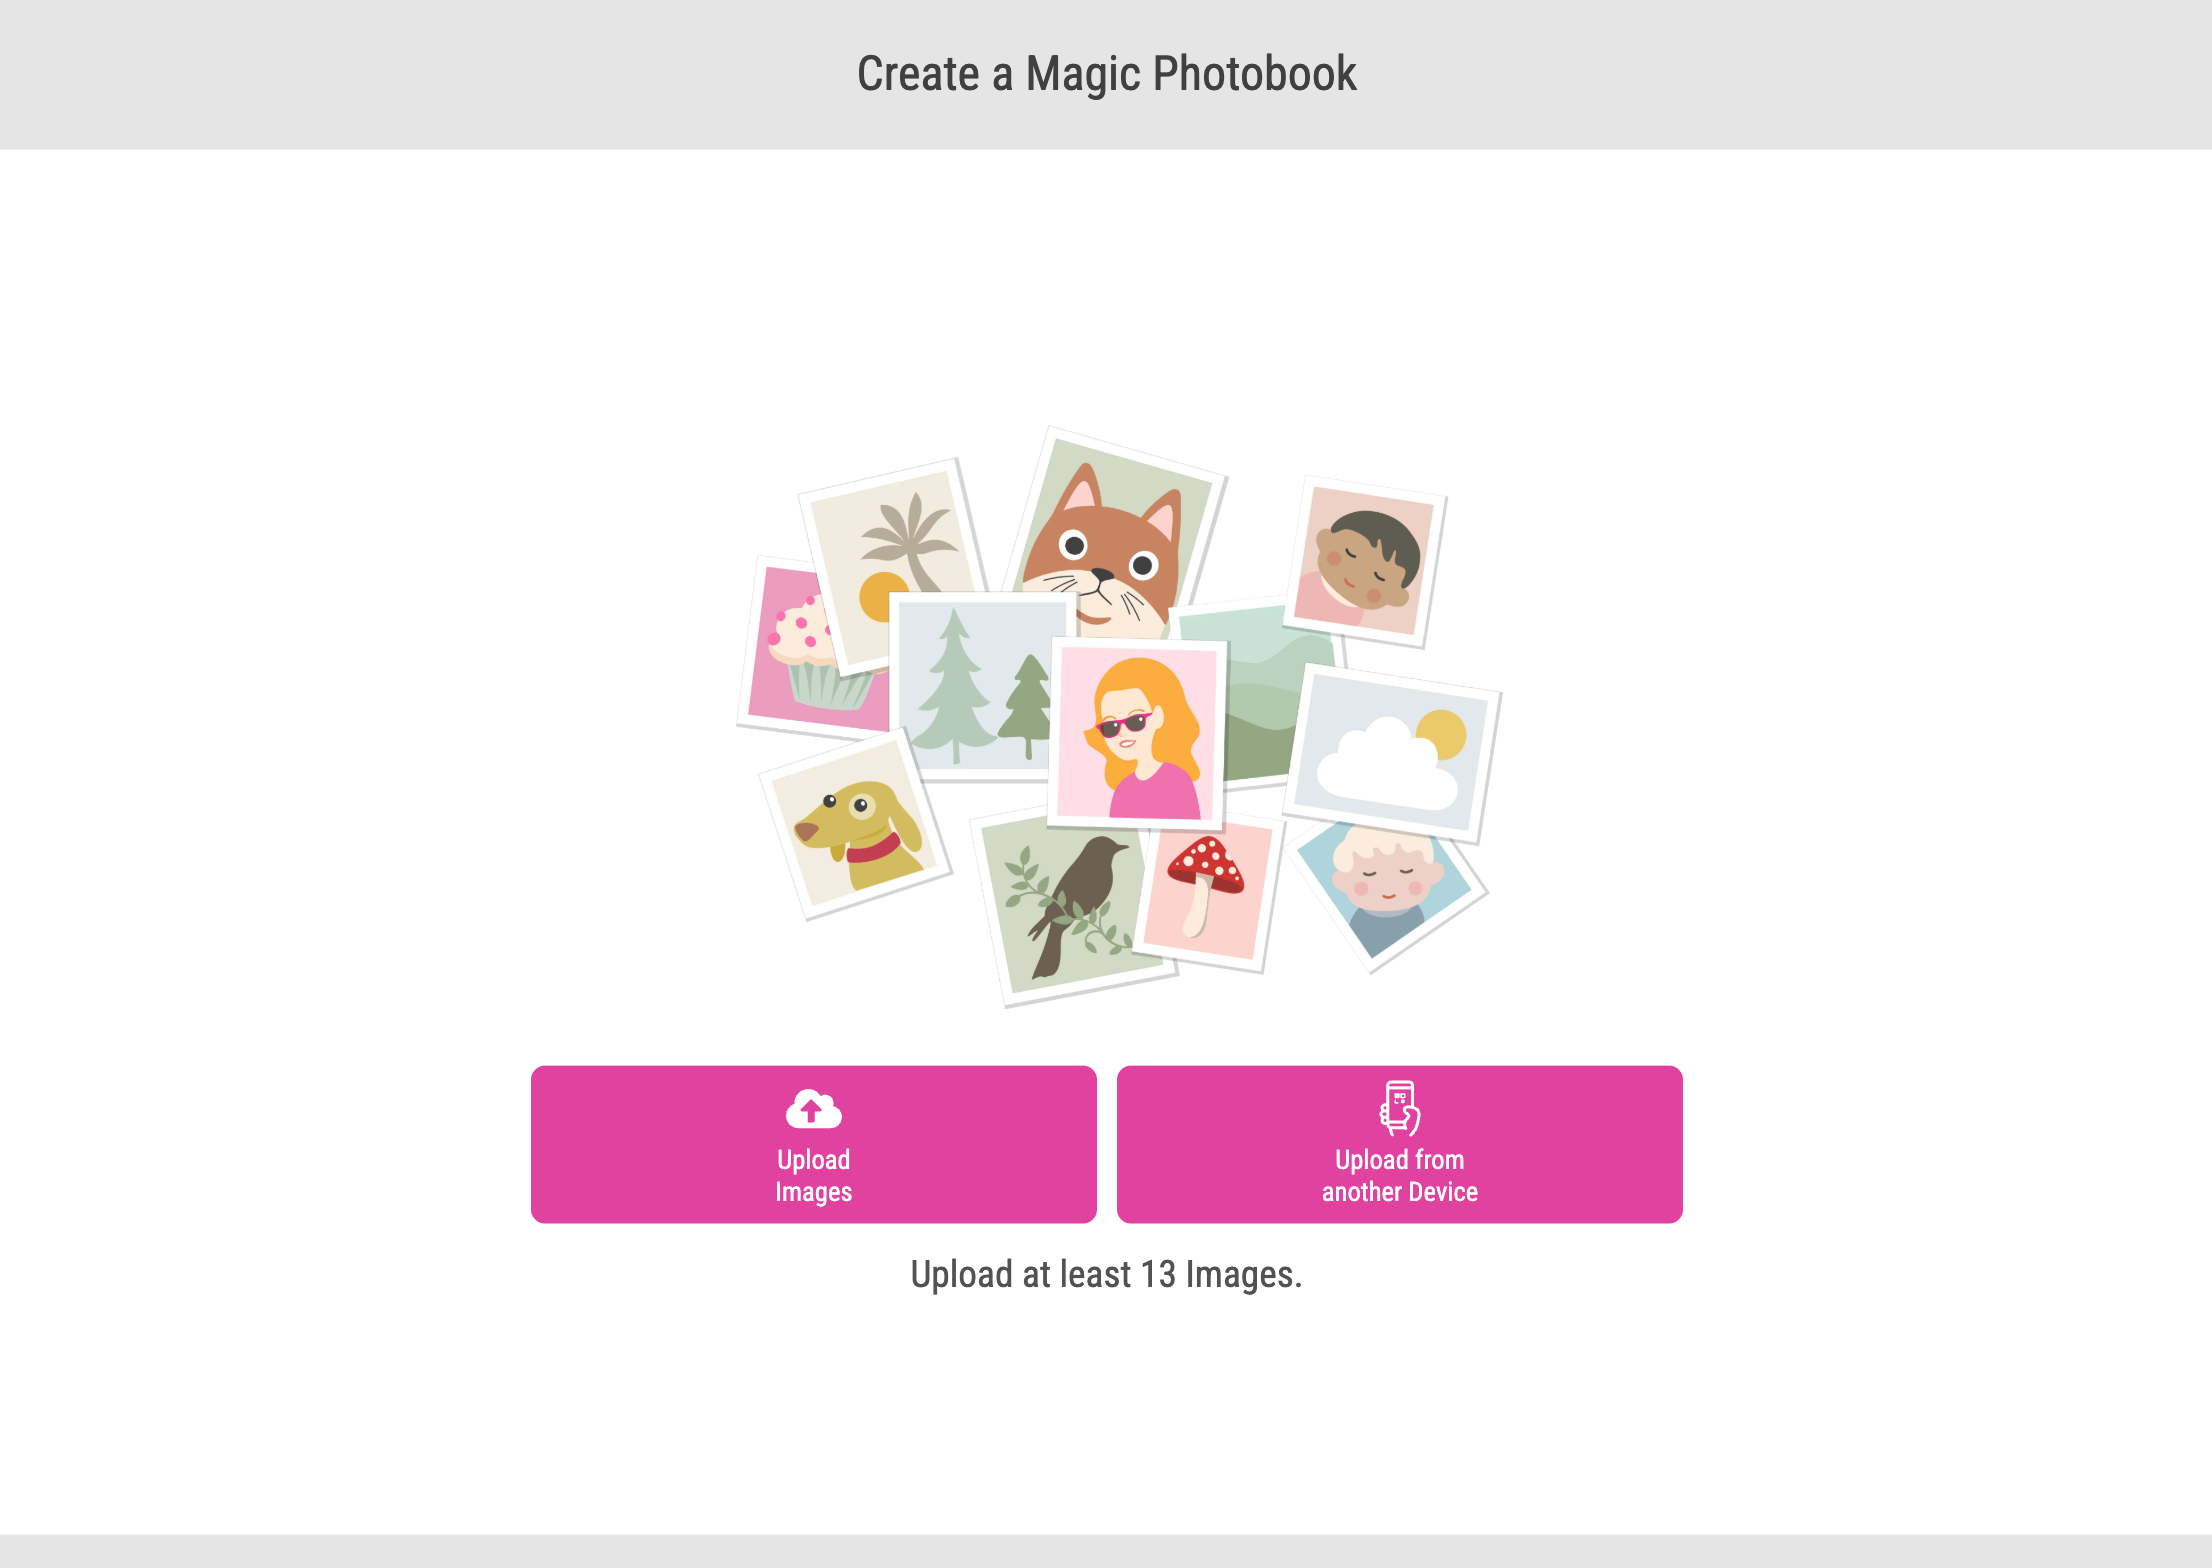
It will automatically activate the image upload option even if there is no image frame placed on the Template. The Buyer can upload Images from the current or another device to get an overview of all images displayed.
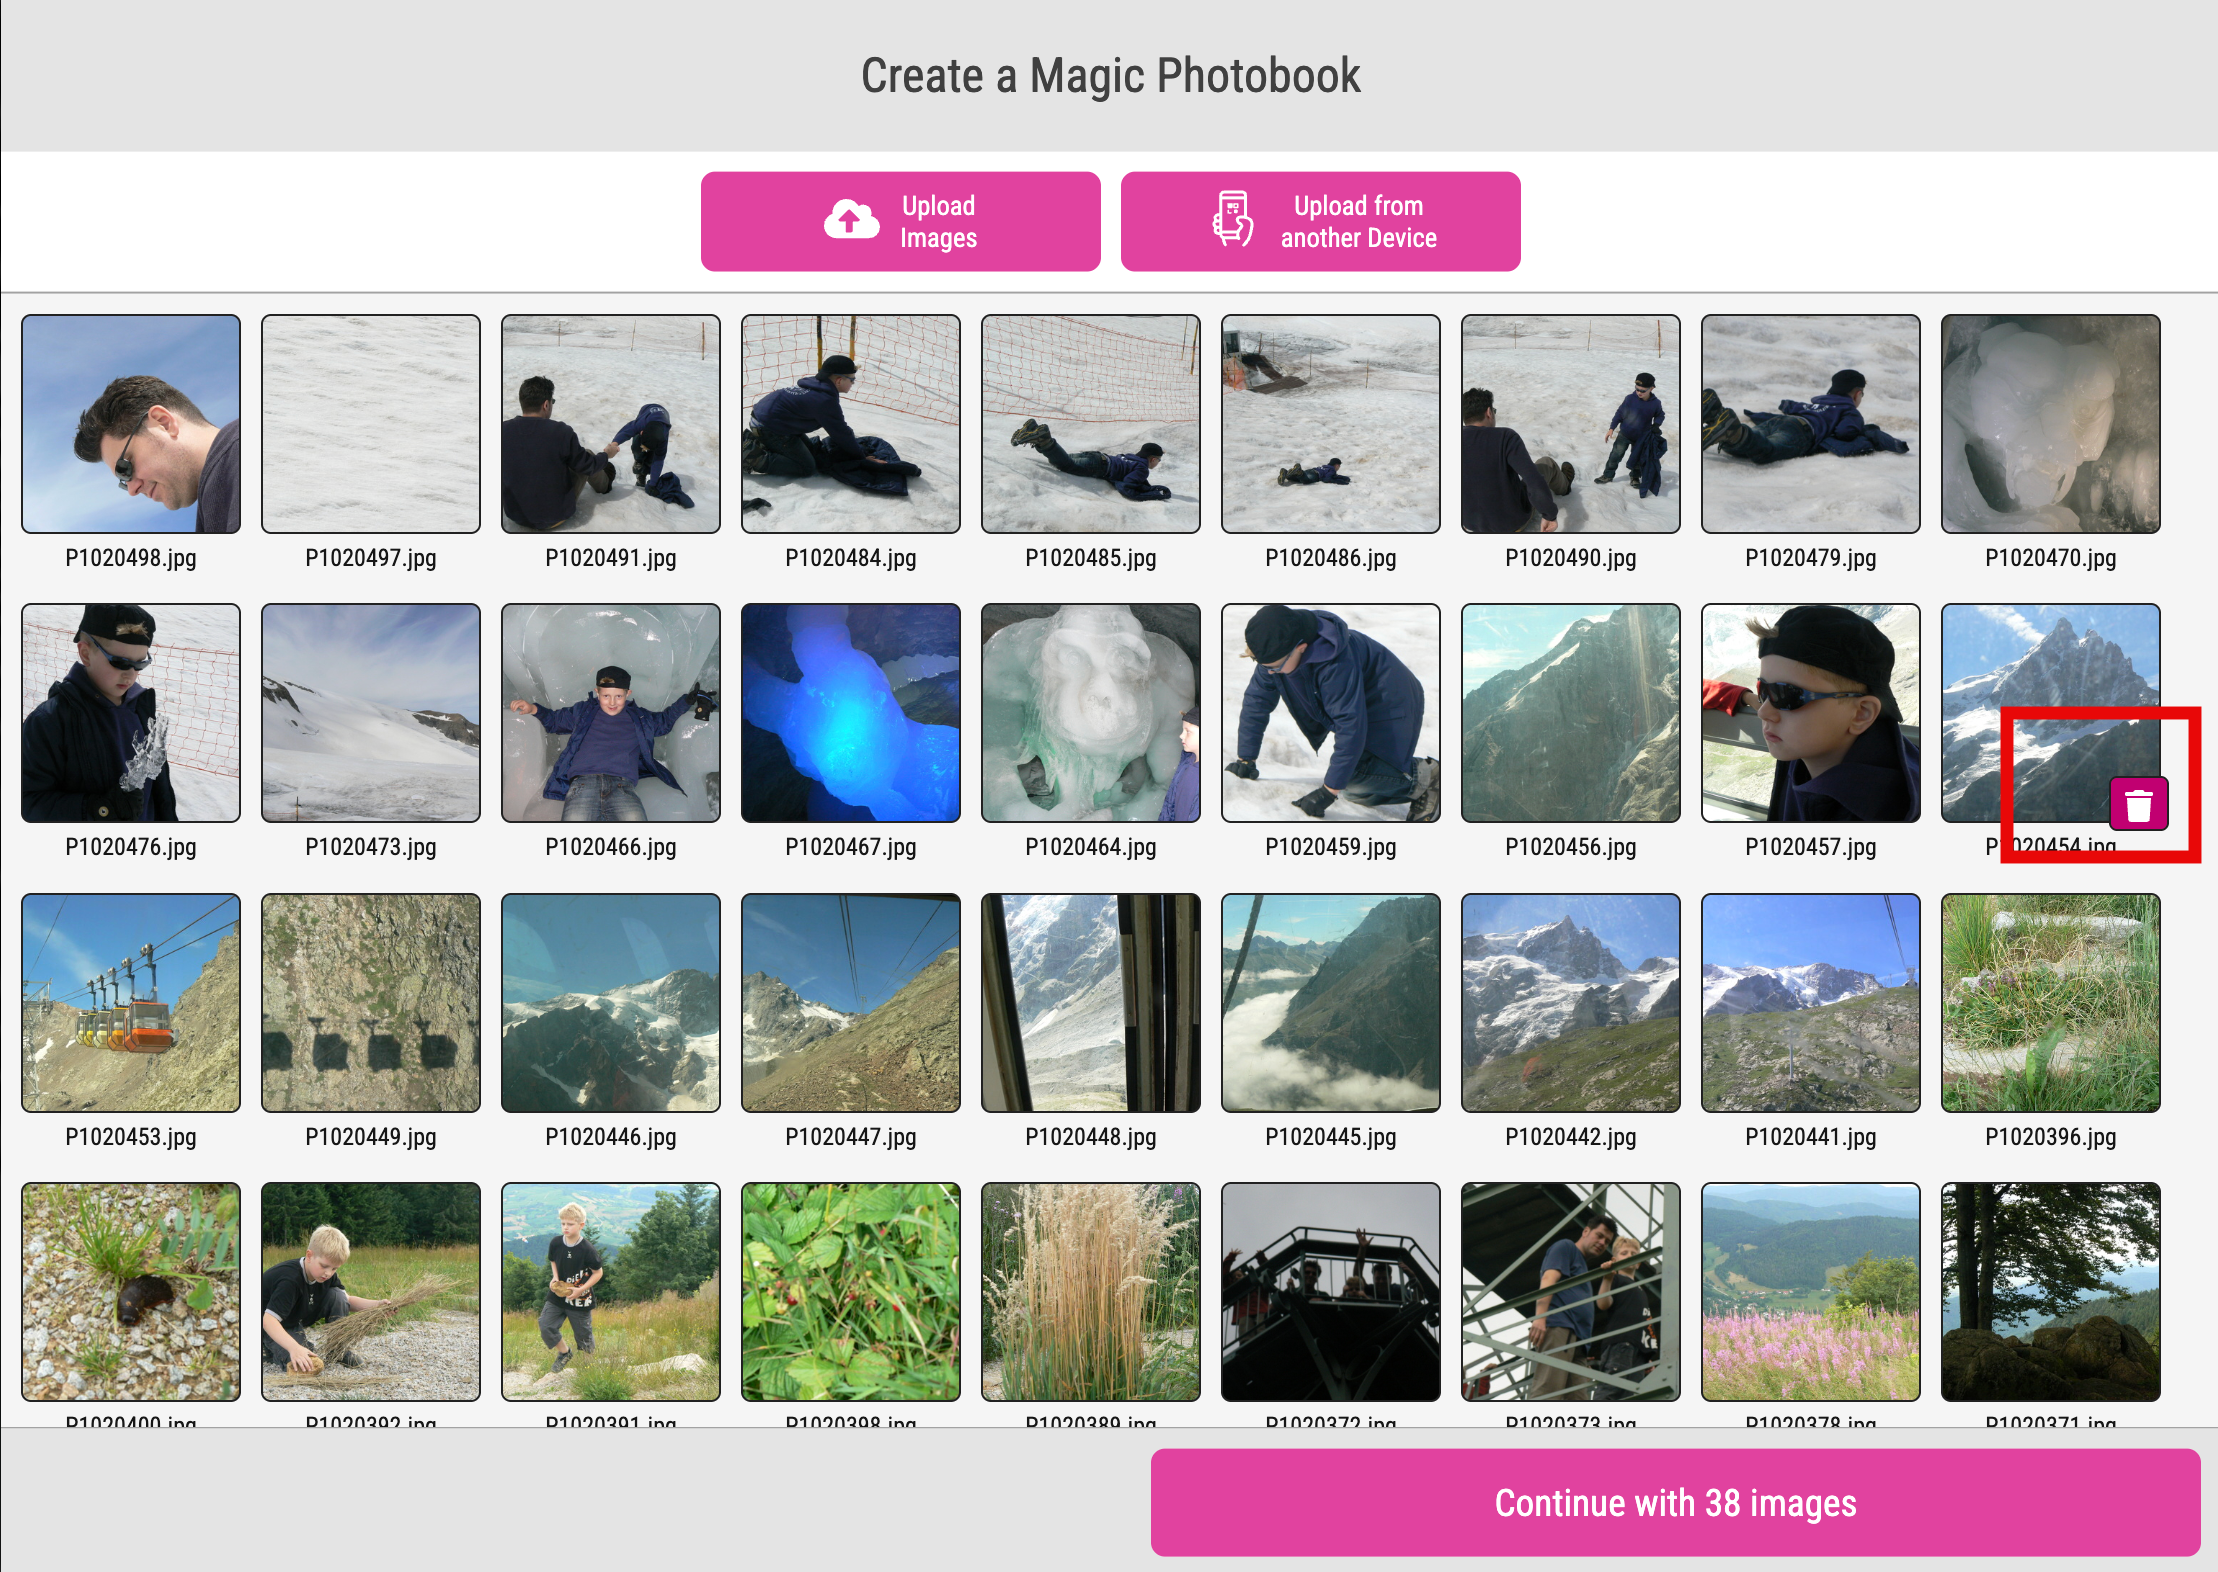
In a next step it shows the total amount of images where the Buyer can now select any image to delete it. And the Buyer can upload additional images.
If the Buyer presses the button Continue with x-images the AI Image Analyses are starting. On the right the Photobook Settings Tab is displayed if you have activated this feature. So that the Buyer can configure the Magic Photobook while the AI Image Analyses are running.
Learn how to activate the Photobook Settings Tab
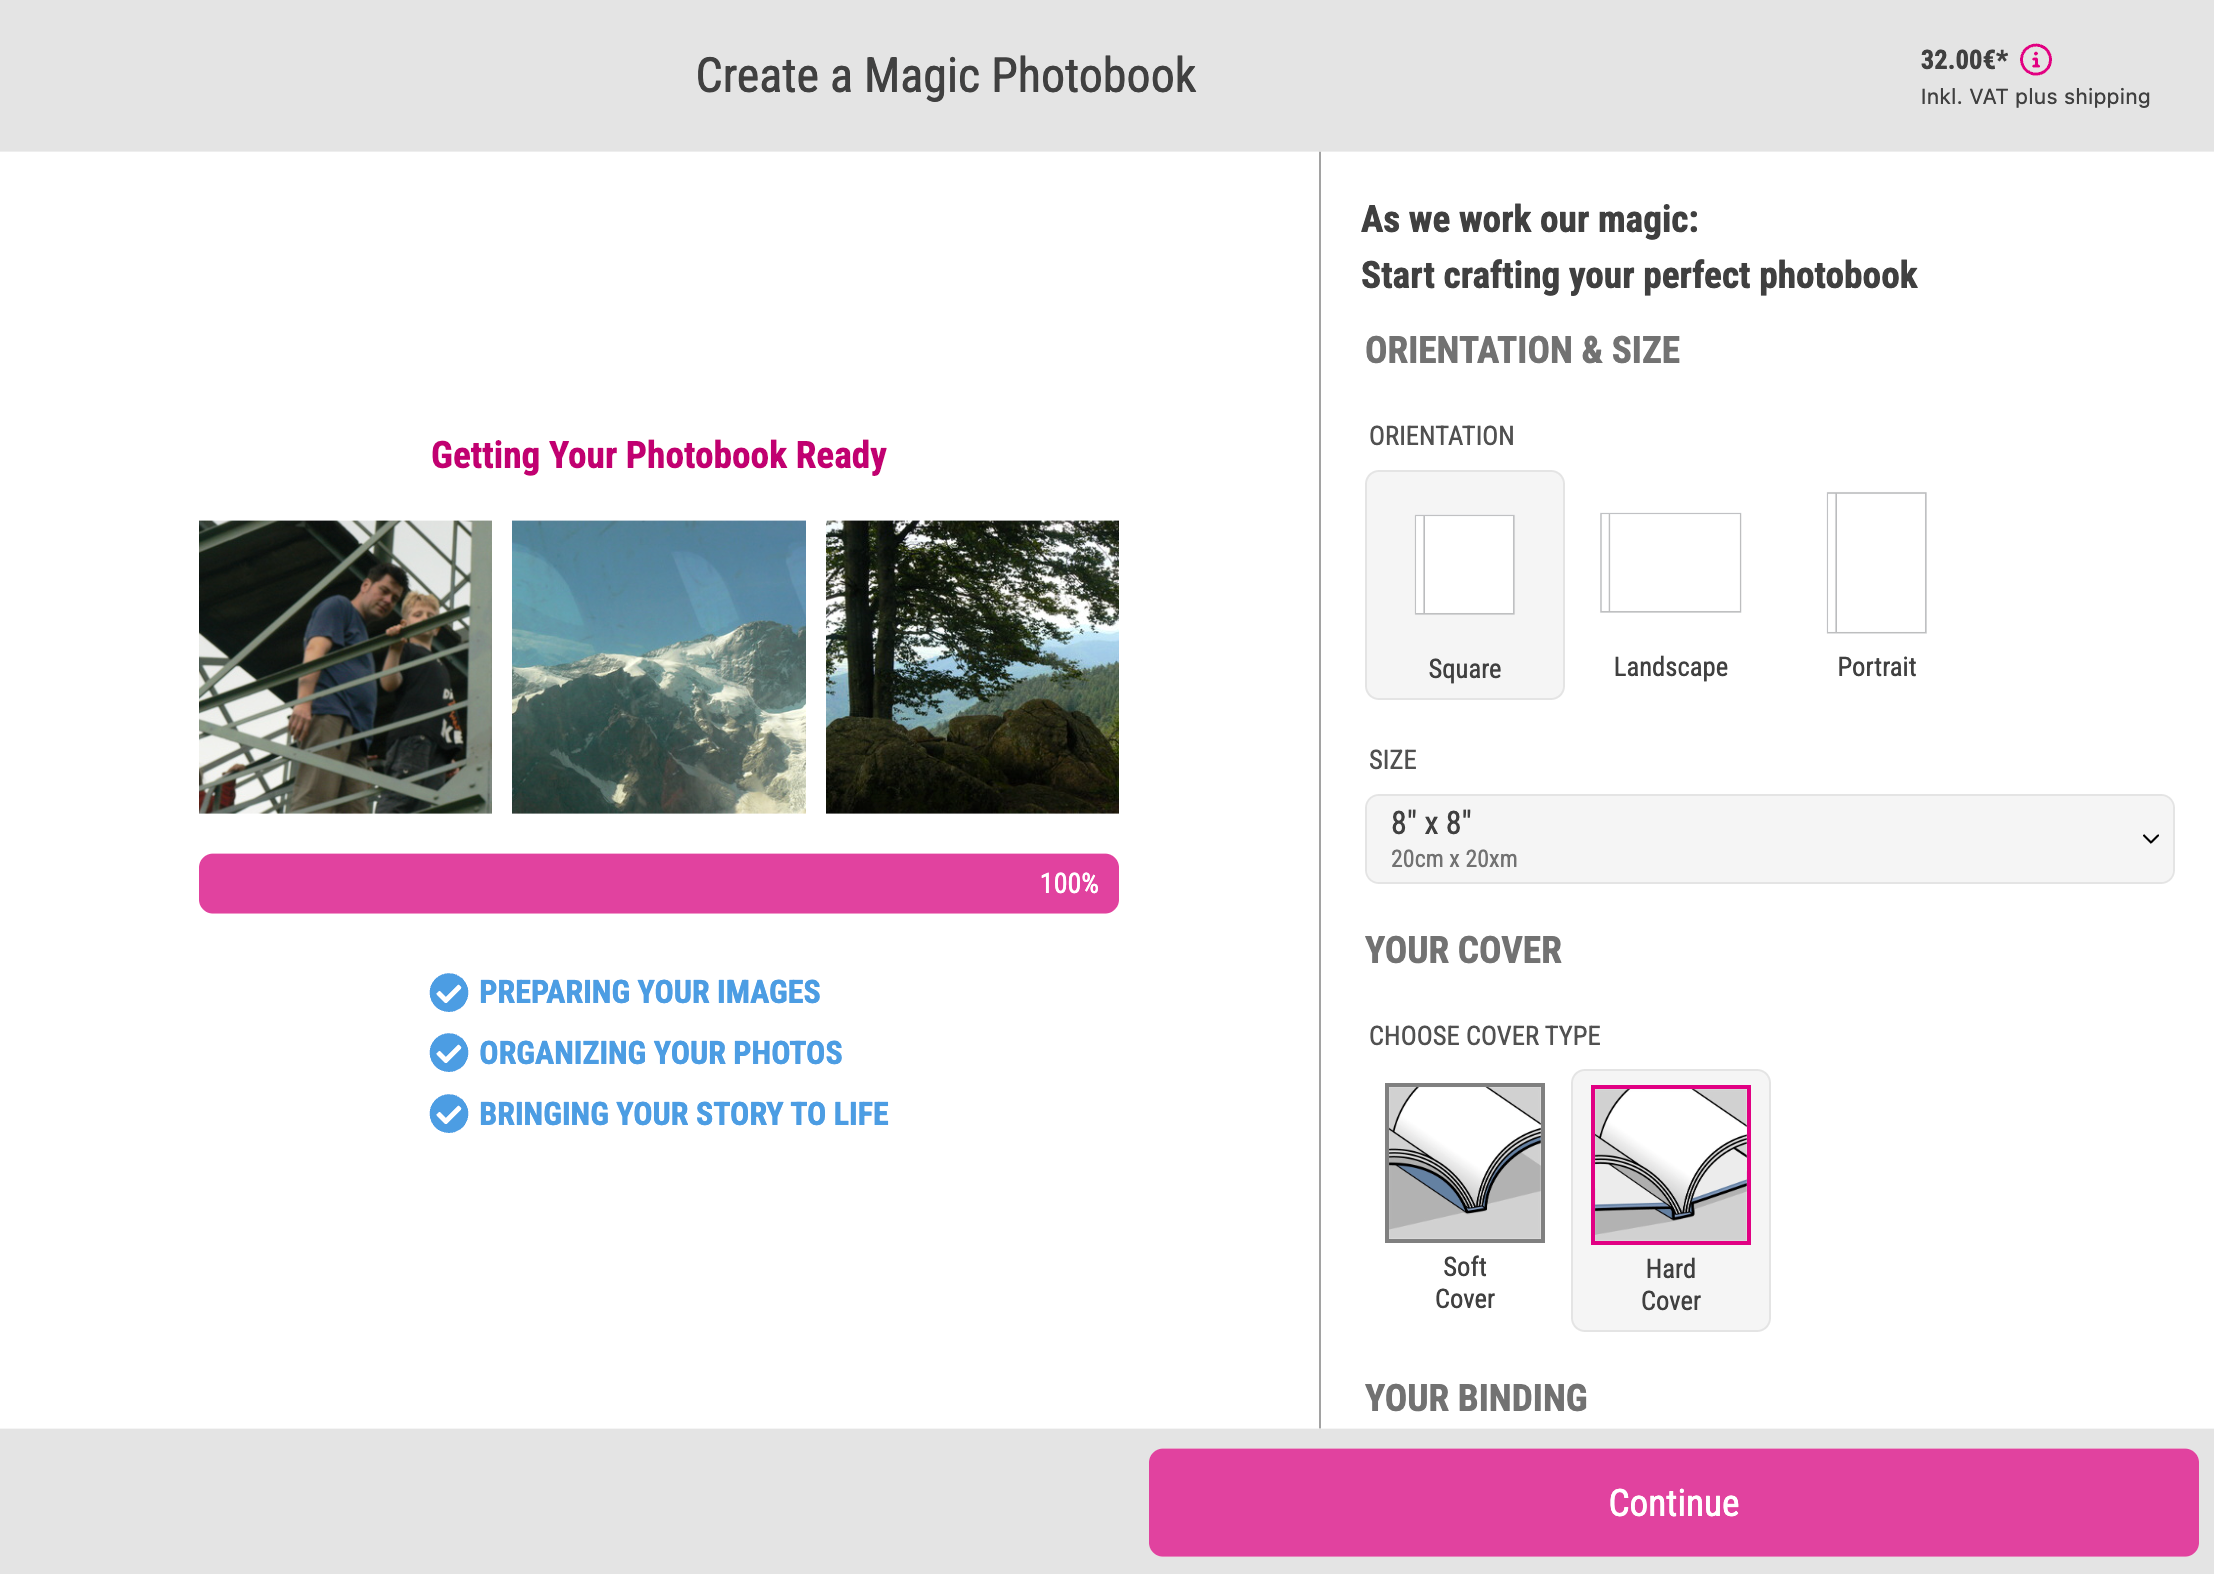
If the Buyer presses the button Continue the overlay shows the options to change the quality of the images used for the Magic Photobook and the amount of pages.
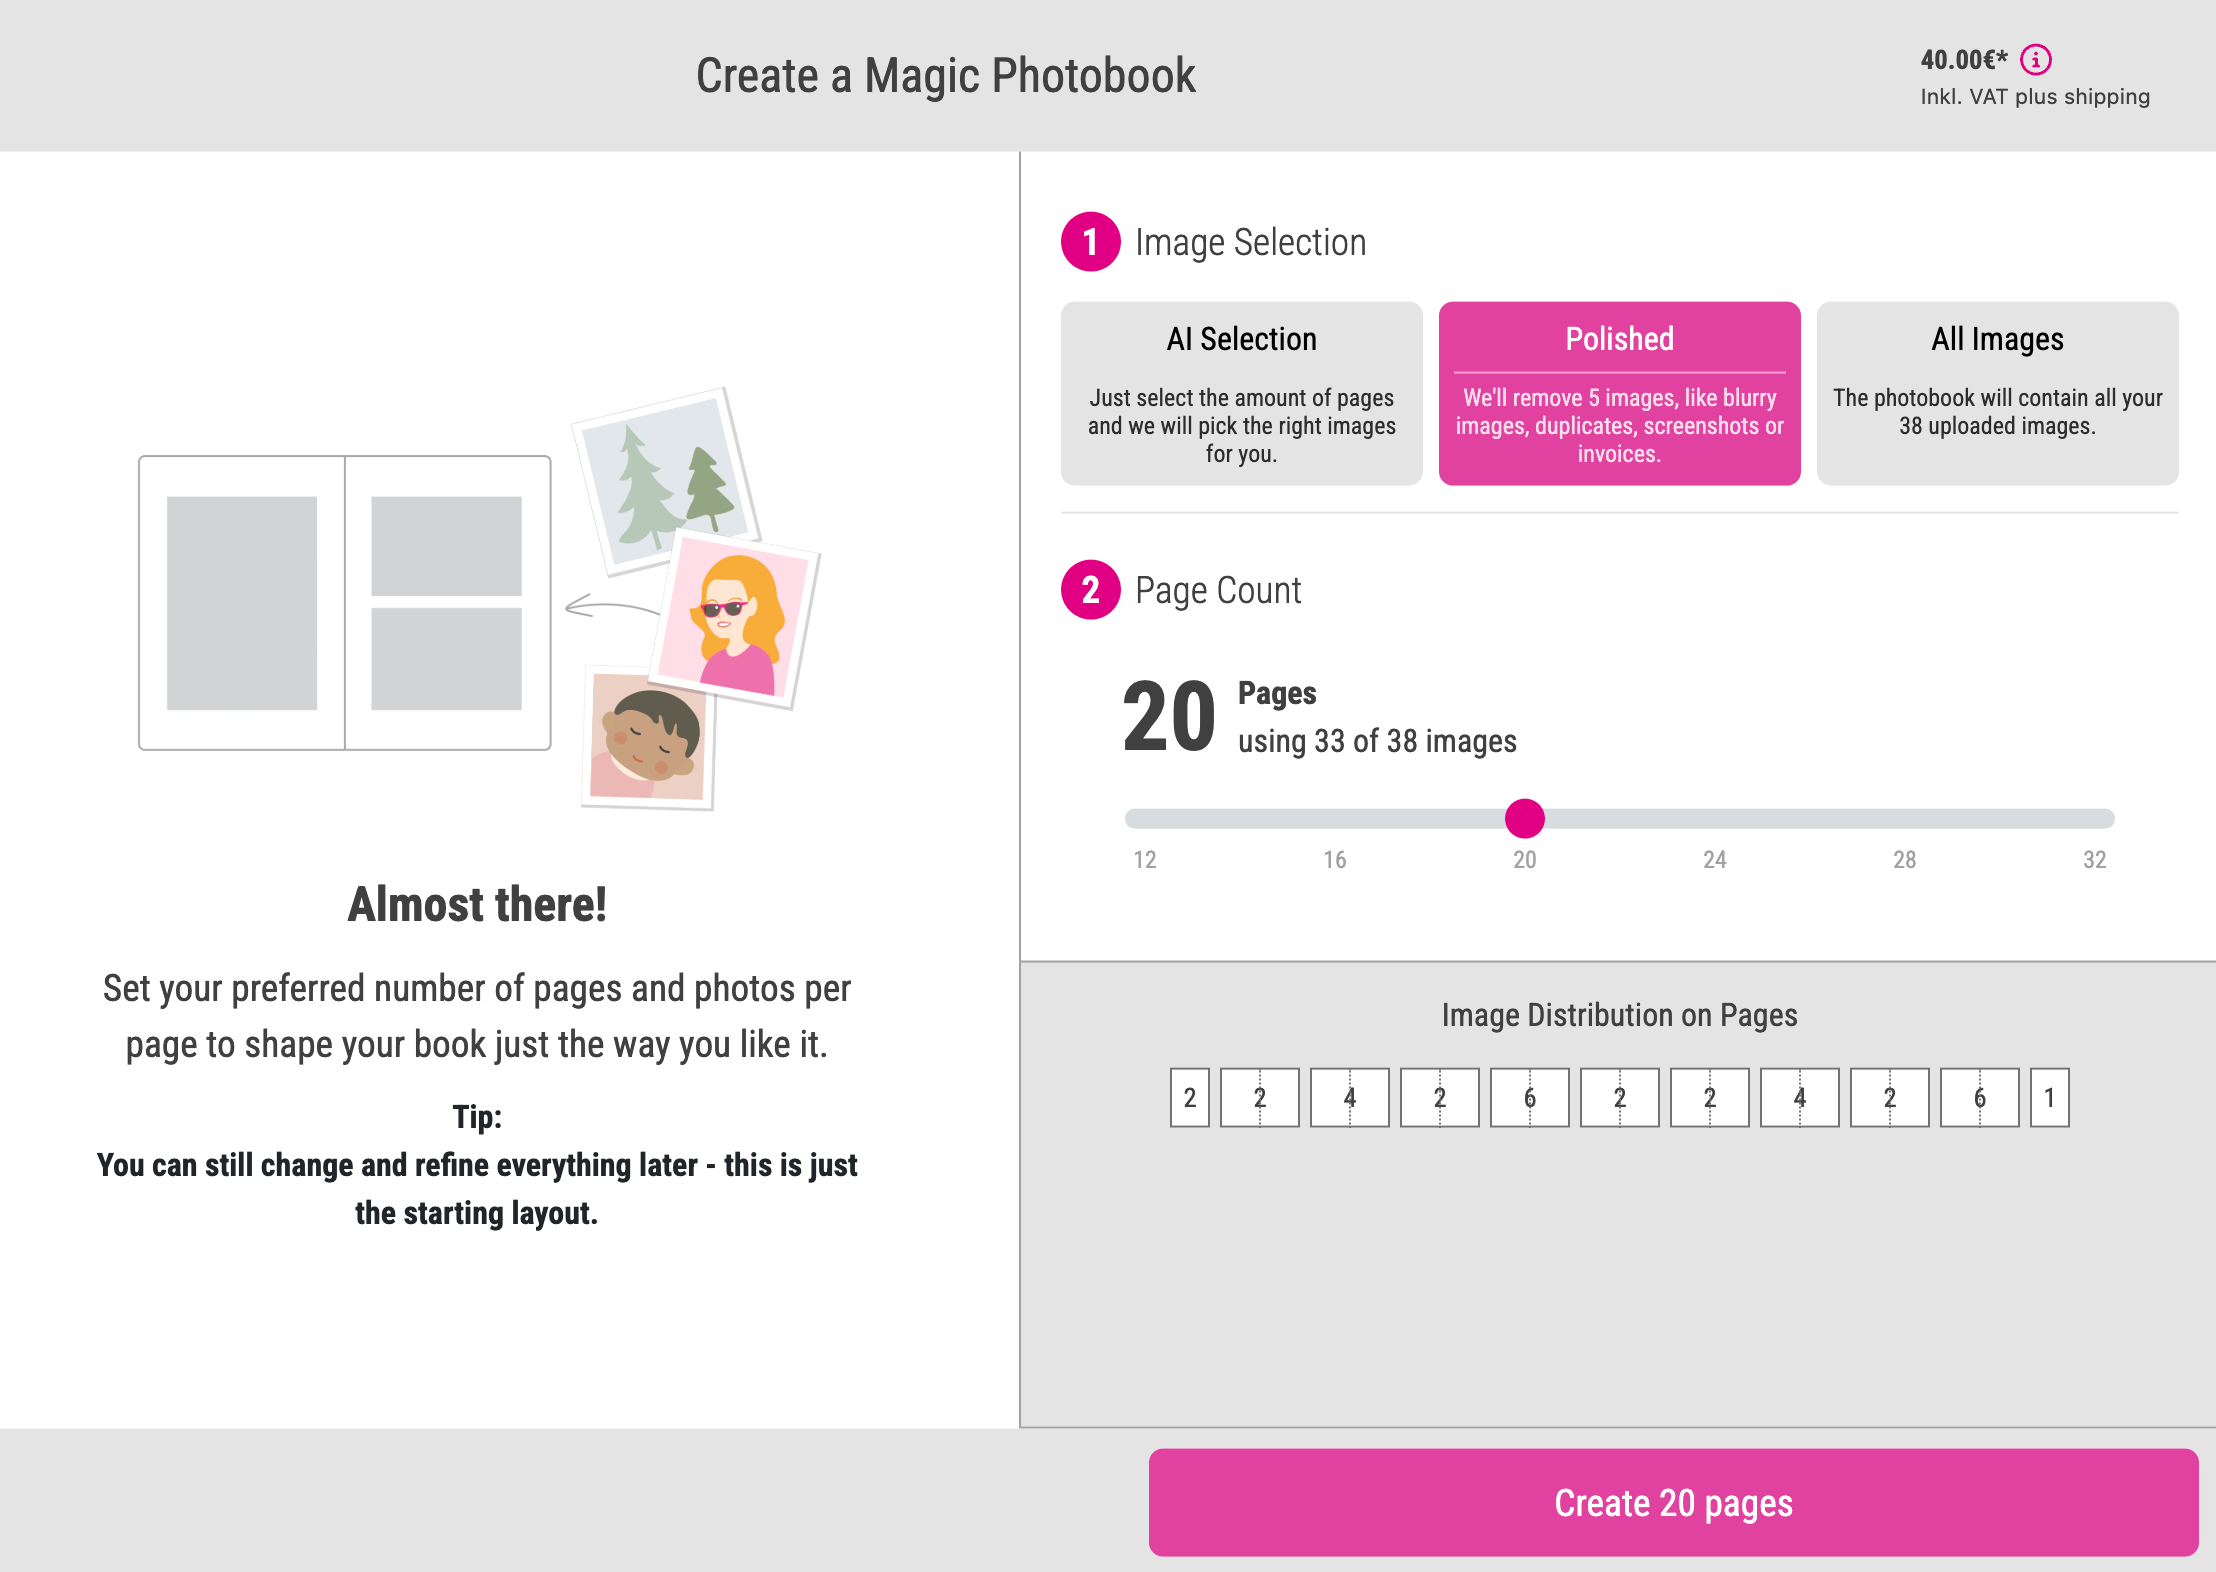
AI Selection
The Buyer has to select a number of pages only. This results in a number of images to be used. Based on this number the AI will automatically choose the best images.
Polished
The AI automatically filters out images that are not suitable - because they are blurry, duplicates, or the content is not relevant, such as accidentally uploaded invoices.
All Images
All uploaded images will be used.
If the Buyer presses the button Create x-pages the generation of the Magic Photobook will start.
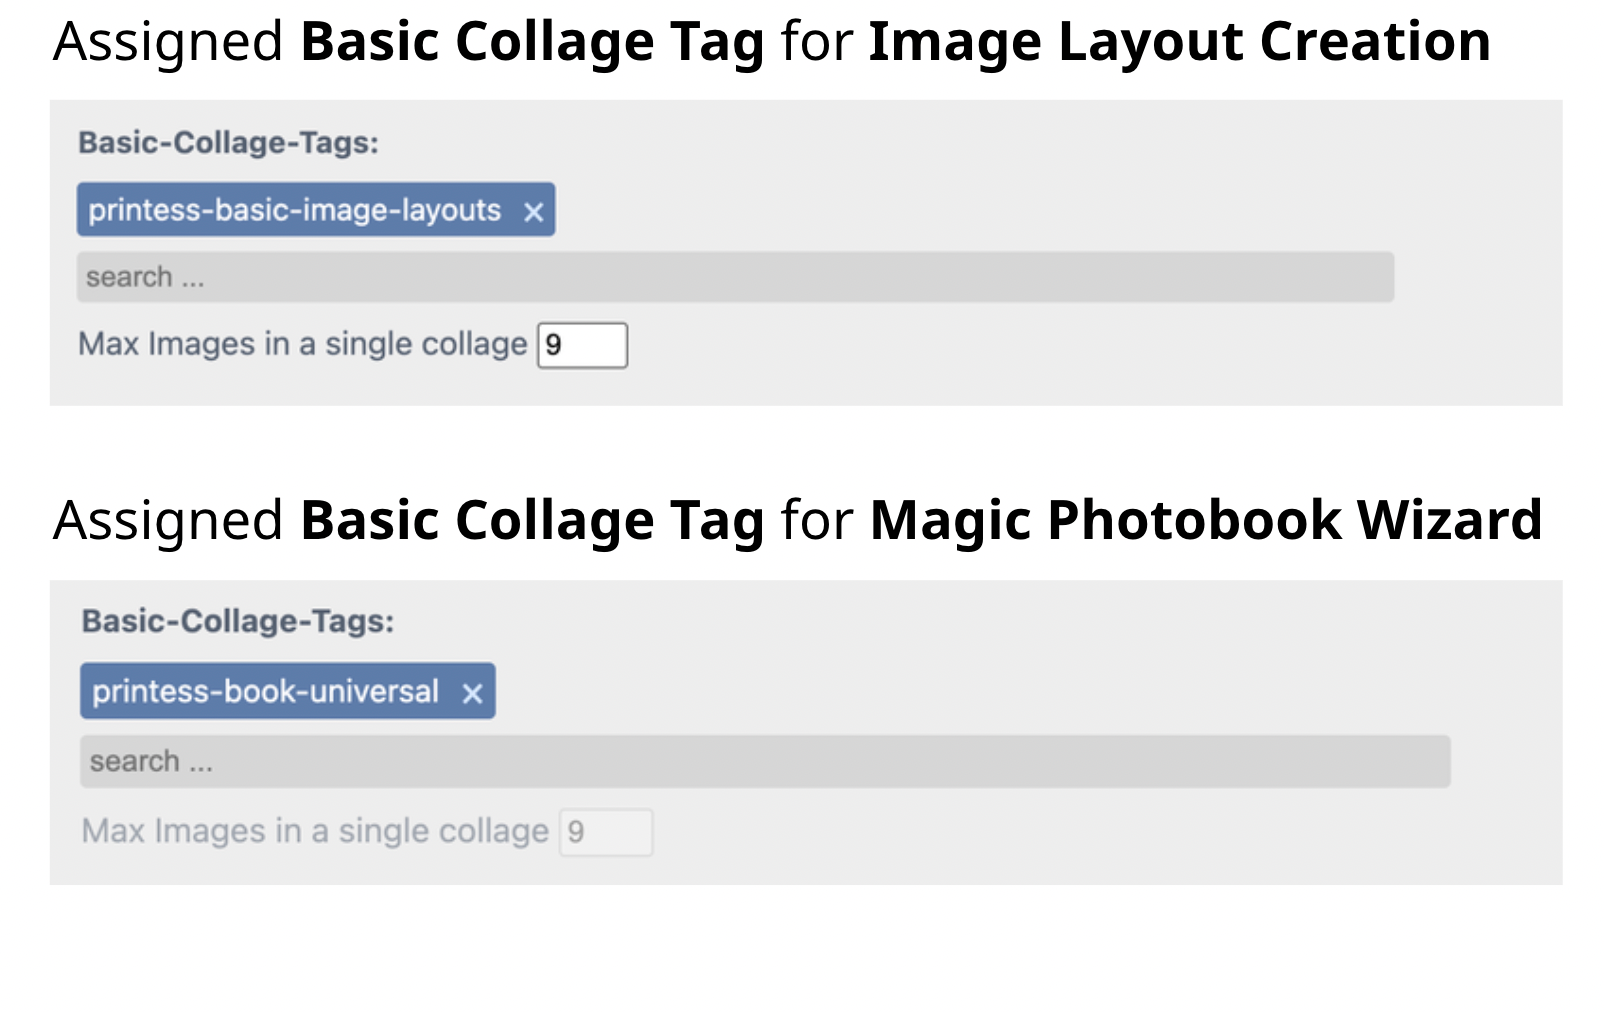
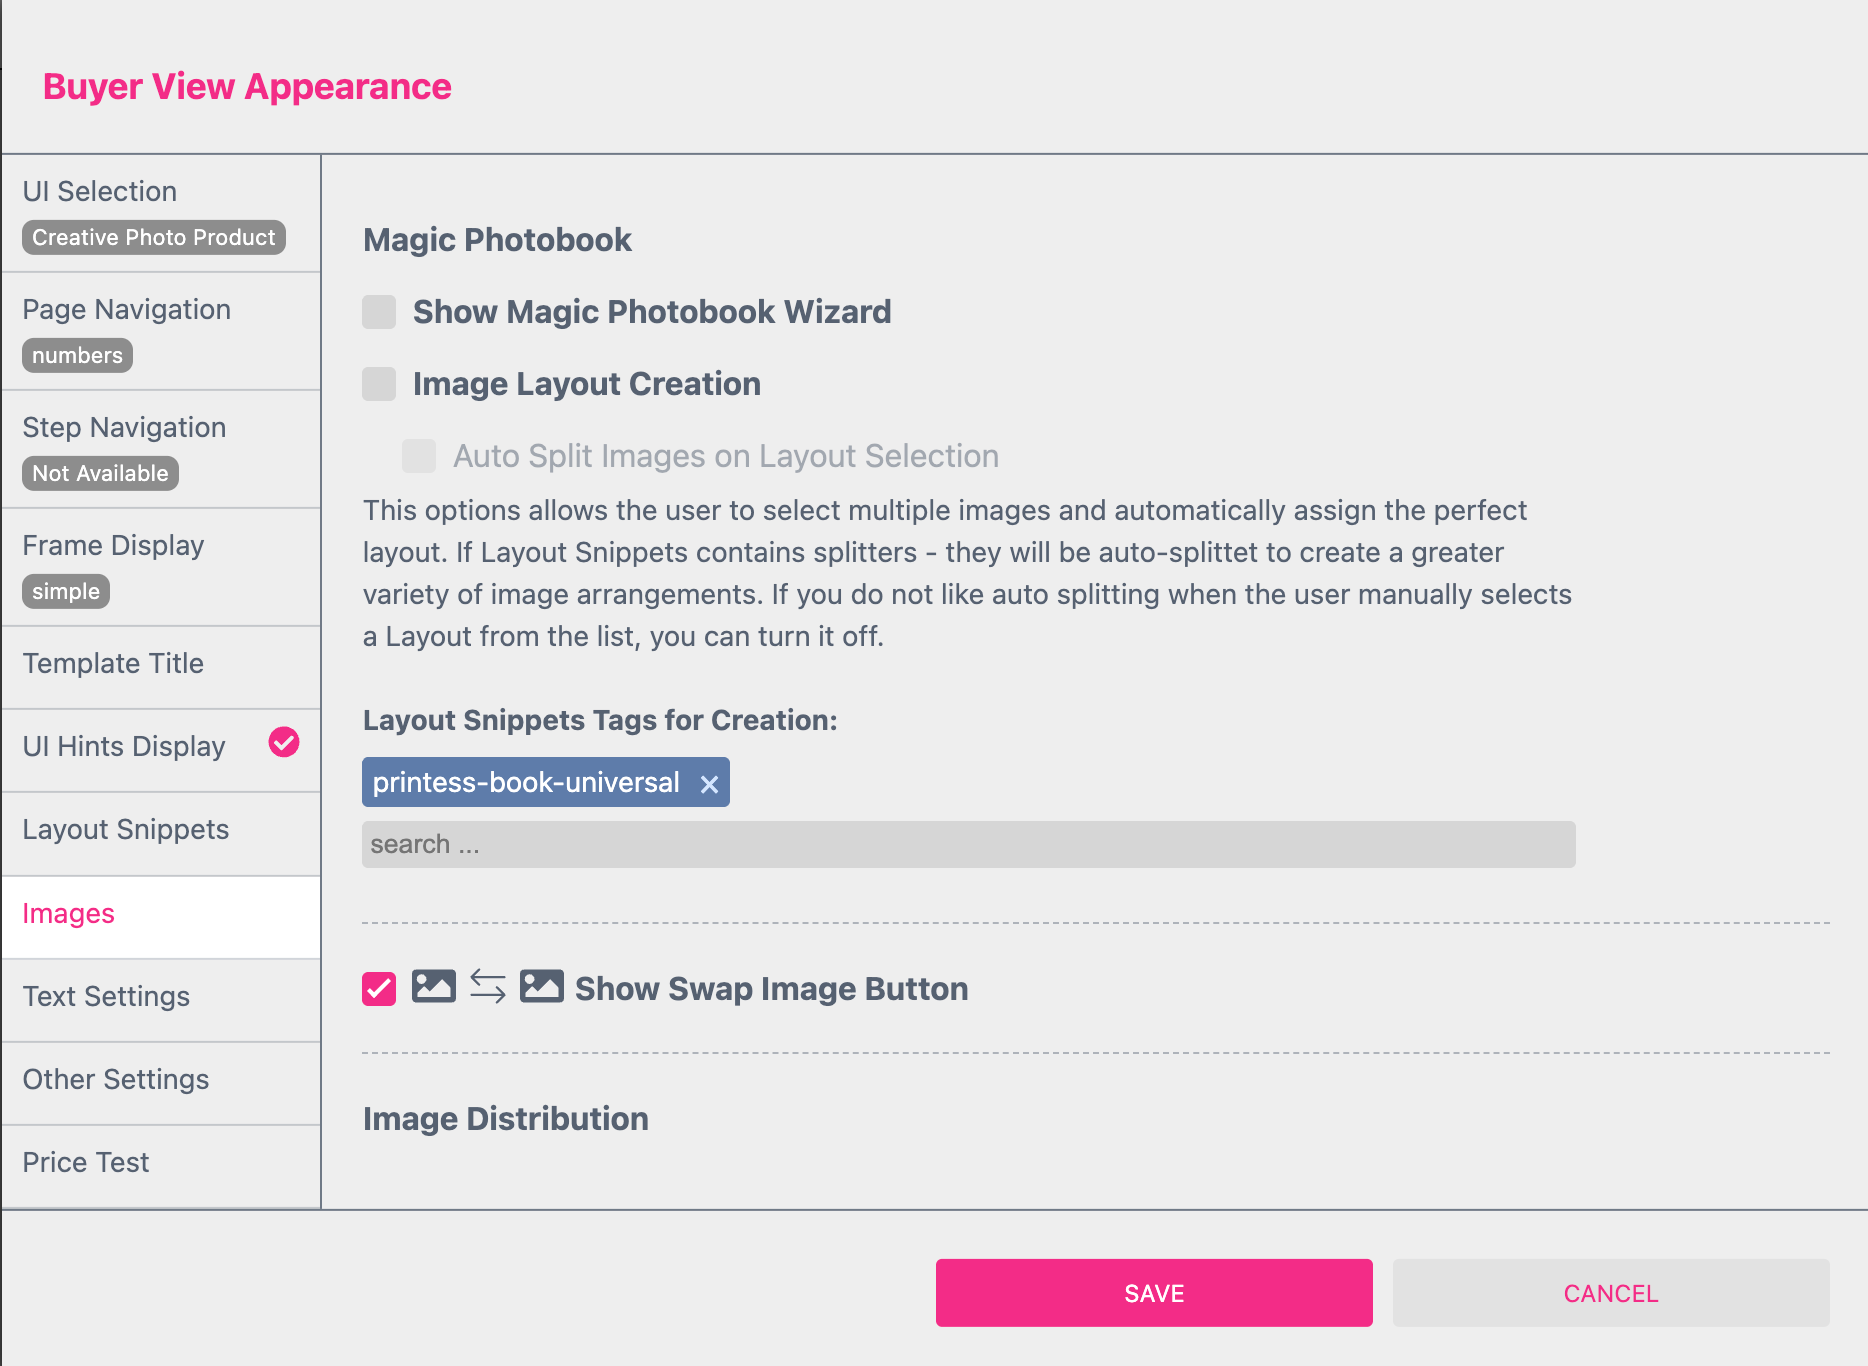
This feature can be used without the Show Magic Photobook Wizard feature above for simpler photo products like a greeting card for example. It allows the Buyer to select multiple images to get automatically the perfect layout assigned.
Therefore you have to assign at least one Basic Collage Tag.
But we recommend to use the default ones which are already assigned. If you use the Image Layout Creation without the Magic Photobook Wizard it is the Tag “printess-basic-image-layouts”. Here you can aslo define the maximum number of images per collage. If you turned on the Magic Photobook Wizard is is the Tag called printess-book-universal. Here the maximum number of images is fixed.
If you really like to use your own Tags you have to make sure that the Layout Snippets are based on Splitter Grids. Otherwise Printess can not automatically split the image frames to offer different layouts with a different number of image frames per page.
Using the search input field you can add more Tags.
After the the upload the Buyer can select a number of images to be used.
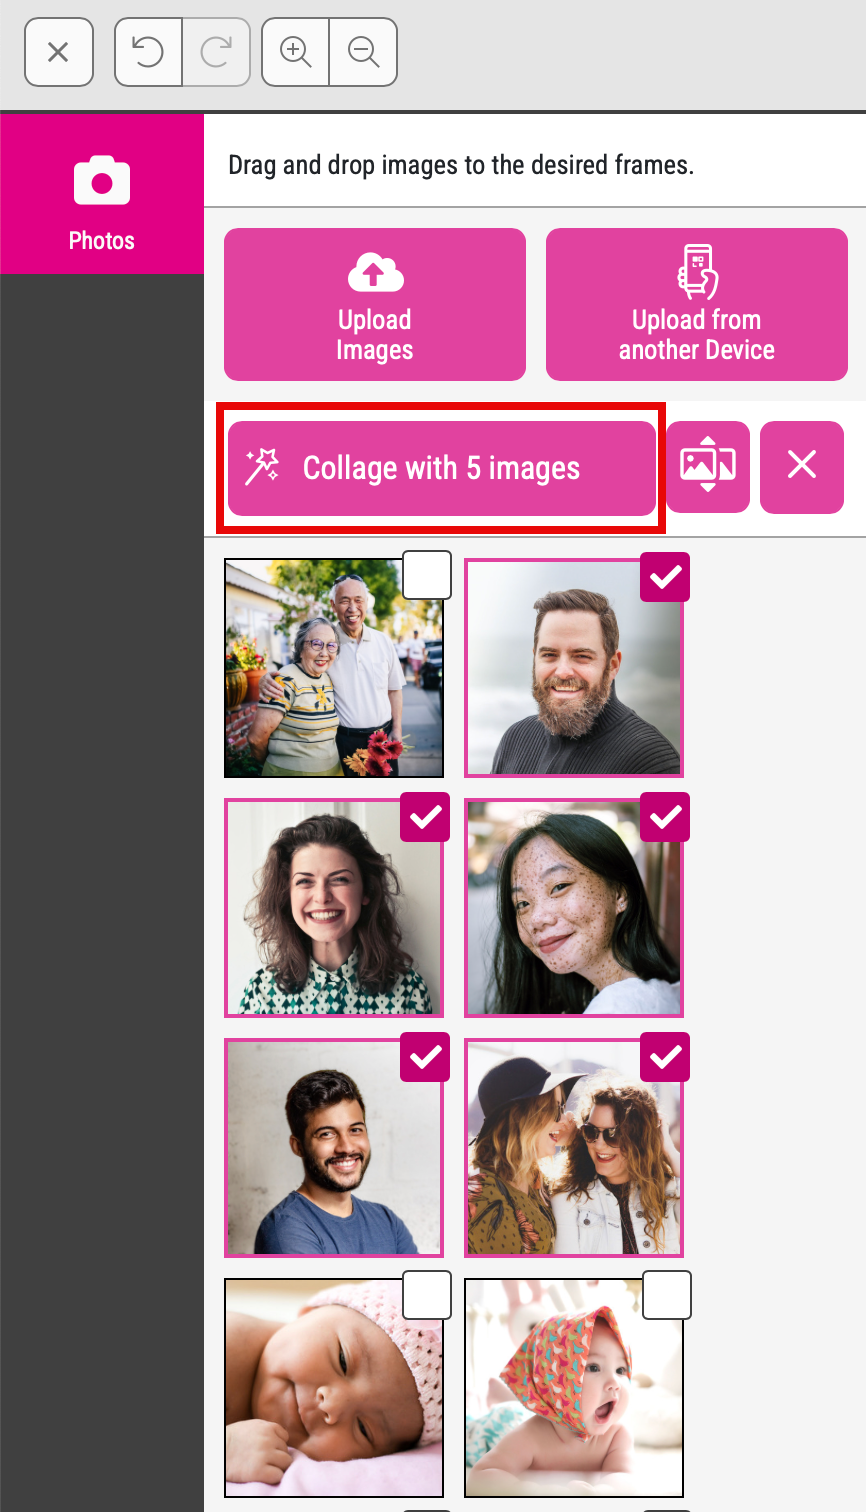
Depending on the number of selected images a range of matching Layout Snippets will be shown when the Buyer clicks on the “Collage with X images” button. Therefore a separate dialog will open.
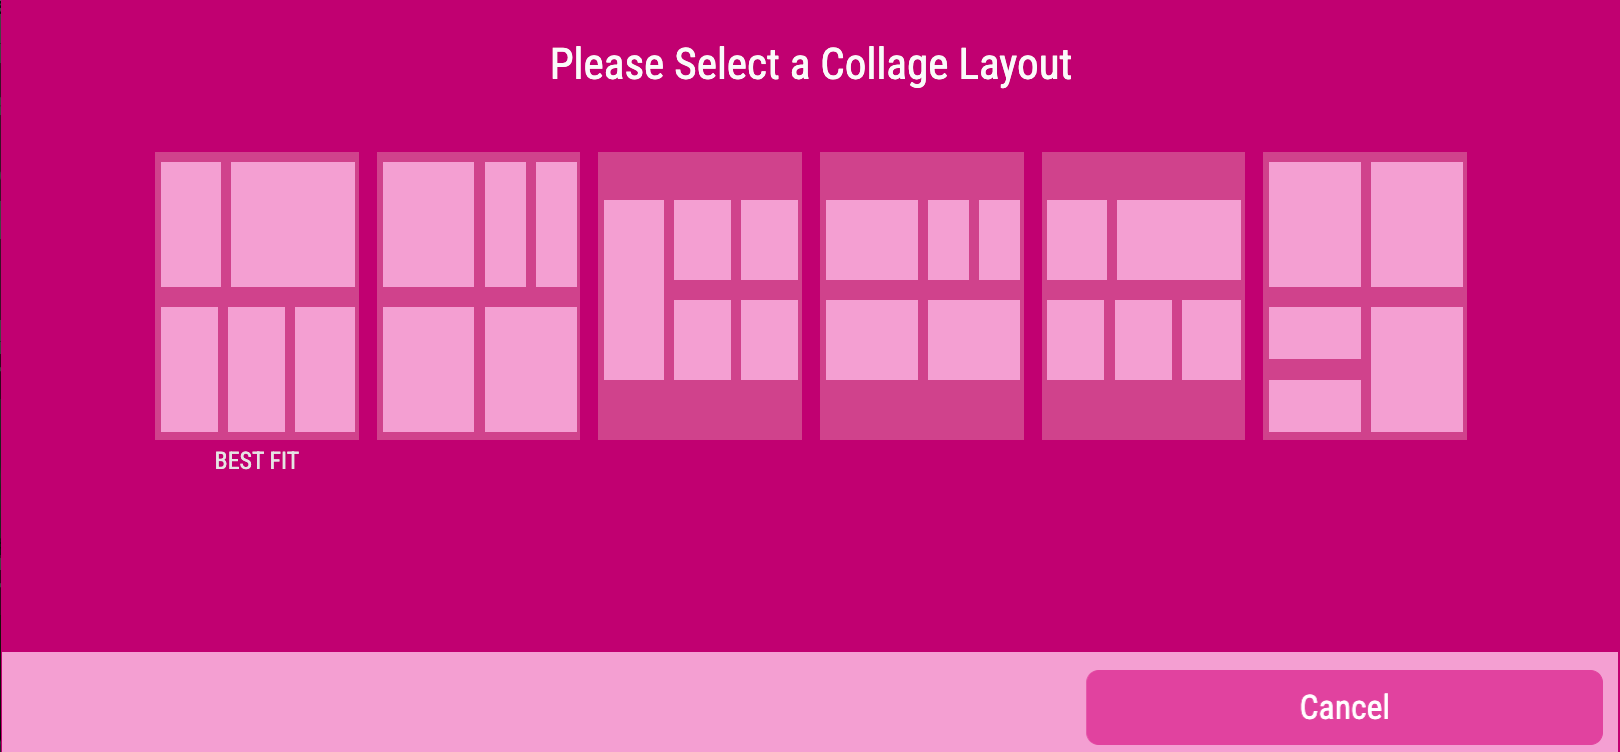
It shows the variations of layouts available for the specific number of images and suggests the “BEST FIT” Layout Snippet. The Buyer can choose one of these layouts to be used for his photo product and the images will automatically be placed in it.
If this option is turned on Layout Snippets which contains Splitters will be auto-splitted to create a greater variety of image arrangements. If you do not like auto splitting when the user manually selects a Layout from the list, you can turn it off here.
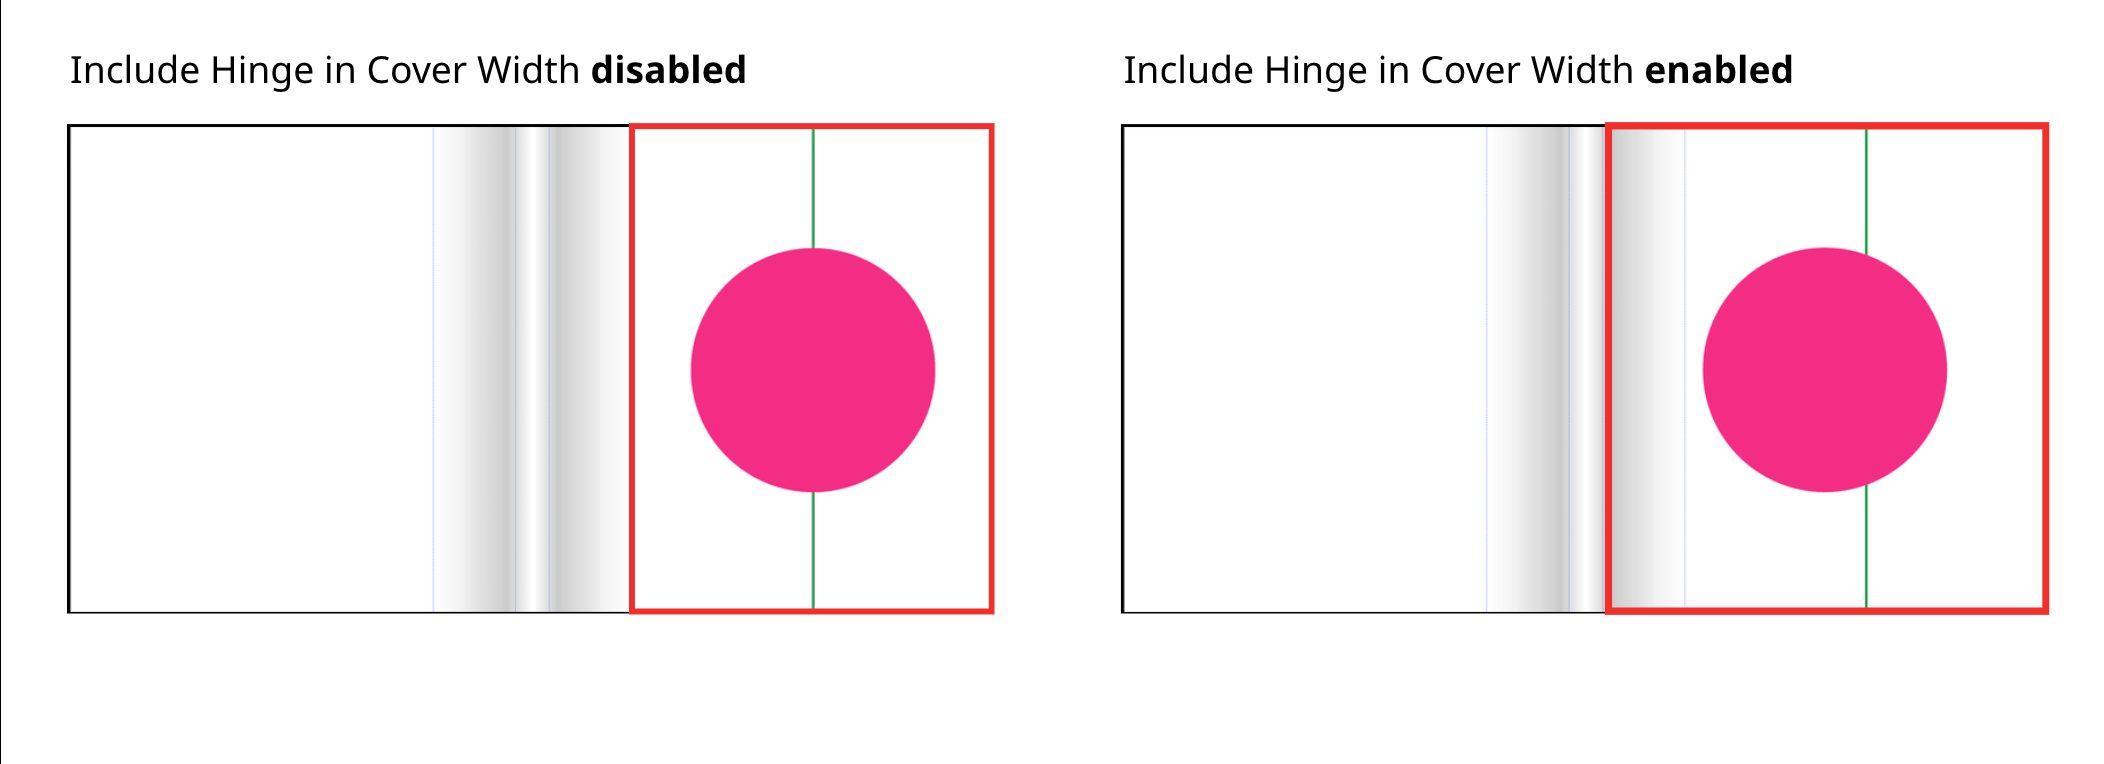
By default this option is disabled so that the Hinge is NOT part of the left and right side of the Cover. If you center any frame now on one of these two sides it will be placed in the center of the page. If you turn on this feature the frame will be placed in the center of the total width - including the page and the hinge.
By default the AI is automatically calculation a different number of images per page to distribute all uploaded images used across all pages of the Magic Photobook. If you turn on this option only ONE image will be placed on each page.
Note: This feature only works if the Layout Snippets used do NOT include Splitter image frames!
Turn on this option to avoid the use of the same uploaded image on the Cover AND at the Inner Pages.
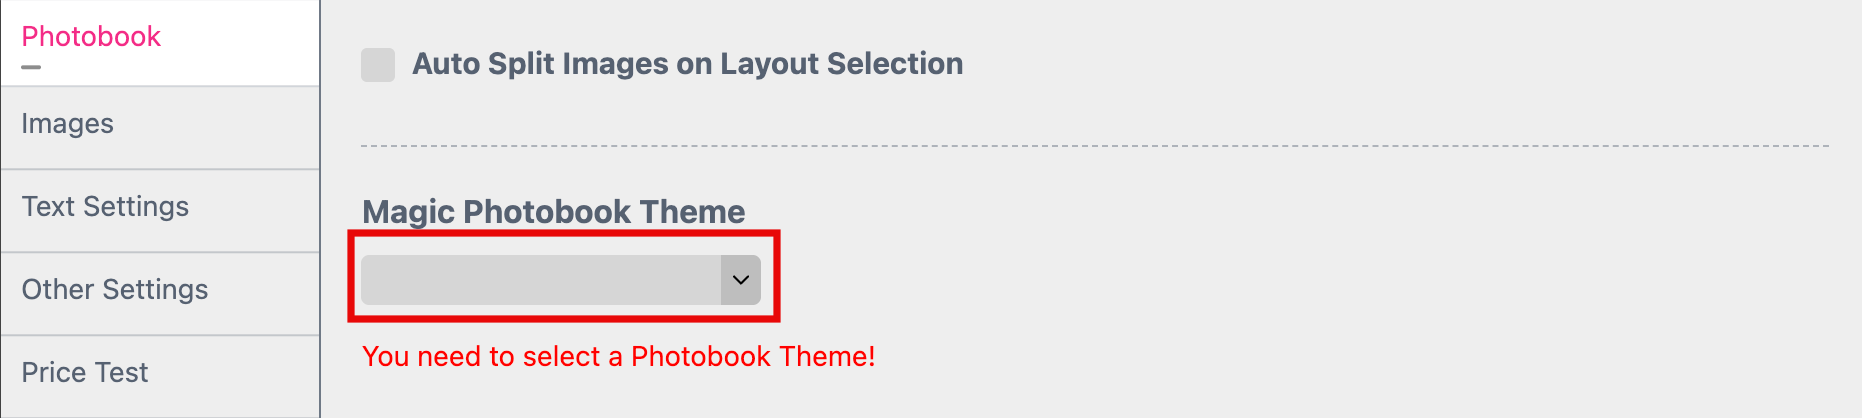
So first of all you have to go to the Account Portal to create a Photobook Theme to assign it here.
Learn how to set up Photobook Themes
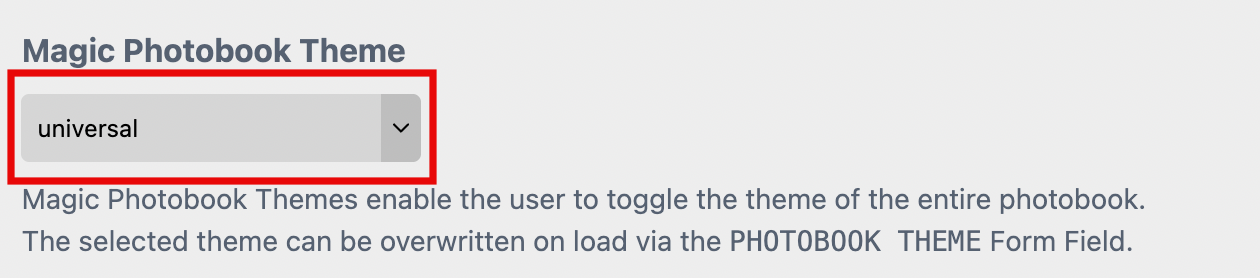
If you have created your Universal Theme you can assign it here to press the Save button.
This assignment is for testing only! Later you have to overwrite this Tag through the Attach Parameters “PHOTOBOOK_THEME=tagname” when you load the editor. Or via a specific setting when using our shop integrations.
If you press the Save button a popup window will open where you have to confirm that Printess will automatically show the Image Search Bar at the Buyer Side on each page.
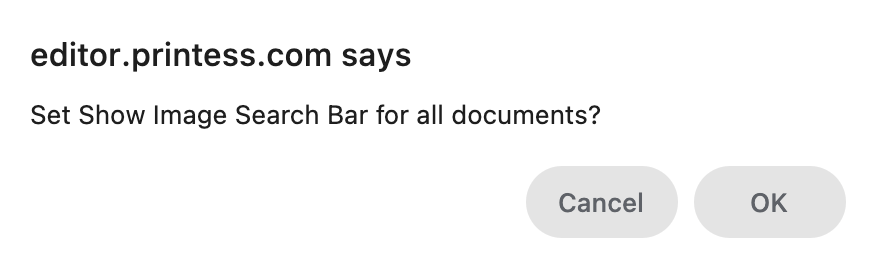
It enables the Buyer to search for an image name of the uploaded images.
If you define Keywords for your Photobook Themes you can add a Keyword Menu here. This will display the Photobook Themes sorted by the Keyword Menu at the Buyer Side.
If you have NO Preview Document defined within your Printess Template you can even though display the Preview Button at the Buyer Side. If they Buyer presses this button and overlay will be displayed to show the Photobook where the Buyer can flip through the spreads.
Available Settings:
In the Document Settings you can define if the Preview should show a Hardcover or a Softcover book.
Learn more about the Preview Cover Type
After the Photobook is created an overlay will be displayed which shows all pages. The Buyer can add, remove edit and move the spreads.

Available Settings:
This feature works for AI generated Photobooks only. It shows an overlay of all images placed on the different spreads as the last step of the Magic Photobook Wizard. The Buyer can add, remove and move spreads. And moving the images by drag and drop from one spread to the other.
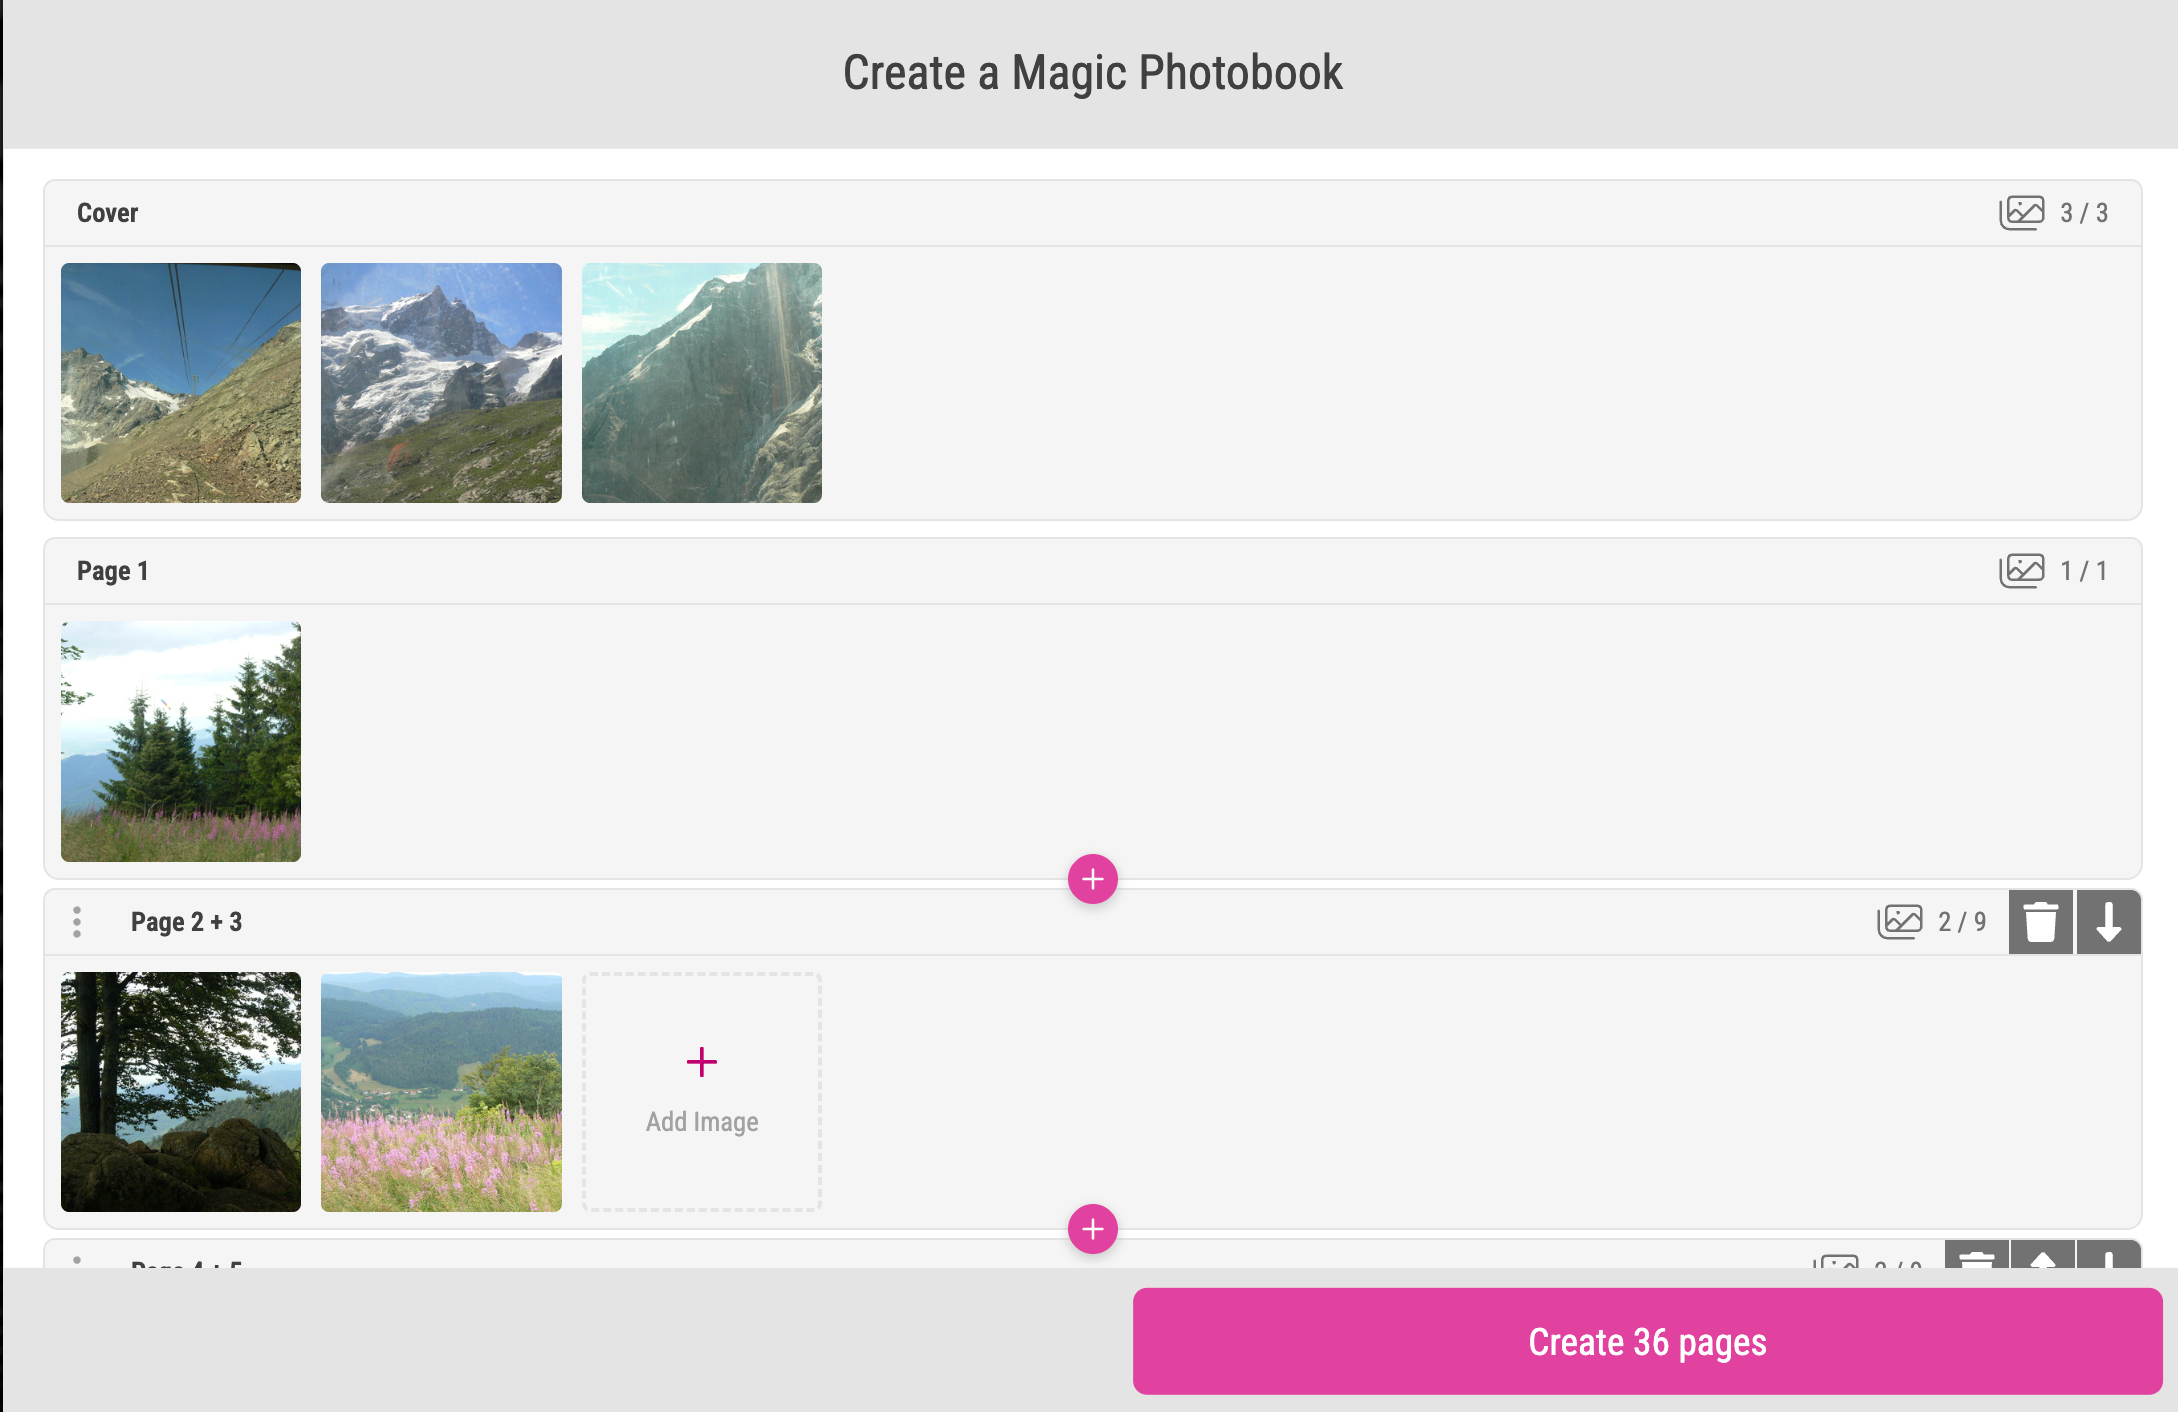
Available Settings:
If you select a Form Field Tab here the included Form Fields will be displayed in a overlay while the uploaded Buyer’s images will be analyzed. So if you offer different sizes, orientations, bindings etc. the Buyer can already configure these settings.
 wizardHeadline
By default the headline says “Create a Magic Photobook”. But you can type in any other headline here.
If you would like to translate that headline in different languages you have to use the Translation Table. Using the Key “createPhotobookHeadline” under the namespace “ui”.
Learn how this works in detail here.
This feature is only available if the Magic Photobook Wizard is turned on!
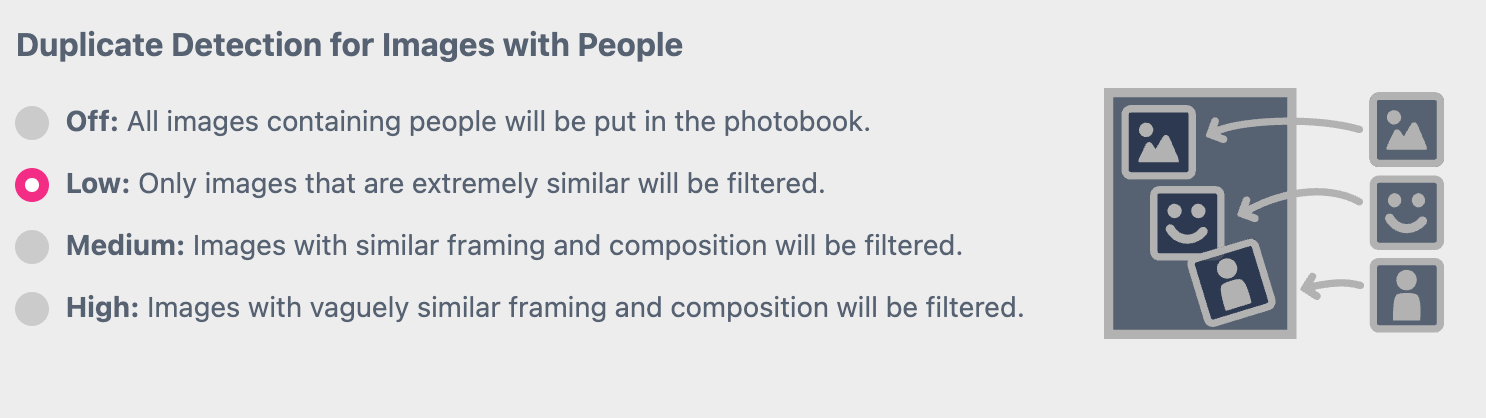
Photos that include people cannot be filtered for duplicates by the AI at all or only to varying degrees. Sometimes you may want to keep a series of images exactly as they were taken. In other cases you may want to avoid duplicates. Therefore you can define here how the AI should handle uploaded duplicates.
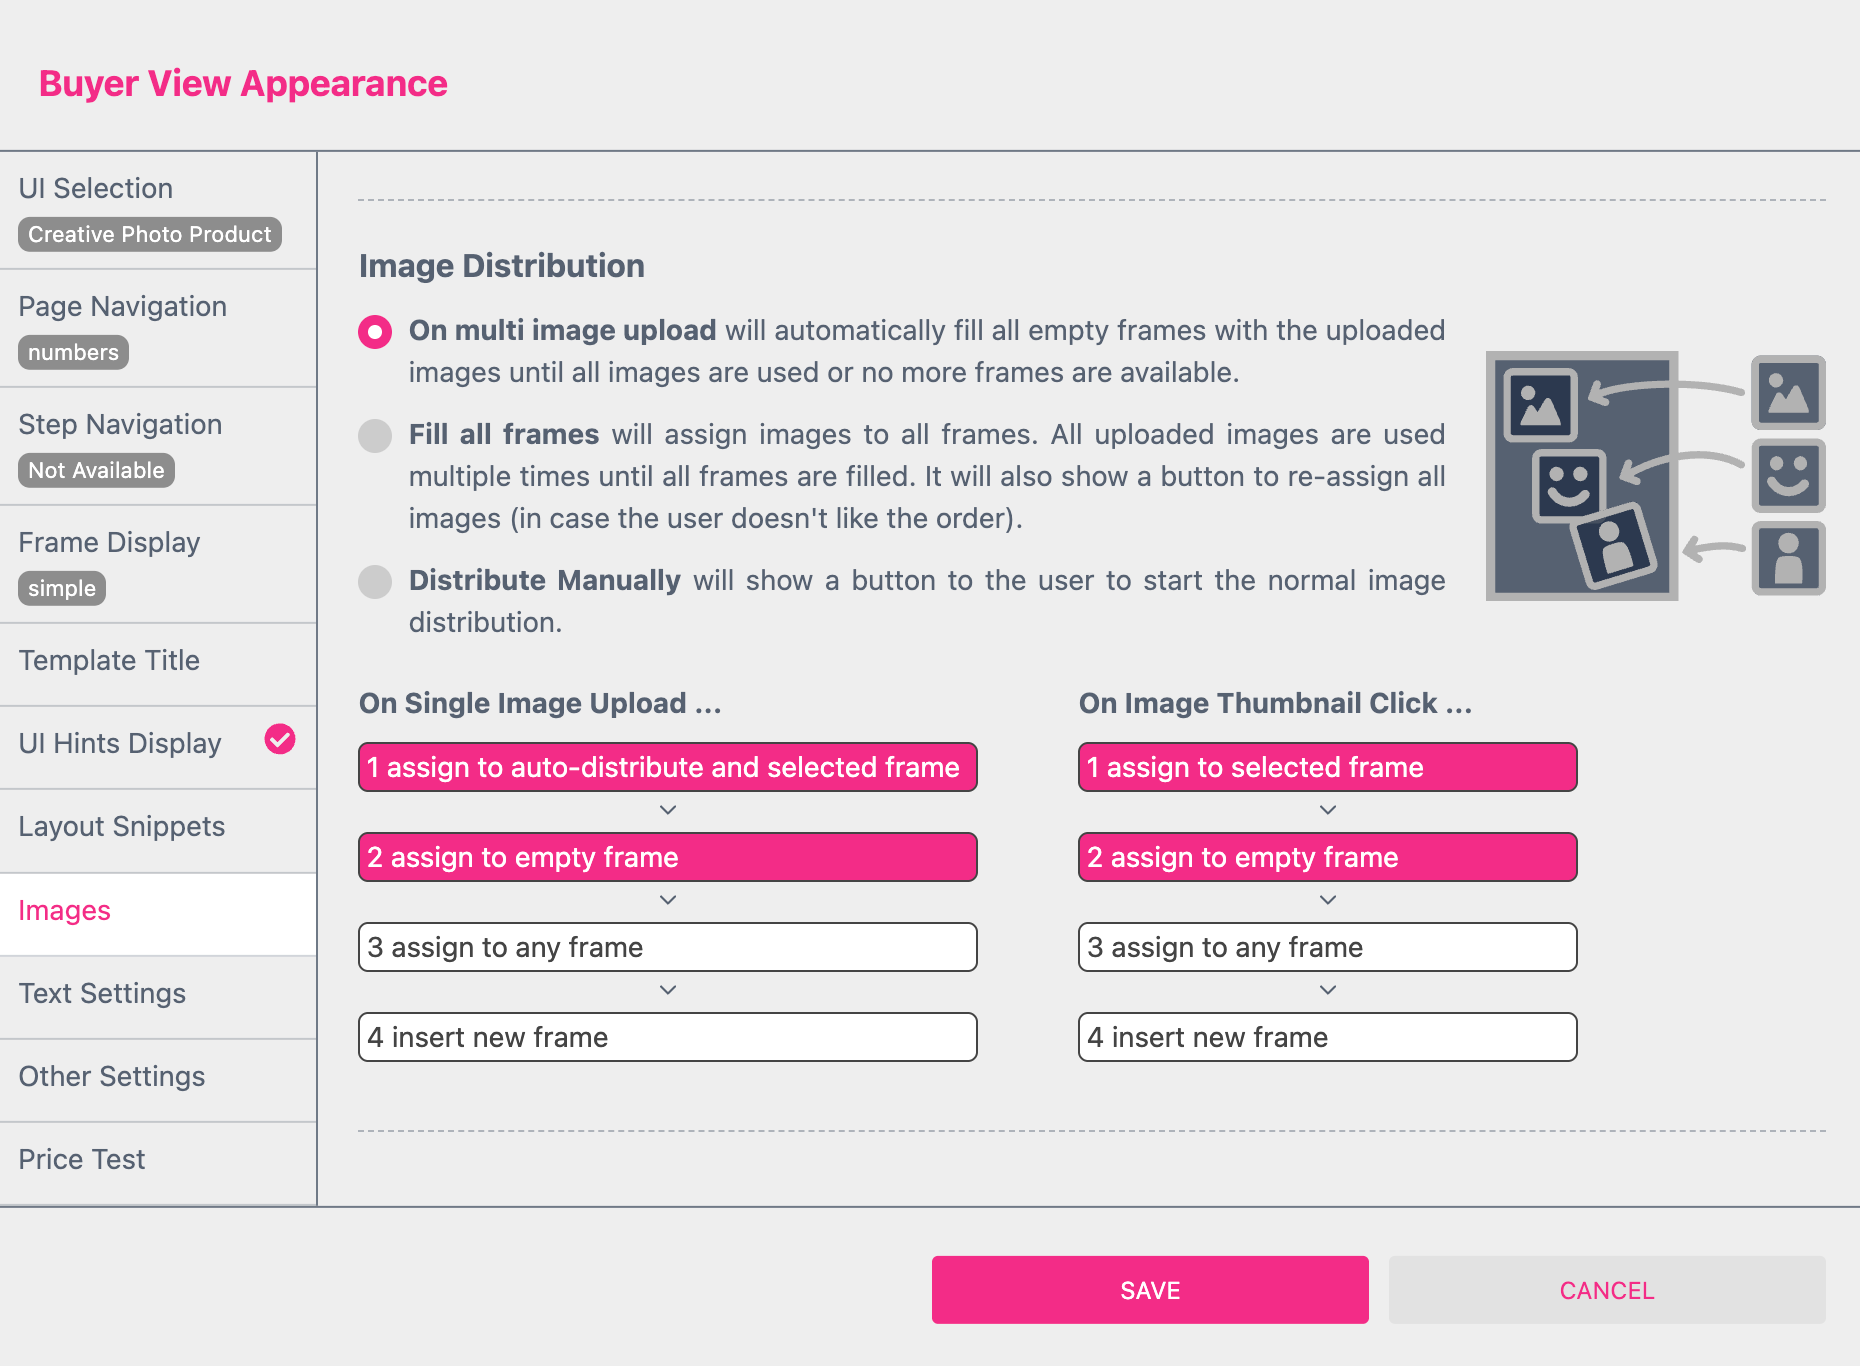
You got three different options if the Buyer is uploading multi images at once to distribute them to the image frames.
On multi image upload The default behavior is filling all empty image frames with uploaded images until either no empty frame is available or all uploaded images have been used.
Fill all frames This will fill all frames and repeat the uploaded images until no frame is empty anymore.
Distribute Manually This is similar to No 1 just that the Buyer needs to click the button Fill Frames before the distribution start.
Here you can enable multiple modes for Image Distribution when the Buyer uploads a single image. Or if the Buyer selects a single image from the thumbnails of already uploaded images. The selected modes build on each other and complement one another. For this reason no mode can be skipped. You can only enable additional functions on top of the existing ones.
assign to auto-distribute and selected frames:
This features is related to the setting you did choose above at the Multiple Image Upload settings. An image will only be placed if the Buyer selected a frame.
assign to empty frame
In addition to the feature above an image will automatically be placed if an empty image frame does exist.
assign to any frame
In addition to the features above an image will automatically be placed if a Sticker Snippet or Layout Snippet with an empty image frame does exist.
insert new frame
Automatically places an image frame if one is not already present.
assign to selected frame
An image will only be placed if the Buyer selected a frame.
assign to empty frame
In addition to the feature above an image will automatically be placed if an empty image frame does exist.
assign to any frame
In addition to the features above an image will automatically be placed if a Sticker Snippet or Layout Snippet with an empty image frame does exist.
insert new frame
Automatically places an image frame if one is not already present.
These are global settings for all image frames of your Template which do have the option “Content” activated. At the Buyer Side the corresponding buttons will appear.
Show Image Background Remove Option The button to use this option will be displayed as soon as the Buyer uploaded an image to the selected frame.
Show Image Upscale Option Using this feature, the Buyer can upscale the uploaded image. The button will only be displayed if the resolution of the image is smaller than defined in the Buyer Side Settings of your Document.
Learn more about the Document resolution here.
Show Text to Image Generation Option With the Bootstrap UI the Buyer has to upload an image first to access this feature. With the Panel UI an image frame even doesn’t has to be selected to use it. In this case Printess will automatically place an additional image frame on the page as soon as the AI image is generated. It will always use the SDXL Mode for the image generation.
You can create, save and manage AI Image Effects in the Printess Account Portal at the Tab “AI Image Effects”. If you press “(edit)” a new browser tab will open to lead you to that Tab.
Learn more about Account Settings here.
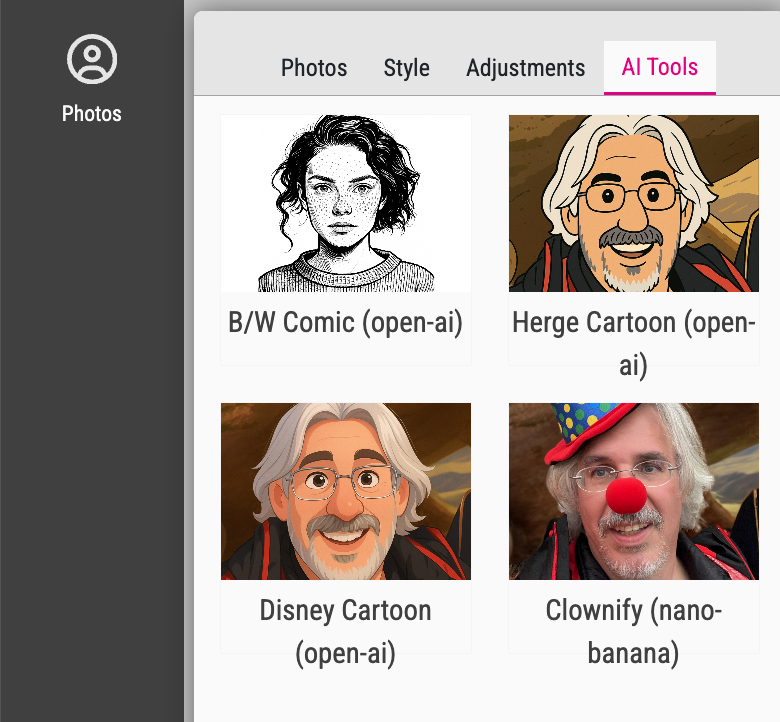
Any AI Image Effect you have saved at the Printess Account Portal will be displayed here with a check box. If you check the box of an AI Image Effect it will be displayed at the Buyer Side for any Image Frame which is set to “Content” in it’s Buyer Side Settings.
After the Buyer has uploaded an image, an additional Tab “AI Tools” will be displayed where all activated AI Image Effects are shown.
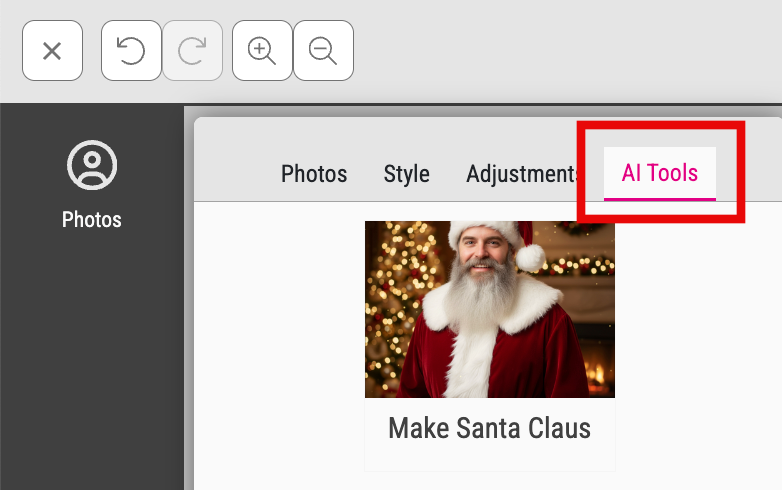
If the Buyer clicks the Thumbnail of an Effect, the AI Image Effect will be executed.
Example Effects
Click this checkbox to display the Printess example effects at the Buyer Side.
fill:
Will expand an image to fill the whole container, which may result in some cropping depending on the dimensions of your container and the image you send into it.
fit:
Will resize an image to fit within the bounds of its container with no cropping.
Only available for the Panel UI. If you turn on this feature a larger image preview will be displayed at the Buyer Side when hovering over an image.
Will display a button at the Buyer Side to enable the Buyer to switch an image from one Image Frame to another. The button is displayed underneath the Image Frame and at the Frame Bar.
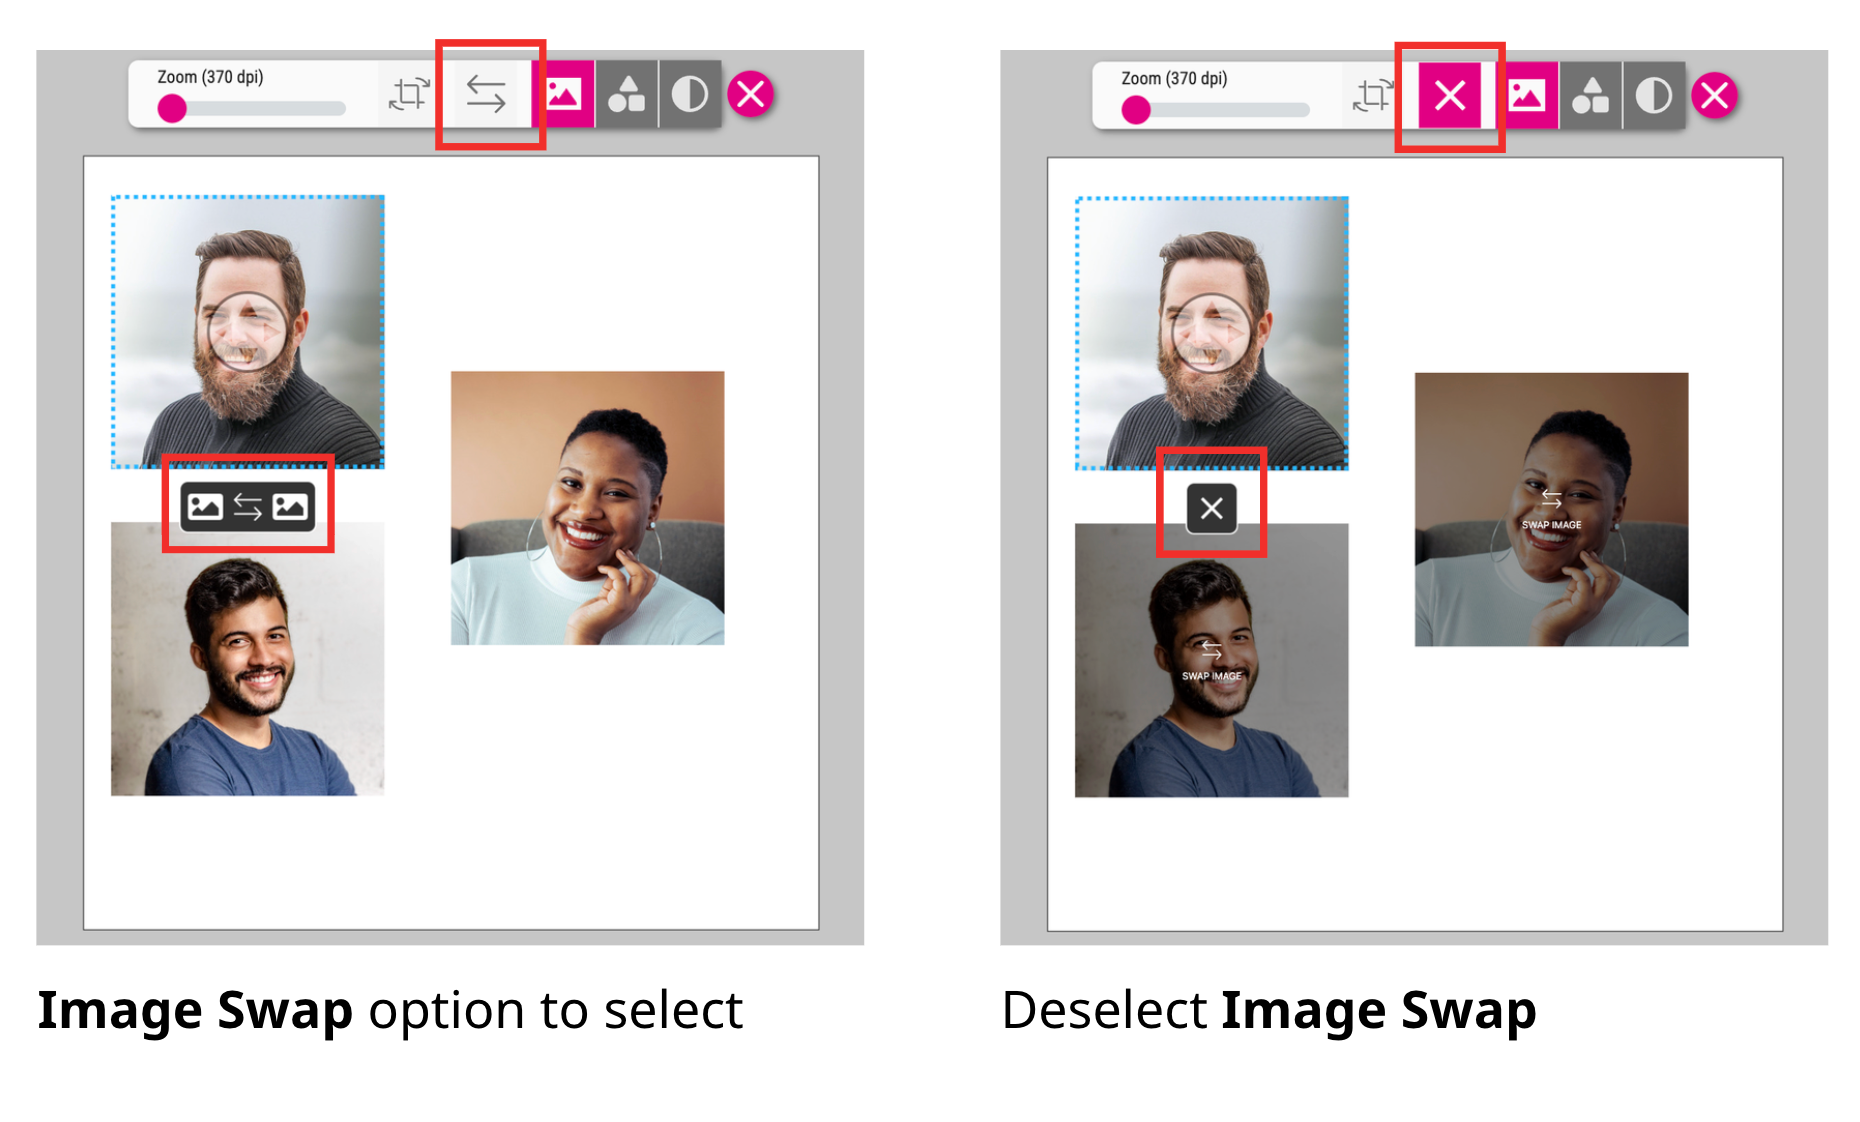
If the Image Swap is activated the Buyer can click on any other Image Frame of any page to exchange the images. To deselect this option the Buyer has to click on the cross icon.
Will display the names of the uploaded images at the Buyer Side. (Panel UI only)
Enables the Buyer to download any image which is stored in the “Buyer’s Upload” Folder.
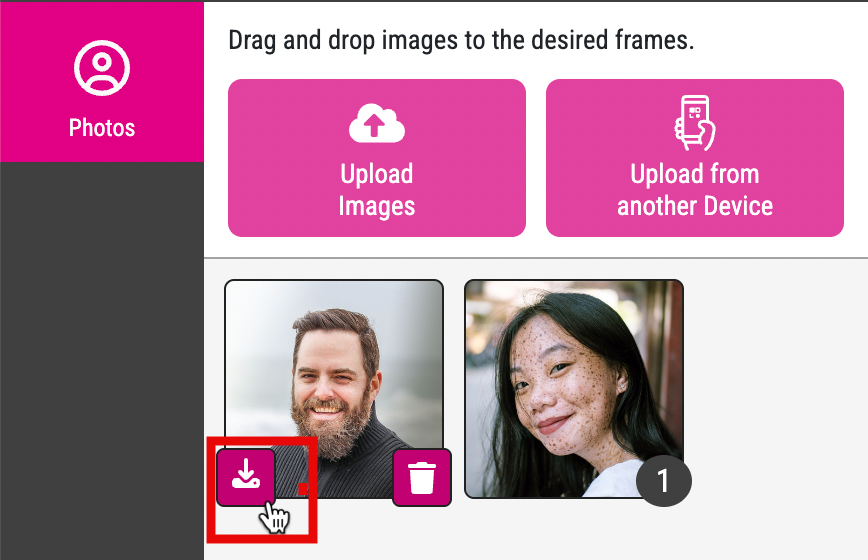
If the Buyer clicks on the download icon a new browser’s tab with the image will open to download it from there.

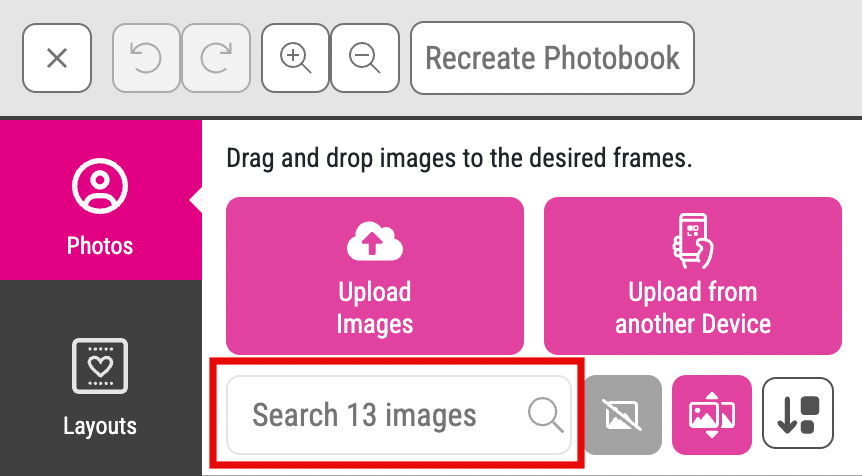
If you wish to provide a lot of selectable images across many groups, simply select this function to enable a search bar for finding image groups within the provided image library.
Enabled by default, this option allows Buyers to upload images to the Buyer Side from their mobile devices. When a Buyer selects the Upload Images from Phone option, a QR Code will be generated which they can scan and use to upload photos from their mobile device to the desktop.


It is enabled by default but allows disabling SVGs for engraving products, where the actual engraving may not appear as it does on the screen. This setting does not influence the upload of jpg, png or PDF files.
Allow ONLY Vector Image Upload (Currently only SVG)
This will restrict the Buyer Upload to SVG files only. This can be especially useful for engraving products. It automatically disables the upload of jpg, png and PDF files!
By default Printess does not allow Buyers to upload PDFs as faulty pdfs might make output files unusable. You can allow for PDF upload and to ensure error free output limit the upload to PDF/X-4 standard which grants well formed output.
The image size hint displays the exact image dimensions in pixel close to the upload button (desktop only).
By default this option is active. It enables the Buyer to check out the product even if the resolution of the uploaded image is not good enough for print. A warning will be shown but the Buyer got the option to “ignore” this warning. If you deactivate this option the “ignore” button will not be displayed at the Buyer Side so that the Buyer can not check out.
Learn how to define the minimum image resolution
By default this option is turned off. Turn it on to skip image resolution checks when the Buyer is adding a product to the basket which includes an uploaded image which does not match the minimum resolution you have defined. No low-resolution warning will appear in the basket validation overlay, and products can be ordered even if they contain low-resolution images.
Learn how to define the minimum image resolution
In Panel-UI the crop+rotate dialog will not render a new image if no rotation has been applied. Enabling this option will force the rendering even with no rotation. It give the Buyer the advantage to have two images been displayed to switch back to the original one.
This setting determines the maximum image width which may be loaded on Buyer Side. Adaptive means the Buyer Side UI will load higher resolution versions of the same image when the buyer zooms into the image, up to the maximum existing resolution. In rare situations where one must limit the maximum resolution for Buyer Side image previews, simply use this setting to select a specific maximum width.
Note: This feature is only available from the Printess Medium Plan. Additional costs will apply.
Not safe for work filtering uses AI to detect and block inappropriate or explicit images before they’re uploaded. Stricter settings filter more aggressively - for example, an image of people at the beach in swimwear might be fine on low but get filtered on strict.

This defines the available font sizes within the Buyer Side. This also controls the available sizes for the buyer side copy-fitting function.
This options forces the use of pressing [SHIFT+ENTER] to input a soft-break in multi line text editing. [ENTER] without [SHIFT] will insert a new paragraph. The default behavior is that the buyer only needs to press [ENTER] to insert a soft-break and twice [ENTER] to insert a new paragraph.
If you are using the option AI Letter Generator for one or more Multi Line Text Frames you have to select a JSON file you would like to use to drive the AI. The JSON files has to be defined at the Account Portal. If there is no JSON defined you will get the message: “No letter templates found. Please create a JSON in the Account Portal.” displayed here. If You have one or more JSON files defined you can choose them here. But each Printess Template can have only one active JSON at a time.
Learn more about the AI Letter Generation Setting
Learn more about defining a JSON for Letter Generator
By default this option is turned on. It enables AI Text editing for ALL Multi Line Text Frames at the Buyer Side - if they set to “Content”. The Buyer can define a prompt to get a text written, it supports a spell-correction, text shortening or changing the writing-style. In addition to this option you have to activate the Buyer Side option “Content” for the Multi Line Text.
You can activate the different AI Text Options which should be available for the Buyer.
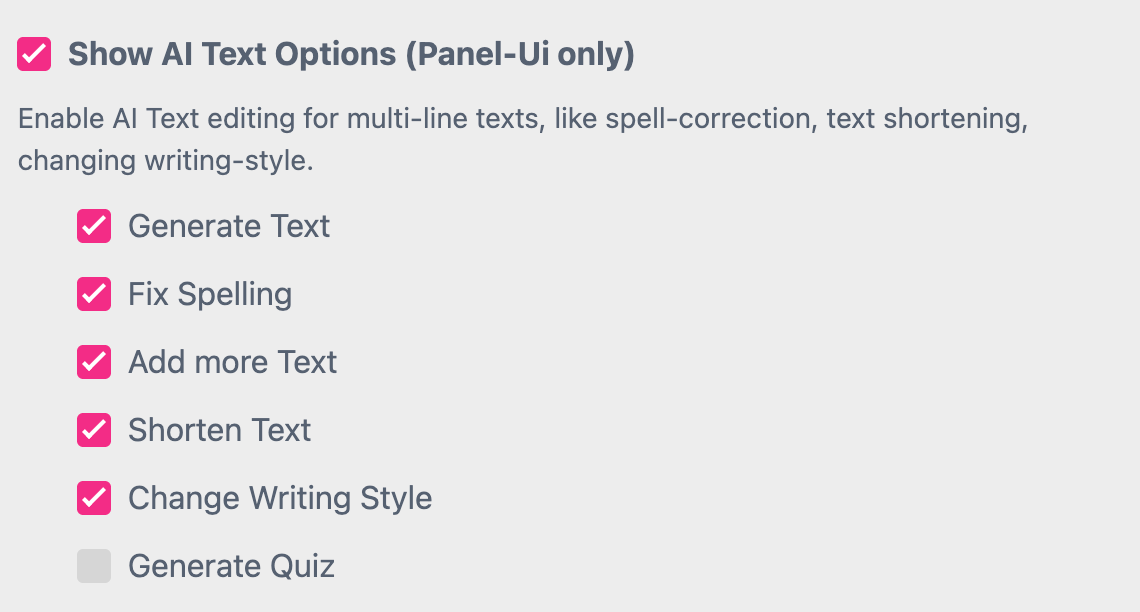
At the Buyer Side an AI icon will be displayed as soon as the Multi Line Text Frames is selected.
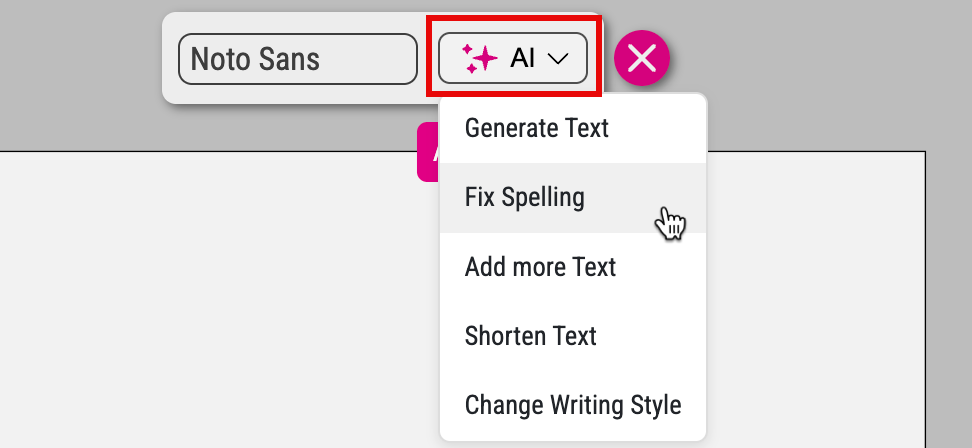
it shows all AI Text Features available in a drop down menu.
Opens a text input dialog to enable the Buyer to define a prompt. Based on that prompt a new text will be written to replace the existing one in the Multi Line Text Frames. The text output equals the language in which the prompt is written.
If you would like to pre-define the prompt for the Buyer you have to check the option AI Letter Generator for the Multi Line Text as well.
Learn more about AI Letter Generator
Executes a spell correction of the current text.
Rewrite the text to express the content in more detail.
Rewrite the text to make it more concise.
An existing text can be rewritten here in different styles - for example poetic or humorous.
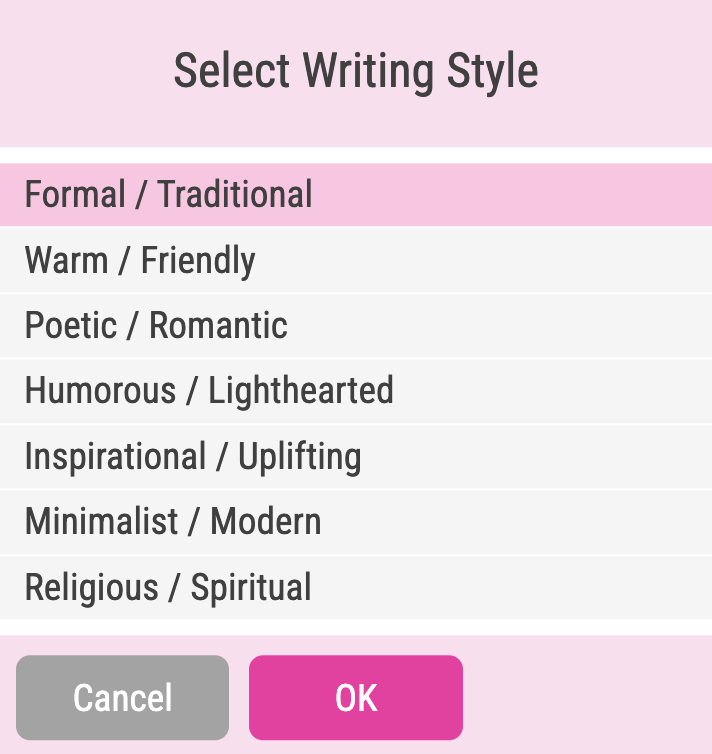
The available Text Styles are defined by a default Printess Script.
Even that this feature is NOT recommended you can enable the inline editing mode for Multi Line Text Frames on mobile view here.

This always shows a color dialog on the Buyer Side and allows buyers to use a color picker (Chrome only) or enter an RGB color value (wherever color change is allowed).

Allow CMYK Colors
Allows Buyers to enter CMYK color values in the color dialog. This is not supported for Multi Line Text. Here the Buyer can only pick CMYK colors from the named colors of the color selection.
Enables the Buyer to select a Color Scheme per Spread. Color Schemes changes will only be applied to the current selected Spread.
Warning: This feature DOES NOT SUPPORT colors assigned in Styles. If you are using color assignments in Styles you should NEVER enables this option!
Learn more about Color Schemes
This switch controls the visibility of the Undo & Redo icons in the Buyer Side. This can save precious screen space on mobile devices. Show Undo & Redo is mandatory if Expert mode is switched on.
Shows a Save button which enables Buyers to save their work at any time and return to it later.
To make this feature work you have to to add the following Callbacks into your Attach Parameters:
Displays a Save & Quit button on the Buyer Side which will let Buyers save their work and exits the page.
By default Printess displays the text “Add to Basket” at the Basket Button on the Buyer Side. As soon as you add a Preview Document to your Printess Template this text will automatically be replaced by a shopping basket icon to save space at the UI. If you don’t want this automatic change and always want the text to be displayed in the button, enable this feature here.
Displays a Load Button  at the Buyer Side. It executes a loadTemplateCallback to enable the Buyer to load a Printess Template. The complete implementation has to be done at your side.
Caution: Creating Proof PDFs involve costs! You have to enable this feature in the Shop Proof Settings.
First you have to activate this option in the Account Portal before you can use it in the Printess Template.
Read about Account Portal Proof Settings here
Shows a “Proof” button at The Buyer Side. It enables the Buyer to generate a Proof-PDF which will be displayed in a new browser tab.

At the Panel UI a separate window will open where the Buyer can choose also the option to download the Proof-PDF.
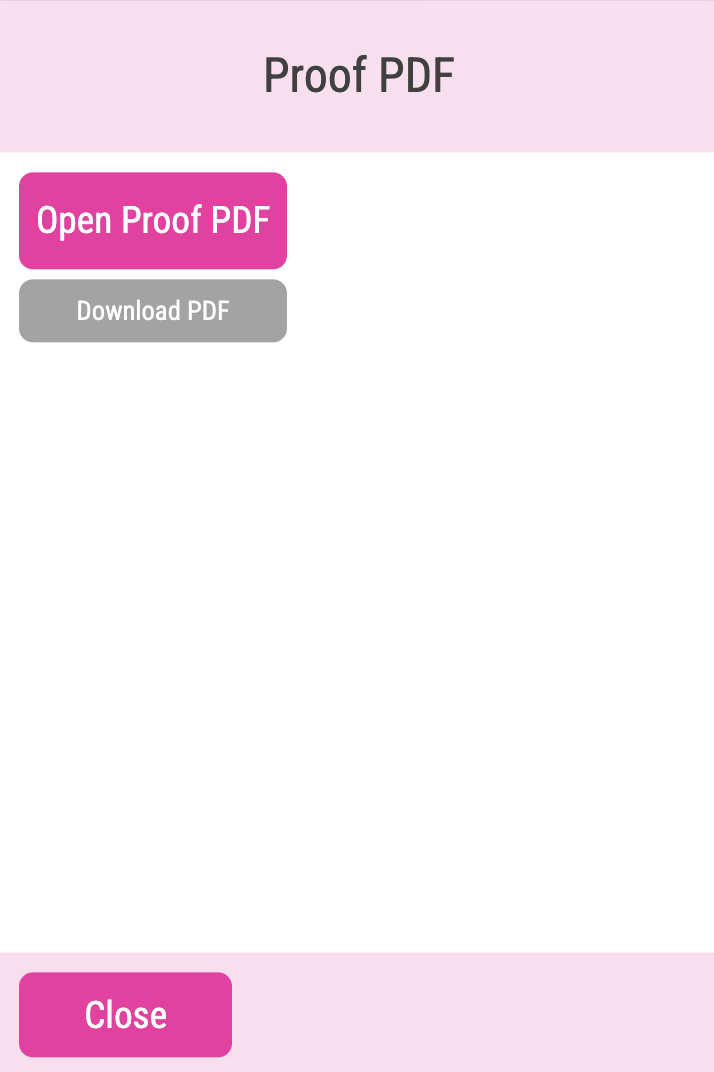
The name of the downloaded file equals the name of the Printess Document.
If you have Show Proof Button at the Buyer Side activated this function will add the bleed you defined in the Document to the PDF.
When enabled, this setting allows Buyers to cut, copy, and paste frames which have Position and Delete enabled in the Buyer Side frame settings:

Displays up-down arrows to reorder the content of the Table Form Field at the Buyer Side.
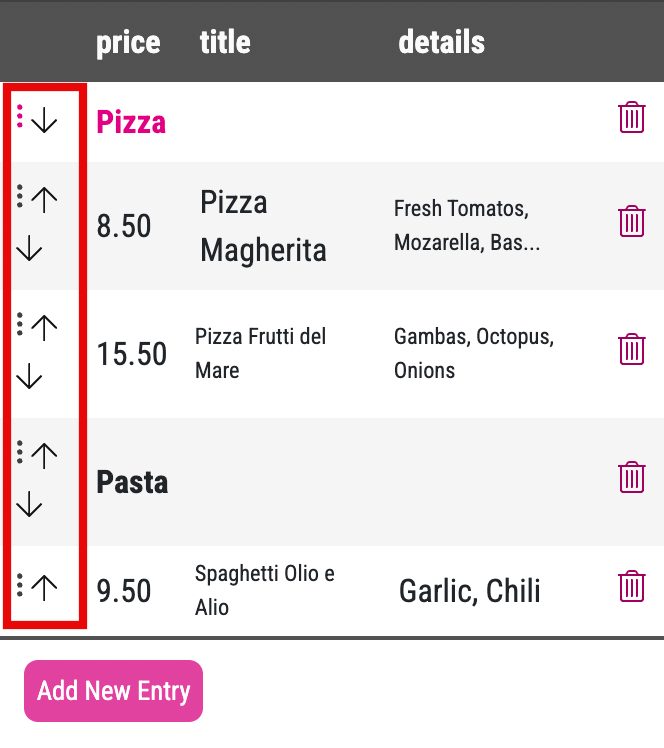
Here you can type in a Row Type. By default it is set to Group. This Row Type will then carry all non “group” items below, when it is dragged by the Buyer.

Enables the AI based Layout Wizard for B2B marketing materials. It automatically creates hundreds of Layouts including images and text content for the Buyer’s Business.
As soon as you activate this feature a message window will open:
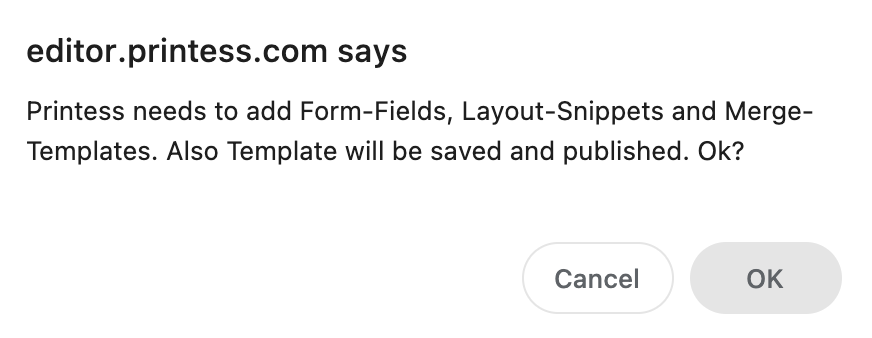
It tells you that all necessary components will be added to your Template and that the Template itself will be saved and published. These actions ensure that Printess MAKE do work as soon as you switch to the Buyer Side.
We recommend to not replace or remove the Layout Snippet Tag which is assigned here by default.
Learn how to create Printess MAKE layouts on your own
This function is important for multi-page documents where Layout Snippets are to be placed. The layout preview at the Buyer Side always shows only the first page of a layout variant — the cover page. If the Buyer selects a different layout for the first page, all pages of the document are updated with the corresponding pages of the same layout. However, if the Buyer changes the layout on page two, three, etc., only the currently selected page and the following will be updated with the new design. All other pages will still keep the previous layout as their content. To avoid this you need to enable this option!
Watch a quick video tutorial here
This is for testing only!
Testing price display would normally involve coding as prices will originate in the shop or PIM system of your business. Please note that this is only for testing within the Designer and will not display if you call the Template from within your integration (you will still need to connect your shop backend).

Please read more about price display functionality in the Buyer Side chapter.
These and other Buyer Side settings with documents scope are explained in further detail here.
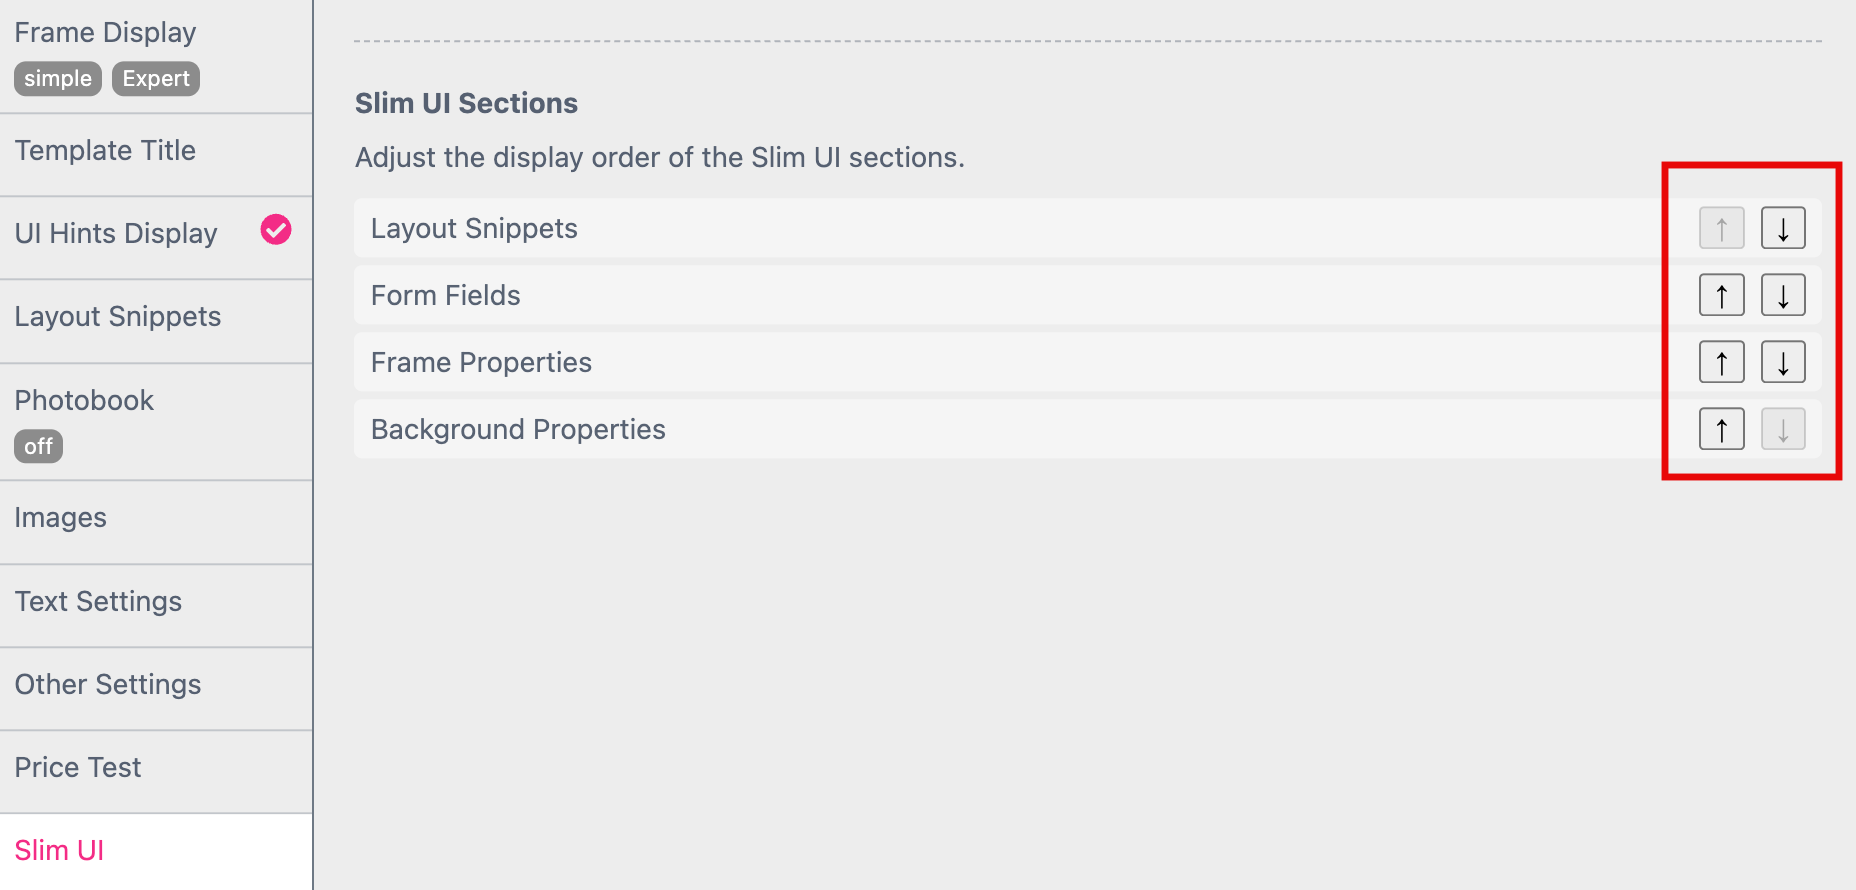
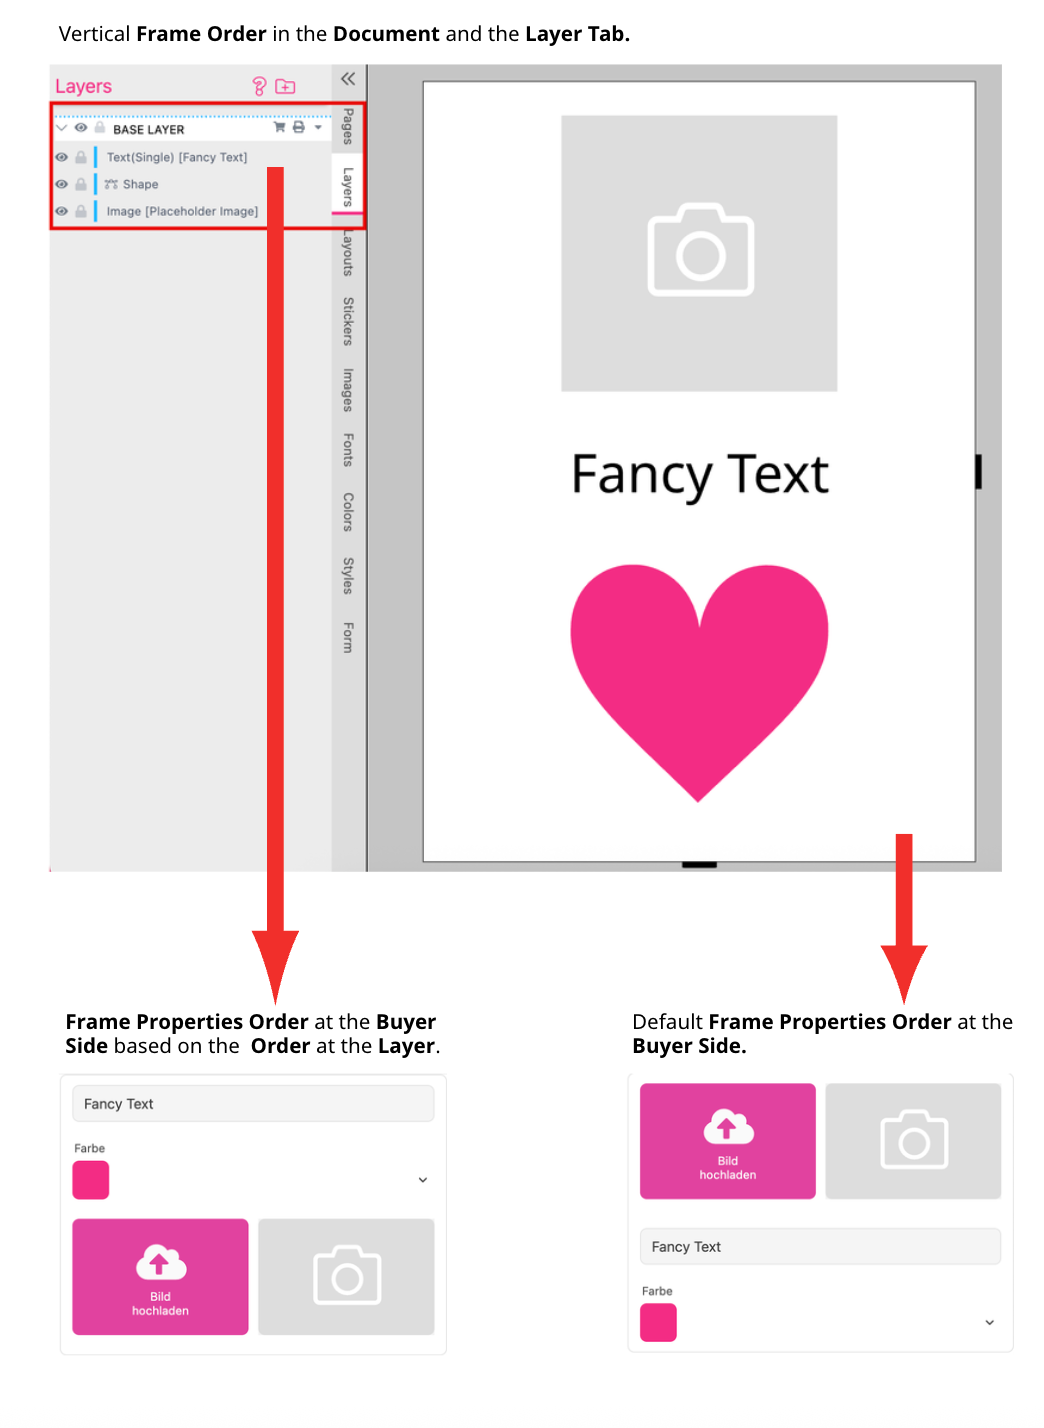
By default the Slim-Ui shows the frame properties depending on their vertical position on the page. If you like to gain full control over the display order, you can enable this option and the frame properties will appear as they are show in the Layer Tab of the Resources Panel.
You can define the display order at the Buyer Side of the four different cluster to move them up and down by clicking the arrows.