
The Printess editor can be easily embedded as an iframe to your shop or web-site:
<iframe id="printess" allow="clipboard-read; clipboard-write" src="https://editor.printess.com/printess-editor/embed.html"></iframe>
Tip: In the User menu (top right corner) you’ll find the option Embed Code. Just click on it and you’ll get a ready-made piece of HTML code for pasting the current Template onto any HTML page.
In the Printess Github Repo you can find a simple example of how to integrate the Printess Editor. It also contains the proper styling for the iframe-UI.
It’s highly recommended to display the Printess editor iframe in full-screen. Especially on mobile devices, the user experience can get a bit quirky if other elements are shown above or below the Editor. Space is extremely limited and to achieve the app-feeling scrolling of the website should not happen. When iOS expands its giant on-screen keyboard, Printess counteracts this distortion by simultaneously hiding all toolbars and page navigation buttons. When the keyboard collapses, the Printess UI will switch back to normal. This will only work if your page does not exceed the area of the iframe-UI.
If you’d like to learn how to handle this behavior on your own or want to tweak the existing code, take a look at the custom integration section below.
Once the DOM is loaded you need to pass some essential parameters like your shop token, Template name, and your session/basket ID.
iframe.contentWindow.postMessage({
    cmd: "attach", properties: {

      /* Paste your Printess shop-token here */
      token: "",

      /* Name of the template to load. You can also pass a save-token from "basket" or "back" callback here to load previously saved work. */
      templateName: "Greeting Card",

      /* Version of the template. Can be draft or published (default) depending on which version of the document should get used */
      templateVersion: "published"

      /* A unique ID to identify this session, can later be used to connect to a UserID once the user has logged in or created an account */
      basketId: "Some-Unique-Basket-Or-Session-Id",

      /* Optional if available: the ID of the current shop-user to keep all uploaded resources together and display for reccuring users */
      shopUserId: properties.shopUserId,

      /* Optional: Set a fixed language - remove the setting to use the browser language */
      translationKey: "en"

      /* Optional: A list of templates to merge on load */
      mergeTemplates: [
        {
          "templateName": "Card-Title-2",
          "documentName": "Document", // optional, source-document used for merging. If not supplied Primary or first Document is used. !!! This is the source, not the target document, you can set the target-document in the designer by enabling "Is Merge Target" in the document menu. !!!
          "spreadIndex": 0  // Example to merge a card title to the first spread on load
          "templateVersion": "published" // Can be draft or published (default) depending on which version of the document should get used
        },
        {
          "templateName": "Card-Back-2",
          "documentName": "Document", // optional, source-document used for merging. If not supplied Primary or first Document is used. !!! This is the source, not the target document, you can set the target-document in the designer by enabling "Is Merge Target" in the document menu. !!!
          "spreadIndex": 2  // Example to merge a card back to the third spread on load
          "templateVersion": "published" // Can be draft or published (default) depending on which version of the document should get used
        }
      ],

      /* Optional: Add your own translation-table. */
      translations: {
        "custom": {
          "name": "Your Name" // you can access this translation with ${gl("custom.name")}
        },
        "ui": {
          "okButton": "Perfect!"
        }
      },

      /* Optional: A list of Form Fields which will be pre-filled on load */
      formFields: [
        {
          name: "Name",
          value: "Peter Meyer"
        },
        {
          name: "Email",
          value: "peter.meyer@printess.com"
        }
      ]
    }
  }, "*");
}
token: 'YOUR TOKEN'
token should be set to a Shop-Token which points to your Printess account. You can retrieve this token once you are logged in (Printess Editor -> Account Menu -> API-Token). You’ll see 2 different tokens in the dialog. Always use the Shop-Token.
templateName: 'Sign'
templateName is required and specifies the name of the Template to load.
templateName can also take the save-token you received from the back or basket callback and load it directly.
To allow your customer to upload images and save/load their work - you need to set the basketId.
Alternatively you can set a shopUserId to make Printess store the context of the current customer (user) so when the customer uploads an image it will be stored under the shopUserId. Thus, when the customer returns later they will see all of their previously uploaded images.
Printess is highly customizable via CSS. You can either select from ready-made bootstrap(ish) themes or provide your custom CSS for the Buyer Side.
Customization must be done within the Printess Account Portal in the Themes and Logo menu entries. Here you can also change the startup logo and animation, as well as copy an embed code.
translations: {
  "custom": {
    "name": "Your Name" // you can also access this translation in documents with ${gl("custom.name")}
  }
}
Unfortunately, iOS does not let an iFrame receive visual viewport events or values so we need to forward it.
The visual viewport is needed to identify if the software keyboard is visible on iOS and to move the selected frame to the center of the screen. So if you observe any behavior where text scrolls off-screen while you edit it, it’s probably because the “viewportScroll” event has not been forwarded.
    if (window.visualViewport) {
      window.visualViewport.addEventListener("scroll", () => {
        iframe.contentWindow.postMessage({ cmd: "viewportScroll", height: window.visualViewport.height, offsetTop: window.visualViewport.offsetTop }, "*")
      })
    }
Important for Android
Unfortunately in a recent update, Chrome changed its viewport resize behaviour when expanding the on-screen-keyboard.
This prevents Printess from adjusting the view to the smaller area. It’s because Chrome just puts the on-screen-keyboard over the Printess customizer.
To counter act this behaviour:
Add interactive-widget=resizes-content to the viewport-meta-tag in the head section of your website:
<meta name="viewport" content="width=device-width, interactive-widget=resizes-content">
If your page does not have a viewport-meta-tag just insert the one above beneath the head tag.
<head>

  <meta name="viewport" content="width=device-width, interactive-widget=resizes-content">

  ... other tags ...

</head>
If you don’t have access to the html of your shop page, you can place the script below anywhere on your html-page:
try {
  (function () {
    const h = document.querySelector("head"), p = "interactive-widget=resizes-content";
    if (h) {
      let m = h.querySelector('meta[name=viewport]')
      if (!m) {
        m = document.createElement("meta");
        m.setAttribute("name", "viewport");
        m.setAttribute("content", p);
        h.appendChild(m);
      } else {
        const c = m.getAttribute("content") ?? "";
        if (c.indexOf("interactive-widget") === -1) {
          m.setAttribute("content", (c ? c + ", " + p : p));
        }
      }
    }
  })()
} catch (e) { console.error(e); }
To facilitate the shopping journey, Printess gives you two essential callbacks:
back: When a user presses the back button.
basket: When a user decides to purchase the configured product.
Both callbacks give you a save-token which can be stored in your database. This token can then be used to either print the saved configuration or load the saved work back to the Printess Editor.
Beside that, Printess also fires a callback when loaded and if the value of a price relevant form-field has changed.
window.addEventListener("message", () => {
  switch (event.data.cmd) {

    case "back":
      alert("Back to catalog. save-token:" + event.data.token);
      break;

    case "basket":
      alert("Proceed to checkout. save-token:" + event.data.token + " thumbnailUrl:" +event.data.thumbnailUrl);
      break;

    case "save":
      prompt("Save button pressed.\n\nsave-token:\n", + event.data.token);
      break;

    case "load":
      alert("Load button pressed.");
      break;

    case "formFieldChanged":
      alert("Price Relevant Form Field: [" + event.data.name + "] changed to '" + event.data.value + "'");

    case "loaded":
      alert("Printess has finished loading the editor and the template.");

  }
  }
});
This callback is fired when the user clicks on the Back button. It carries a save-token in case you want to allow your user to continue their work later. To enable this, just pass the save-token instead of the Template name.
This is fired when the user selects the Add to Basket button. It carries a save-token which you can pass to the backend API for production or pass to templateName for making changes on the saved work. The basket callback also carries a thumbnail URL for showing off the configured product in your shopping cart.
This is fired when the user clicks the Save button. It carries a save-token which you can pass to the backend API for storing. Later you can pass it as templateName for contiue working on or ordering. The Save Button is only visible if you activate it under Buyer View Appearance -> Other Settings -> Show Save Button
This is fired when the user clicks the Load button. The Load Button is only visible if you activate it under Buyer View Appearance -> Other Settings -> Show Load Button
Printess utilizes Form Fields which are created by the designer and can be changed by the buyer.
Let’s say you want to pre-populate form fields with customer data when showing off the Printess Editor? You can easily do this by just passing an array of objects when loading the Printess editor:
formFields: [
  {
    name: "Name",
    value: "Peter Meyer"
  },
  {
    name: "Email",
    value: "peter.meyer@printess.com"
  }
]
Each object needs to address a form field by its name and set its value as a string. Even if the form field type is a number or object, you still need to pass the value as a string. The above example could be used to pre-populate a business card template.
Tip: You can test your Form Fields by adding: “&ff_FormFieldName=FormFieldValue” to your Test URL. Define a Form Field Name and a Value to test it at the Buyer Side.
A third callback is formFieldChanged which is helpful when a user changes a certain configuration that has been marked as price relevant. Depending on the resulting value, you can adjust the price of the product accordingly.
These form fields can contain price relevant information such as material or color. The Retro Sign example Template demonstrates a couple of these form fields. Material, Size (and if a solid material is selected - Drill Holes and Varnish). All 4 form fields are possibly price relevant, so the eCommerce app must know if any of these values are changed.
Printess will automatically show the Buyer Side UI in the current user’s browser language. Translations are managed/modified in the account portal. Read more about translations and Buyer Side language here.
If a specific language is desired (e.g. if a buyer should be able to set his preferred language, (regardless of local browser language) one can use the translationKey with a language key (window.navigator.language). Specific language keys like en-US will fall back to en in case no specific language is defined in the account portal. The default value is auto which lets the browser language determine the Editor language.
translationKey: "en"
Normally Translations should be managed/modified in the account portal and not via Custom Translations.
Read more about translations and Buyer Side language here. .
For debugging or if you’d like to change a certain value across all languages, you can provide a custom translation table to the attachPrintess call. Available keys can be found in the translation.json on the Printess Github Repo.
You can modify the values to the given keys to your needs by adding them to your translation table. If no custom translation for a specific key is found, Printess will fall back to the default translation.
The IFrame integration still gives you access to API methods. You can call any method of our API by its name. You’ll find a complete reference here: JS-API Reference
And this is how a sample call to change a form-field value would look like:
iframe.contentWindow.postMessage({
    cmd: "setFormFieldValue",
    parameters: ["name","Peter"]
}, "*");
If you expect a result from a method-call you can listen for a message with the method-name.
For example hasSelection will return a boolean.
iframe.contentWindow.postMessage({
    cmd: "hasSelection"
}, "*");
window.addEventListener("message", () => {
  switch (event.data.cmd) {
    case "hasSelection":
      if (event.data.result === true) {
        alert("Printess has a current selection!" );
      }
  }
});
When not using the builtin Design + Base Template you can also merge templates manually in code. This allows for a little bit more flexibility when building individual merge strategies.
As an example for this have a look at a proposed greeting cards workflow.
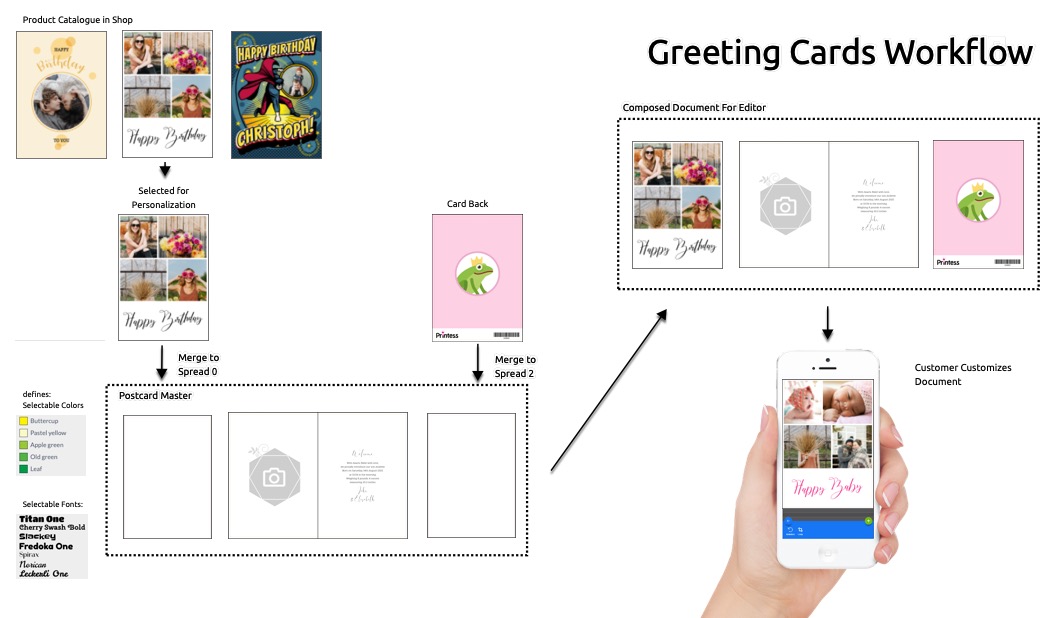
In this example the final document to edit for the buyer is created by taking the Greeting Cards Master Document and merging the buyer selected artwork template on Spread 0 and the cards back template to Spread 2.
The Greeting Cards Master template will not only define the inside pages (which could have been merged as well) but also defines the available buyer colors, buyer fonts, form fields, styles, the final bleed, the pasteboard, usable Snippets, and the basic Buyer Side behaviors like Multi Line text edit mode. This helps to keep your products maintainable. If e.g. an additional font should get added to all products one would only need to edit the master document and not all product artworks.
templateName: "card",
mergeTemplates: [{
  "templateName": "motive1",
  "documentName": "Document", // optional, source-document used for merging. If not supplied Primary or first Document is used. !!! This is the source, not the target document, you can set the target-document in the designer by enabling "Is Merge Target" in the document menu. !!!
  "templateVersion": "published" // Can be draft or published (default) depending on which version of the document should get used
  // spreadIndex: 0; // optional
  // mergeMode: "merge" // other options: "layout-snippet-no-repeat" | "layout-snippet-repeat-all" | "layout-snippet-repeat-inside"
}];
A commonly used approach is to have a Master Template with the final dimensions, general Buyer Side settings, and all available colors and fonts. And then having multiple Artwork Templates which the customer can select directly from the shop catalog.
Example: Let’s say the Master Template is named “Card” and the selected motive is named “Motive1”. When you show the Printess Editor you can now load “Card” via the
templateNameproperty and merge in the document Document from the “Motive1” Artwork Template via themergeTemplatesproperty.
WithspreadIndexyou can define the spread number (zero-based) that the merged Template is placed on.
mergeMode By default merge mode for mergeTemplates is set to “merge” what simply merges the content of the merged doc(s) into the Master template. If set to one of the layout snippet modes the content merge will happen as if the pages of the doc had been used as Layout Snippets. This allows for merges which later on will disappear when the buyer selects a different layout.
Merging can also merge multiple documents from one template. Please note that this requires to enable the Is Merge Target property for additional documents and to not! set documentName while merging.
Additional Note: Keep in mind that on a facing-page document each pair of pages counts only as a single spread.
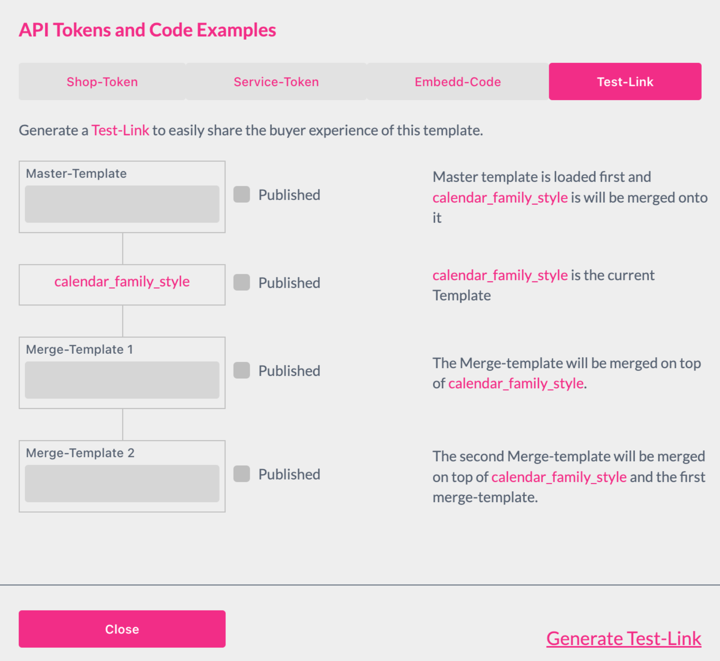
Printess also has a convenient way to test your merge workflows via the Generate Test Link Menu. Just add a Master Template and optional additional merge documents and generate yourself a Test-Link. For each document you additionally have the choice to use the Published version or the actual save state.
Merging of templates can also be tested for up to three merge templates directly in the editor by supplying the parameters in a URL (the API does not limit the amount of merge templates). To let this work the browser needs to be logged into the editor and the account the templates to be merged are in.
An example merged URL looks like this: https://editor.printess.com/printess-editor/buyer-test.html?name=card_Master&merge1=card_RoundPhoto&version=draft
These are the Parameters:
The Editor will open the master template and merge the additional merge templates creating a new merge document which can be tested.
Notice this URL method is for testing purpose only (during design phase) - in the real shop workflow this is done by the merge Templates parameter when starting the buyer side editor (see below). Learn more about merging templates in the embedding the editor chapter.
Merge Documents also allows for merging image, color and font lists into your buyer side documents right before editing. Making it super easy to control the available resources centrally without touching thousands of templates. Read more on how to control what resources get merged from a source document here.
You now know everything you need to get started with the Printess Editor. Have fun and please let us know what you like or where we can improve!