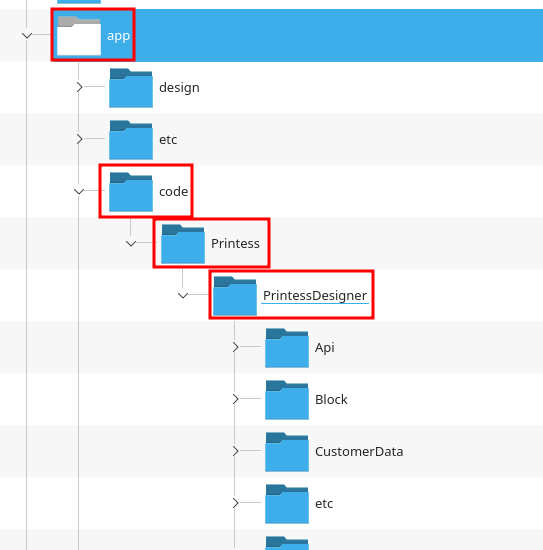
The Printess Magento Plugin is not available via the Magento Plugin store. In order to use the Plugin, you have to have access to your Magento’s server file system and have the proper rights to execute file system and Magento commands as the user that owns your Magento file system entries.
The Printess Magento Plugin might work with older 2.x Versions but will only get tested & maintained with the actual version (currently Magento Version 2.4.6.)
Each of the follwing steps needs to be executed with the file system user of your magento installation Make sure that your Magento installation directory has the app/code sub directory. In case no plugin has been installed manually before, the code sub folder might not exist and needs to be created inside the app folder. Download the Printess.20.zip file and extract its contents to the Magento app/code directory by keeping its internal directory structure. You should now have a directory structure like this {MAGENTO_INSTALLATION_DIRECTORY}/app/code/Printess/PrintessDesigner

Open a terminal / console and switch to the Magento installation directory.
Execute php bin/magento setup:upgrade to register the plugin. This will also ensure that all necessary database changes and configurations are executed.
The command will print out all the installed plugins after sucessfully finished. This list should contaien the Printess_PrintessDesigner entry:
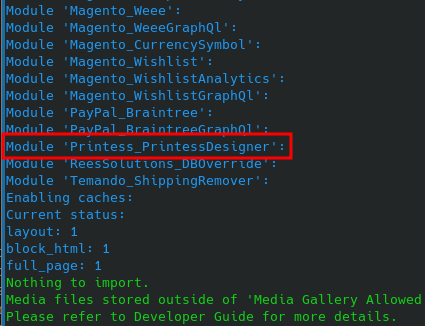
Now, all the Data- Interfaces that are required for the magento communication need to be compiled. This is done by executing php bin/magento setup:di:compile. This step might take a while.
After a successful compilation the result screen should look like this:

Now, we need to ensure that all the static content files of the plugin (.css and .js files) are deployed to the correct (current) version of your themes assets folders.
this is done by executing php bin/magento setup:static-content:deploy -f
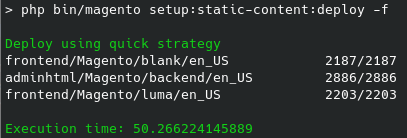
The installation of the plugin is now finished.
To verify the status of your plugin, execute php bin/magento module:status Printess_PrintessDesigner.

In case the status is not enabled, it can be enabled by executing php bin/magento module:enable Printess_PrintessDesigner --clear-static-content.
The last thing left to do is clearing the cache to ensure that the additional Printess content files are loaded on product page load in the store frontend.
This is done by executing the follwoing to commands: php bin/magento cache:clean and php bin/magento cache:flush.
After the plugin was installed successfully, you will find its configuration settings inside your stores configuration.
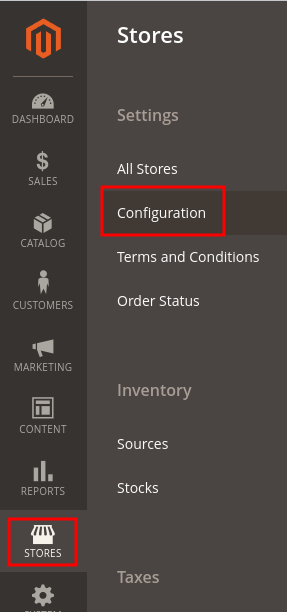
Inside the store configuration you will find the Printess section:
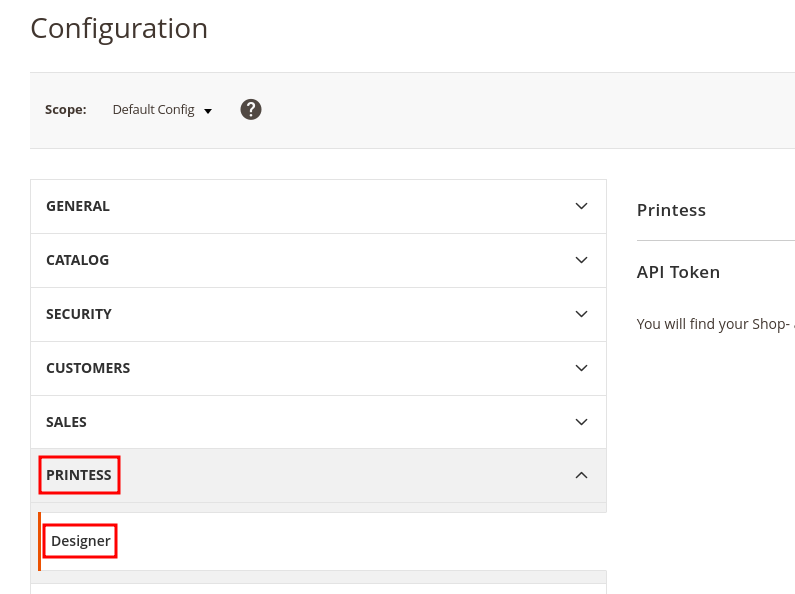
To get the plugin running, you only need to provide your printess accounts Store- and Service- Tokens.
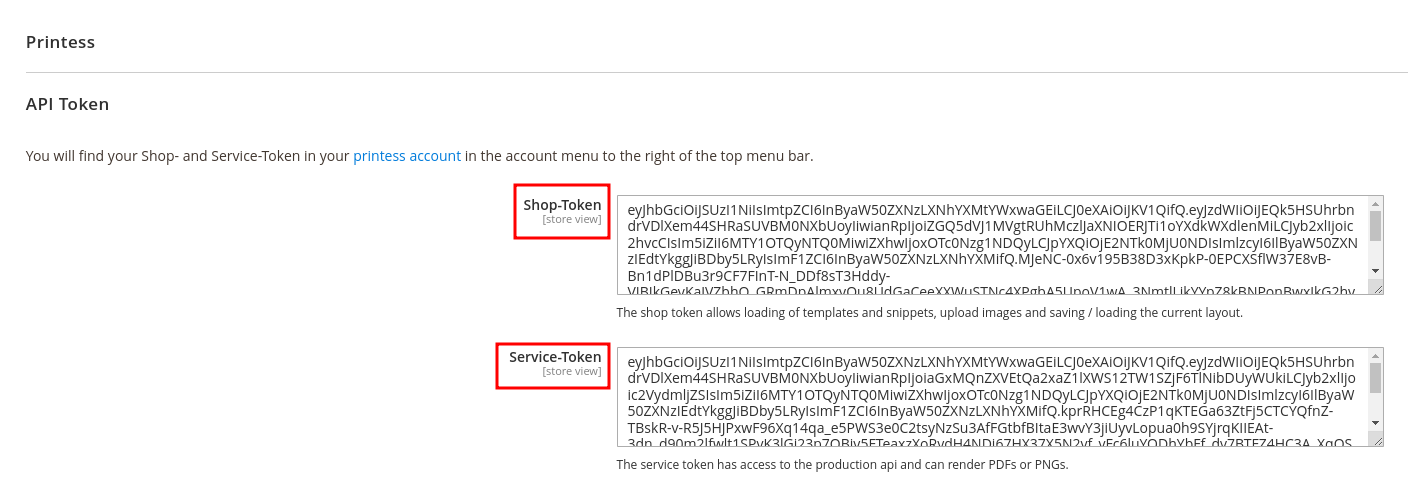
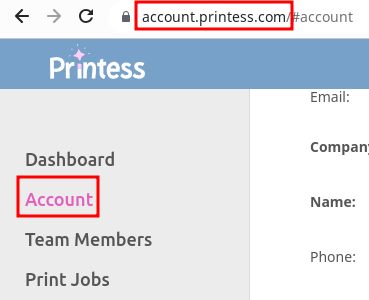
You can find these tokens either inside the printess account portal on the bottom of the Account section:

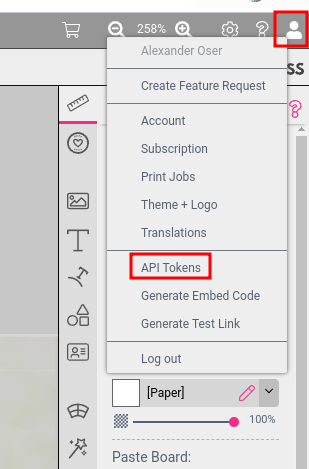
They can also be found in the account menu on the top right side of the Printess Editor after opening a template:
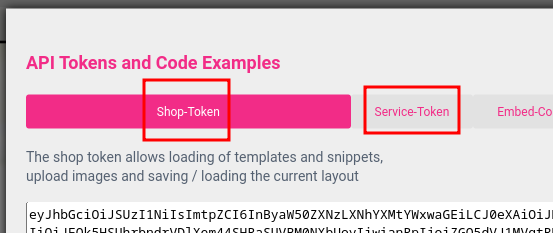
Thats it. Thats all to get the plugin running. The other options described below are optional.
Below the Shop tokens, you can find 2 additional settings.
By default, the Plugin produces a PDF file with an output resolution of 300 DPI. You can change this behavior on product level. It is also possible to specify different fallback settings on Plugin level for products without specific configurations. These can be specified inside the Output configuration of the Plugin.

Format: The output file format. Supported values are: pdf, png,jpg,tif. In case no value is provided, PDF file format is used by default. DPI: The output file resolution. If no value is provided, 300 DPI is used as default. Optimize Images: Select yes to optimize otuput files.
To configure a product that can be used with the printess integration, either open an existing “Simple Product”
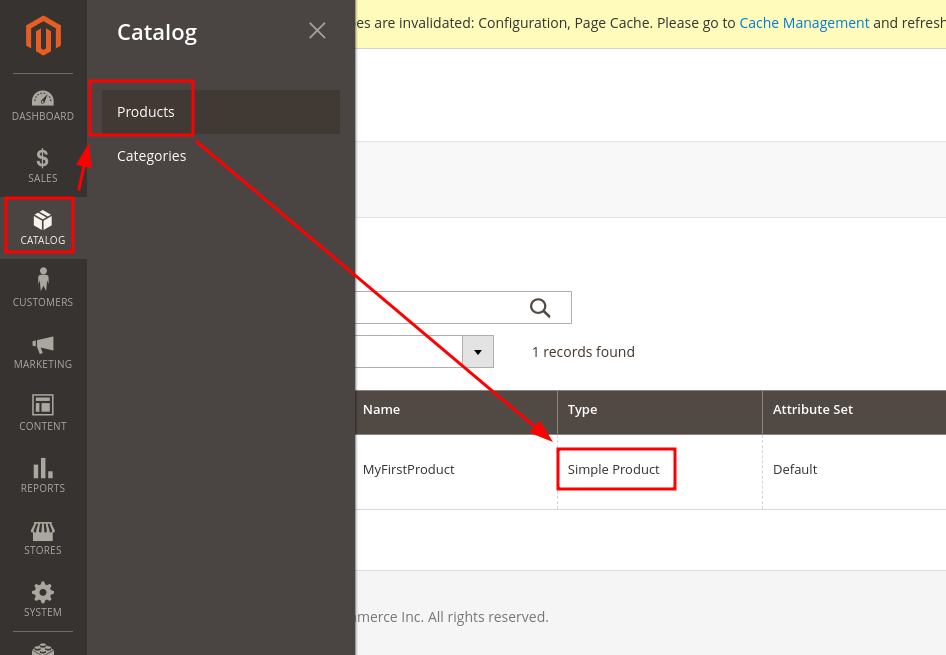
Or create a new “Simple Product”

Scroll down to the bottom of the product configuration where you can find the Printess settings block.
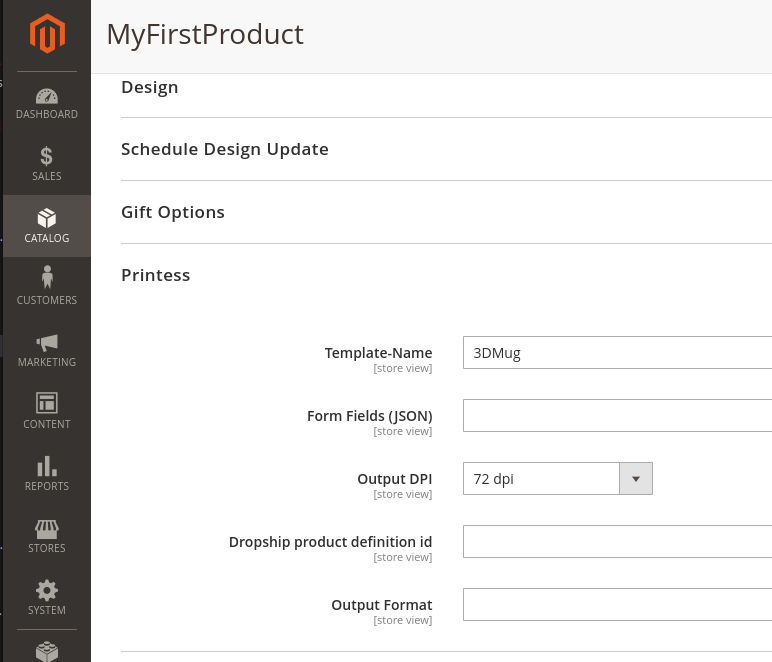
For a quick start, the only mandatory field is the “Template- Name” field. Enter the name of an existing Template inside your Printess account. Make sure that the template, that you would like to use is published.
After you added a template name and saved your product changes, open the product on your Magento store front (buyer side). The Add to Cart button should now be replaced with the Design Now button.
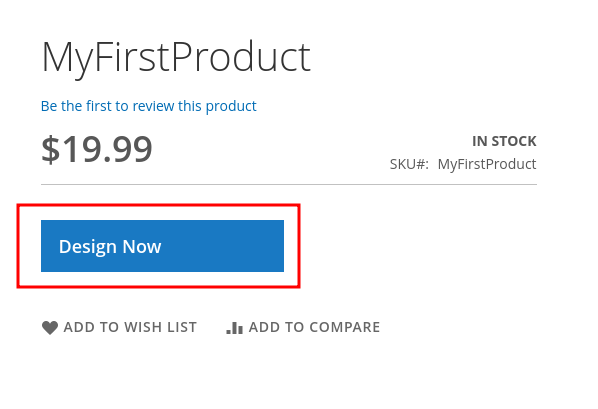
After clicking the Design Now button, instead of putting the product directly inside your cart, the Printess Editor should open. The product will be added to the shopping cart after modifying the design and clicking on the Printess **Add to Cart" button.


By specifying the Output DPI and the Output Format you can specify the print resolution and the file format on product level instead of plugin level as described earlier.
The Printess dropship integration can be configured by providing the Dropship product definition id. This is the id of your dropship product definition inside the dropshipper configuration at the Printess “Account- Portal”.
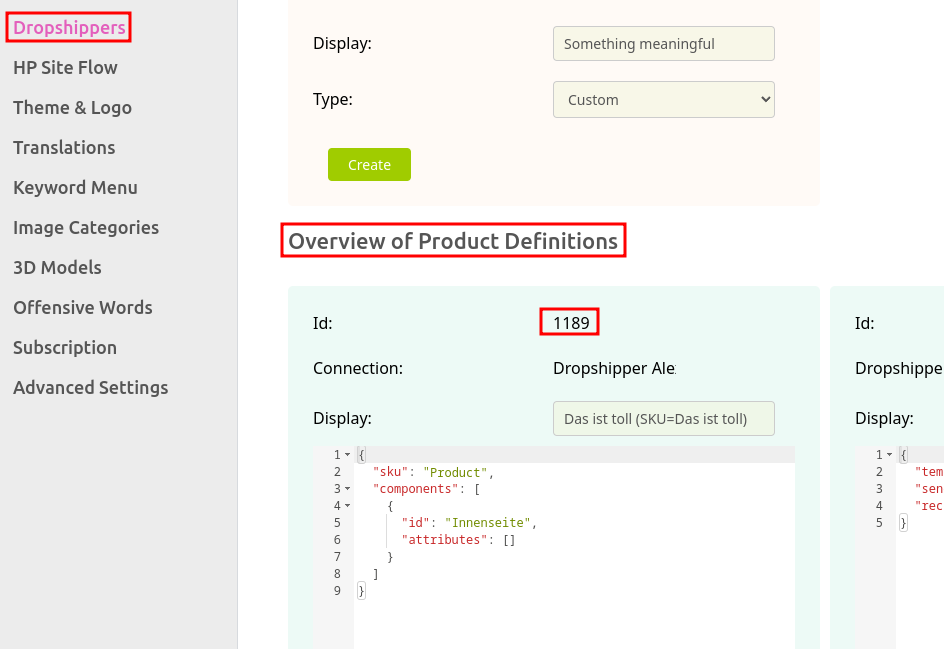
Dropshipping is disabled by keeping the “Dropship product definition id” empty or providing -1 as value. To use the dropship configuration that is specified inside the Printess template, set “Dropship product definition id” to 0.
The Form Fields (JSON) setting is used for mapping product variants to specific form field configurations of a specific template. This is used to support different prices for different form field configurations. See Product Variants for more details.
Upsale options or design changes can be implemented by a combination of Magento product configurationms (product variants) and Printess form fields. This is realized by specifying one or more product configuration(s) for a product (which creates additional virtual products on Magento side) and by adding form field mappings to each of these products. Each product variant that is created through your product configuration, will get a configuration that specifies all the form fields that are affected by this variant and the form field value that should be used. This is done by providing a JSON formatted text to the Form Fields (JSON) option of the Printess plugin that is attached to each product.
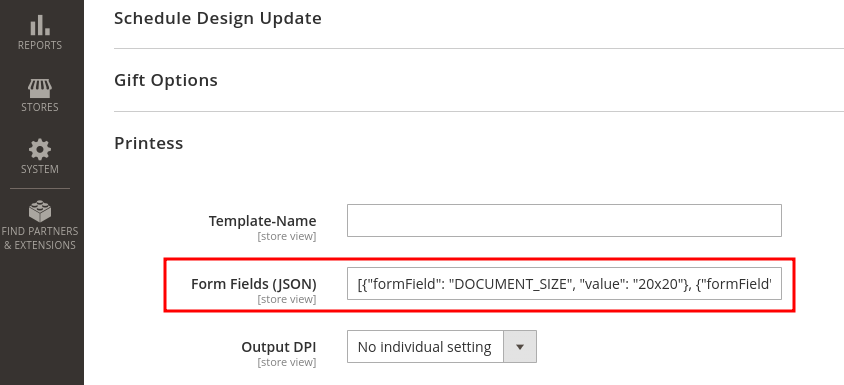
The value for this configuration is a list of form field name and value pairs. In JSON notation, a list (or array) is specified by enclosing square brackets (AE: brackets) [ ]. This list contains one or more objects representing one form field each. In JSON, an object is enclosed in braces (AE: braces) { }. Each of these objects contains 2 properties: formField for the name of the Printess template form field and value for the form field value. In JSON a property has a name enclosed in double quotes e.g. “formField”. Followed by a colon : to seperate the property name from the value and the value which is enclosed in double quotes as well: “DOCUMENT_SIZE”. In case the property name or the value contain a single or double quote or an apostrophe, these quotes need to be escaped by adding a back slash in front of the single or double quote: ', ", \´. Different properties inside one object are seperated by a comma , in JSON. One object that specifies a form field and its value in JSON notation: {“formField”:“DOCUMENT_SIZE”,“value”:“20x30”} In case more than one form field (JSON objects) needs to be added, list (array) values are seperated by using a colon , The complete mapping for 3 form fields with their respective value looks like this then (3 Formfields DOCUMENT_SIZE, Material, Border and their values 20x20, alu, color): [{“formField”: “DOCUMENT_SIZE”, “value”: “20x20”}, {“formField”: “Material”, “value”: “alu”}, {“formField”: “Border”, “value”: “color”}]
It is important that the form field names and the form field values matches exactly the form field names inside the printess template (including correct casing)
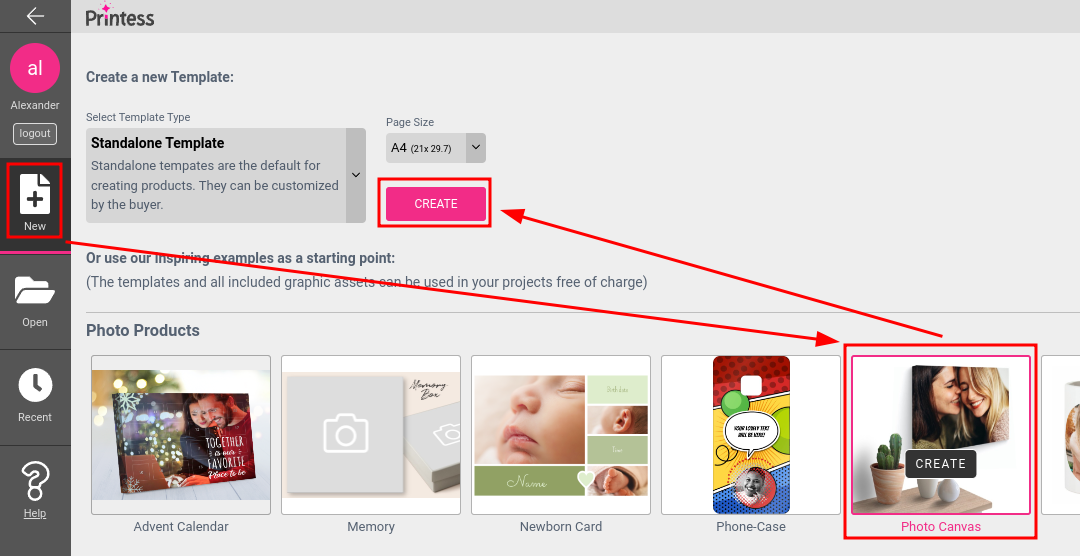
The following example demonstrates the use of our Photo Canvas example in combination with variants. Create a new Printess template and use the Photo Canvas as base:
Open the form field configuration tab:
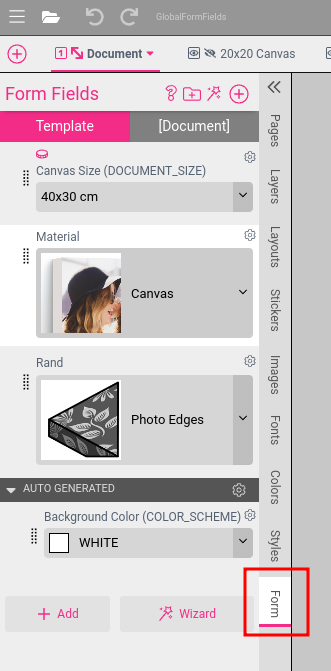
There you can find 3 form fields that we will use to configure the size of the canvas, the canvas material and the frame design:
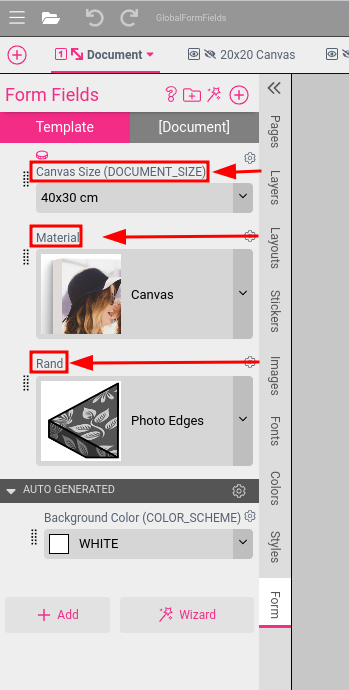
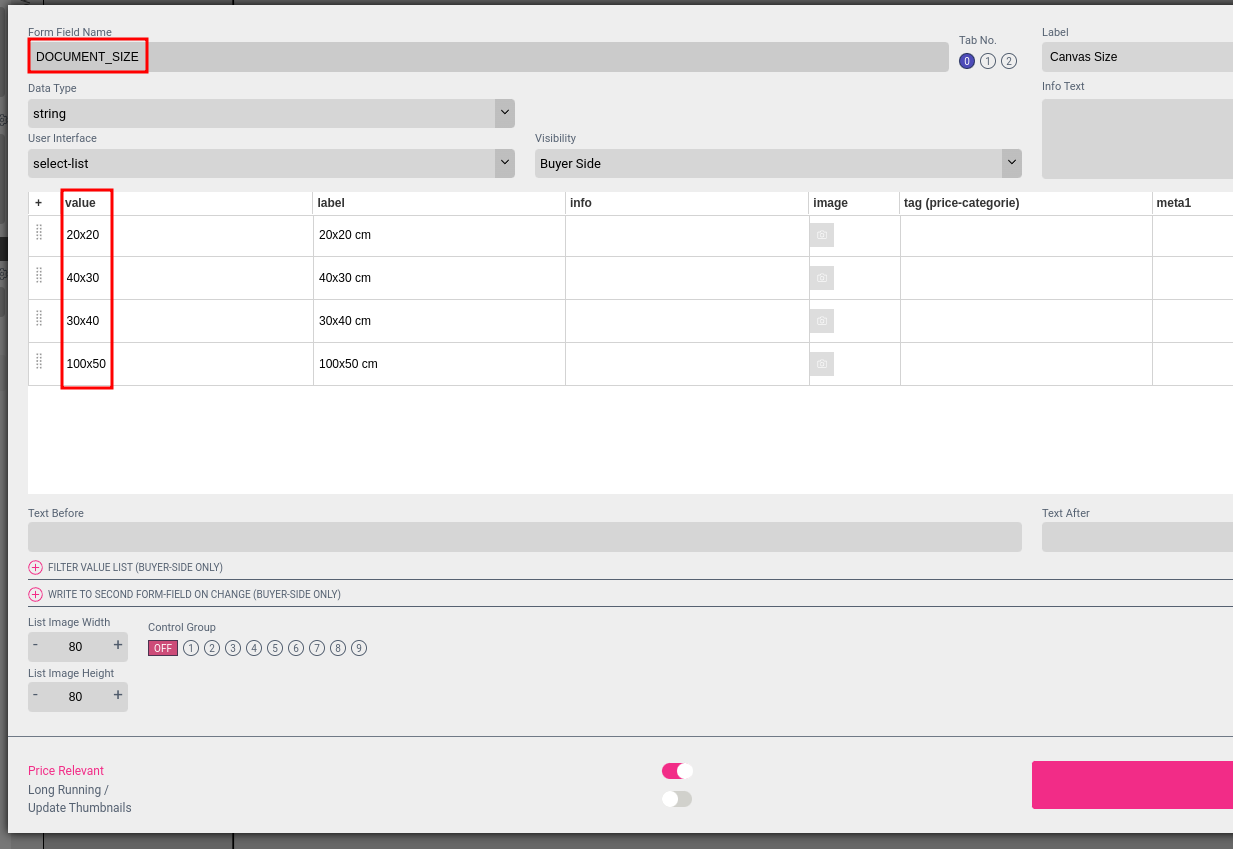
Open the configuration for all of these 3 form fields and copy the name as well as the values for each of these form fields to a text editor.
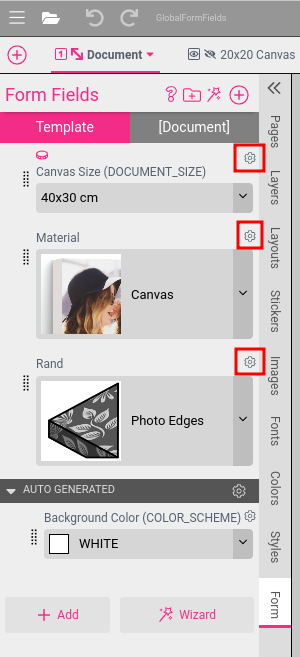
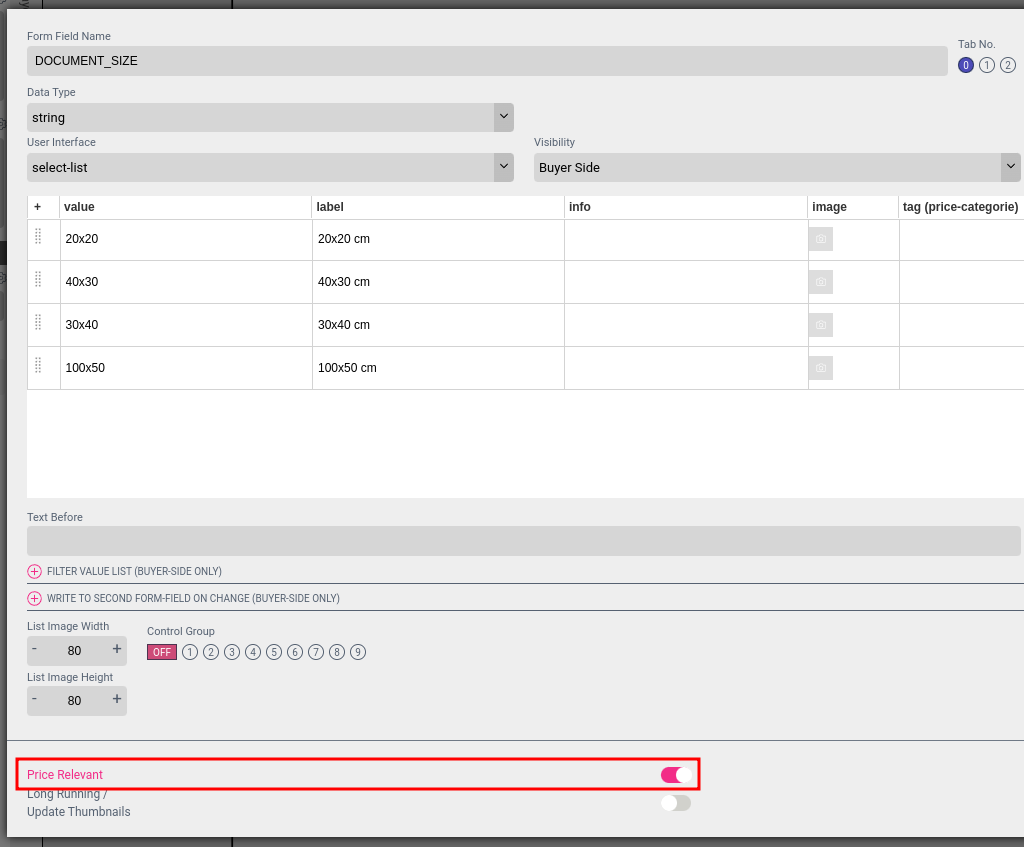
In case the resulting variants are having different prices, make sure that the Price Relevant option is activated for all the form fields that are responsible for triggering different prices.
This leads to the following list of form field names and values:
DOCUMENT_SIZE
20x20
40x30
30x40
100x50
Material
canvas
alu
glass
Rand
mirror
color
The last thing to do inside the Printess Editor, is saving the changes and publishing the template.
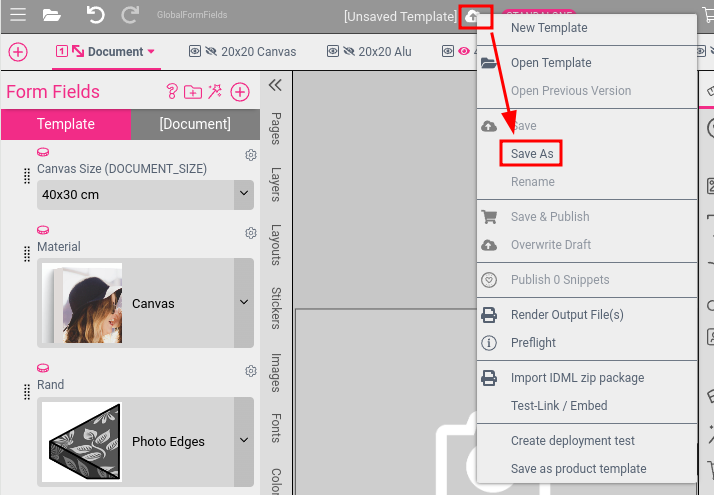
Provide a name for the template and copy it to the text editor where the form fields & values are noted down.
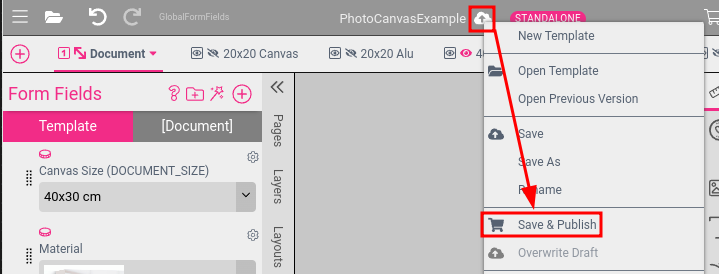
Finally publish the template:
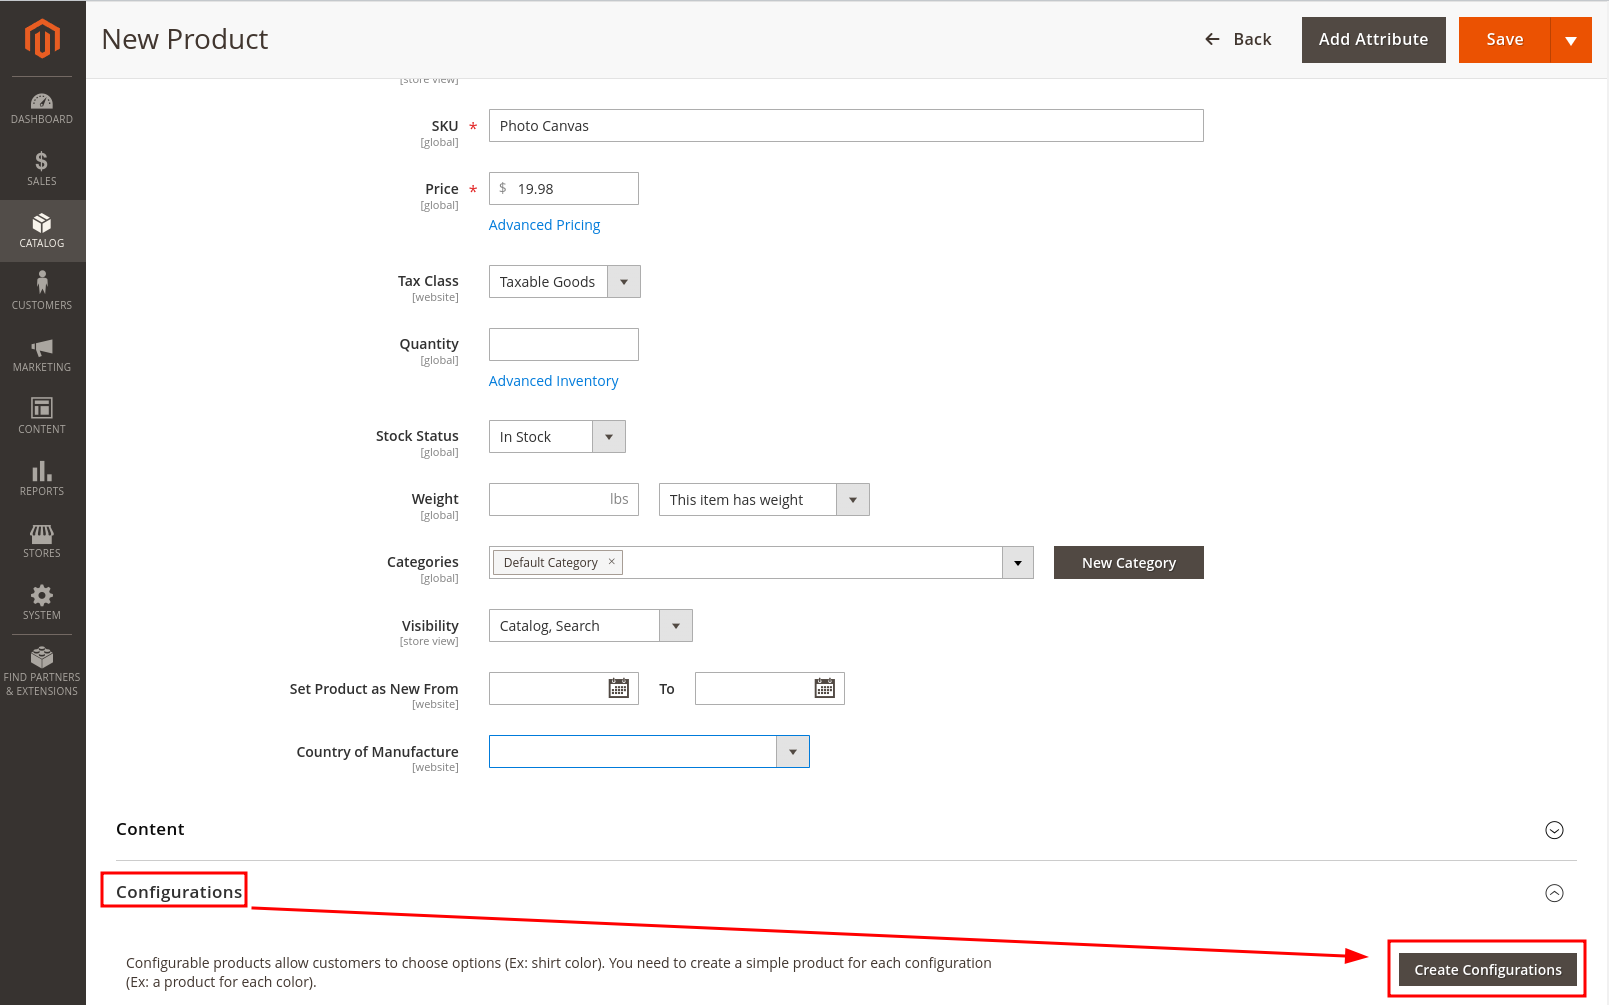
A new product needs to be created on Magento now. Give it any name and click on Configurations/Create Configuration
Create a new attribute for each of the form fields inside the printess template.
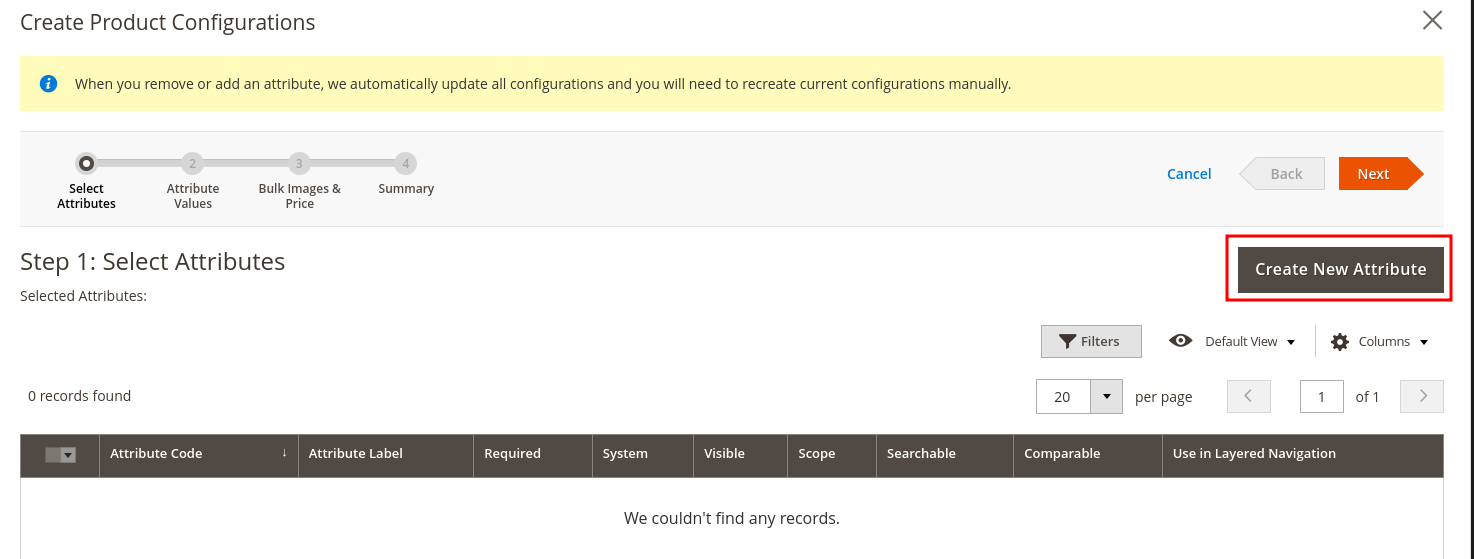
The name of the attributes and the display values do not matter. The connection to the printess form fields is done later by using the form field mappings.
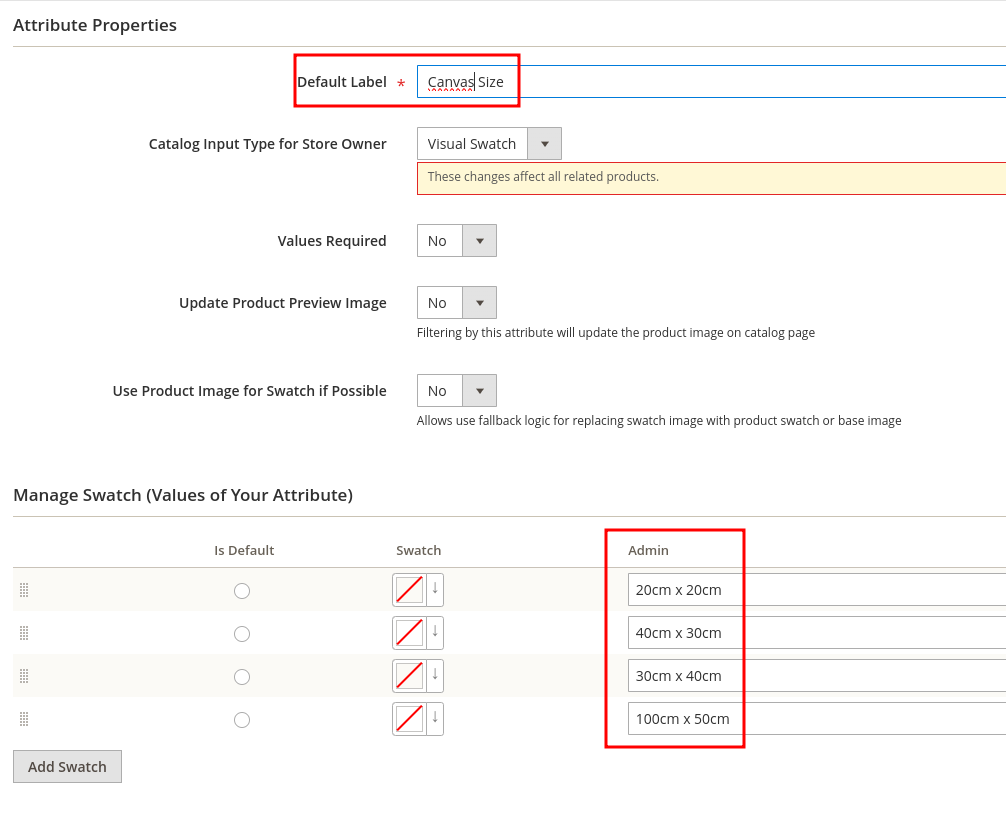
Do this for all 3 form fields.
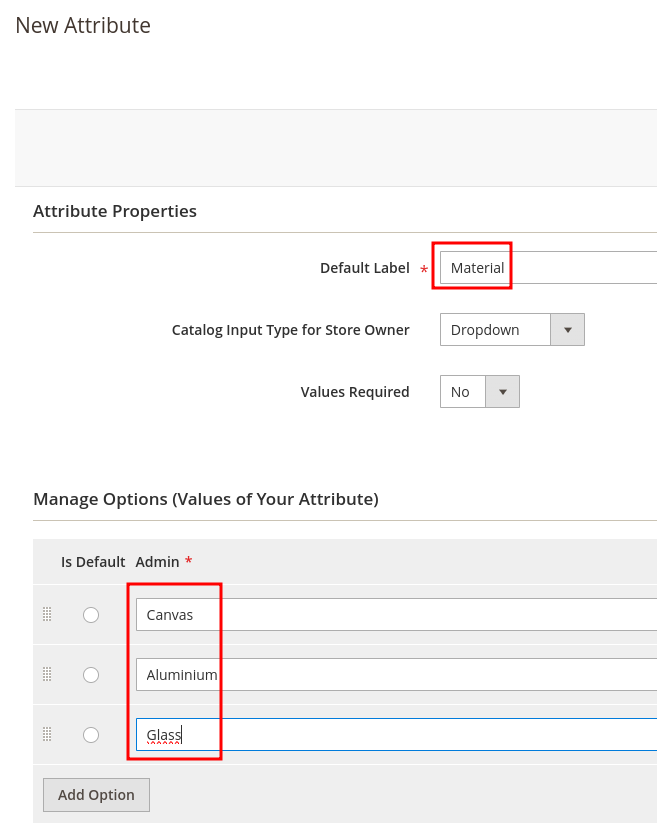
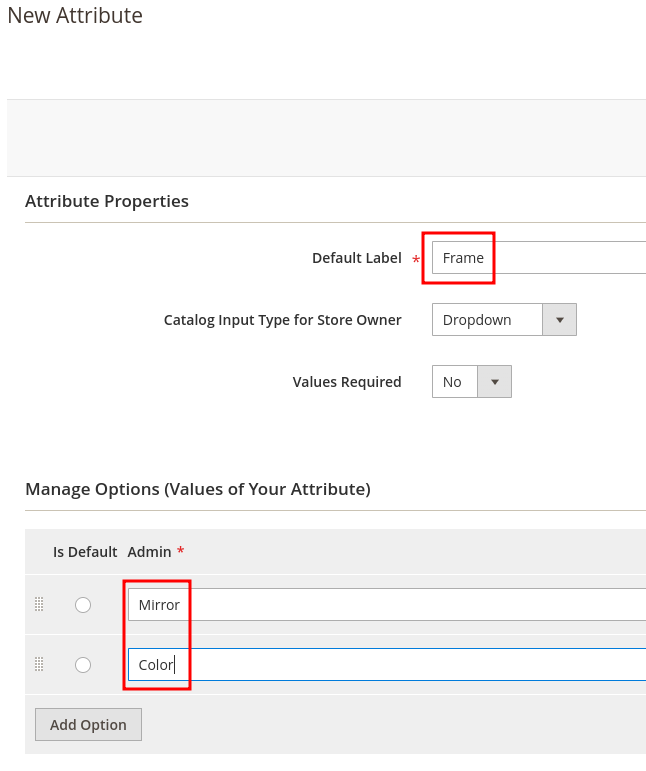
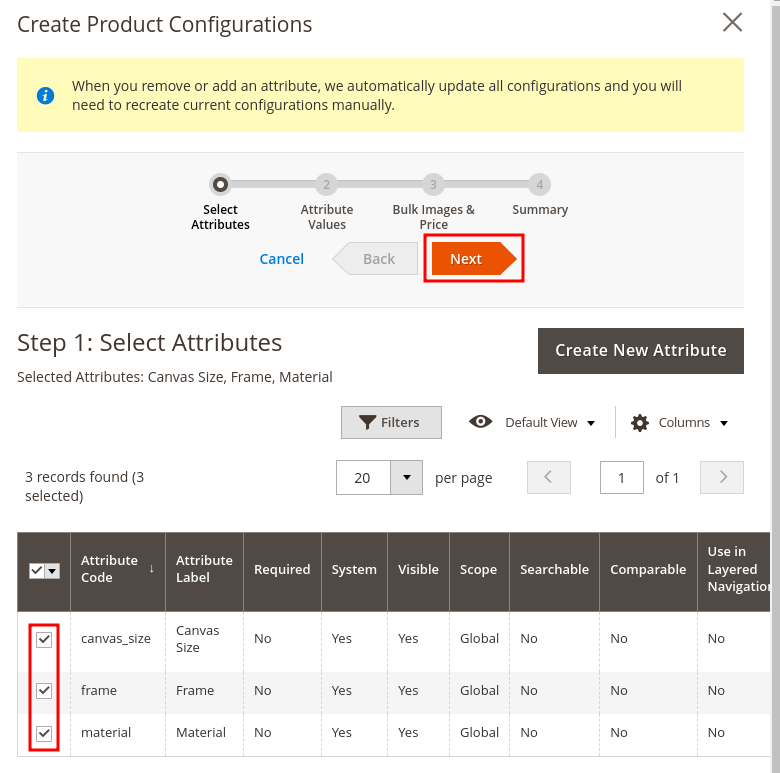
In the product configuration dialog, select all 3 of the created attributes and click on next for the attribute value assignment.
Select all values for all 3 attributes.
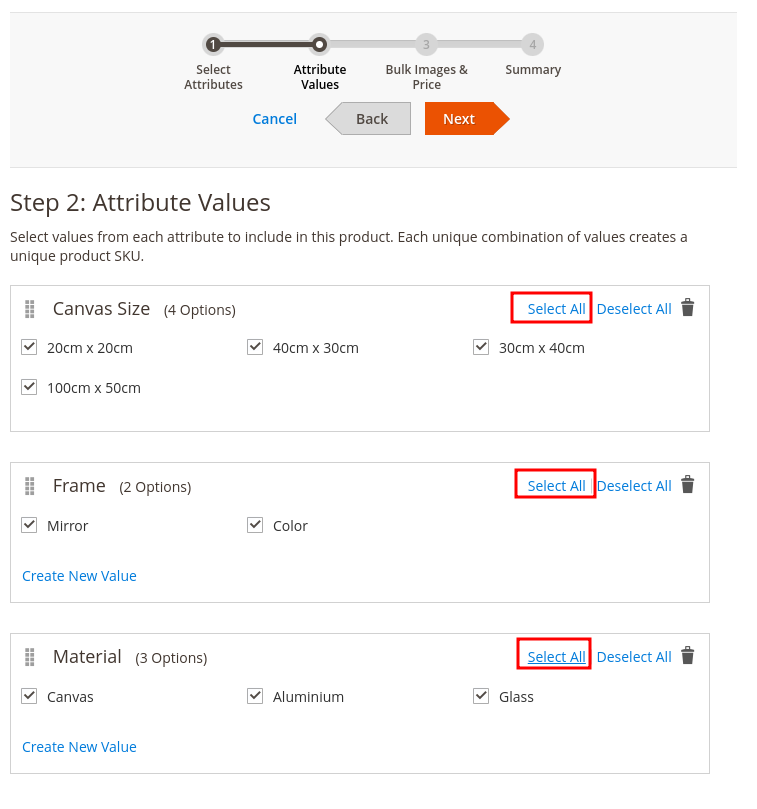
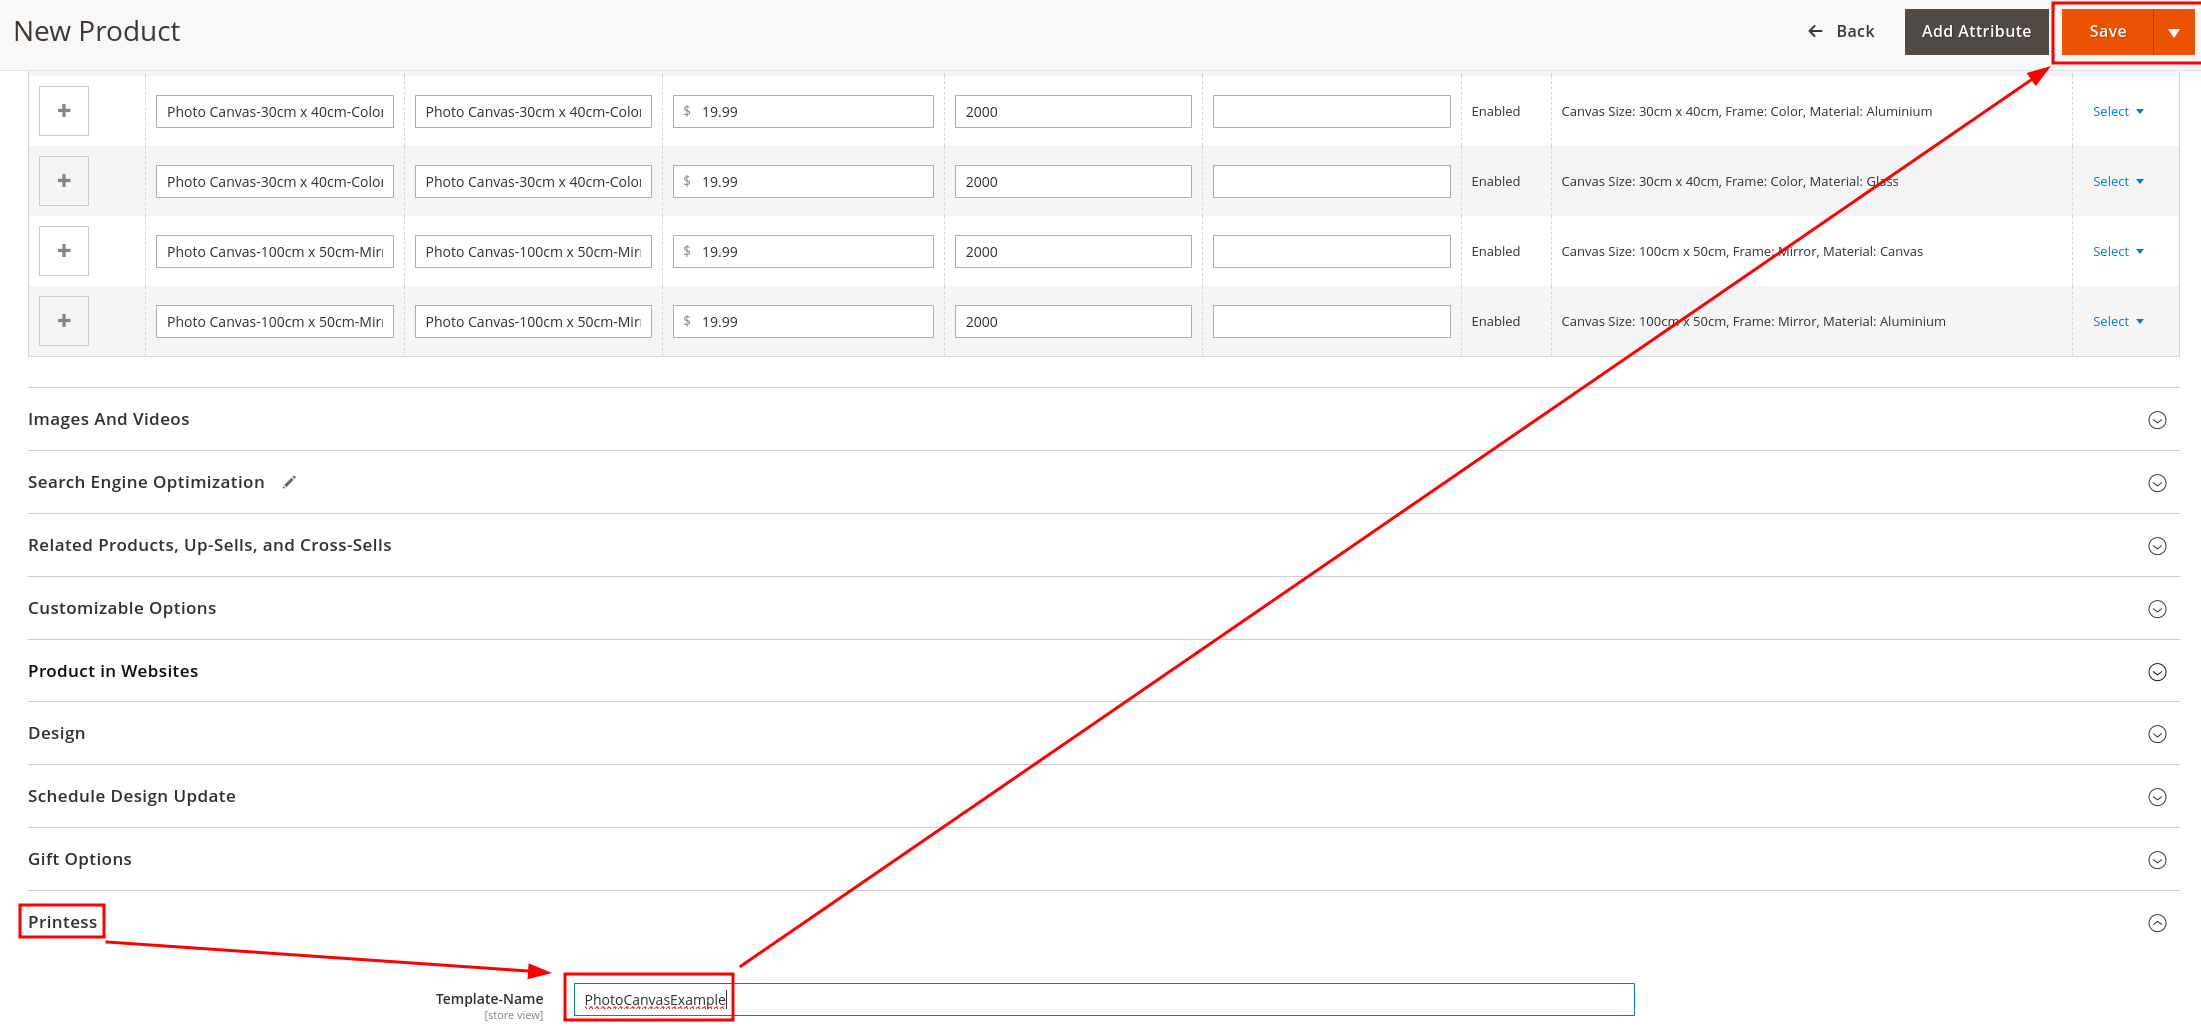
Now configure the thumbnails, prices, sku’s and awailable quantitites etc and finish the product creation. On the last screen of the product creation, provide the Printess template name under the printess setting (This can also be done / changed after the product was created inside the product configuration)
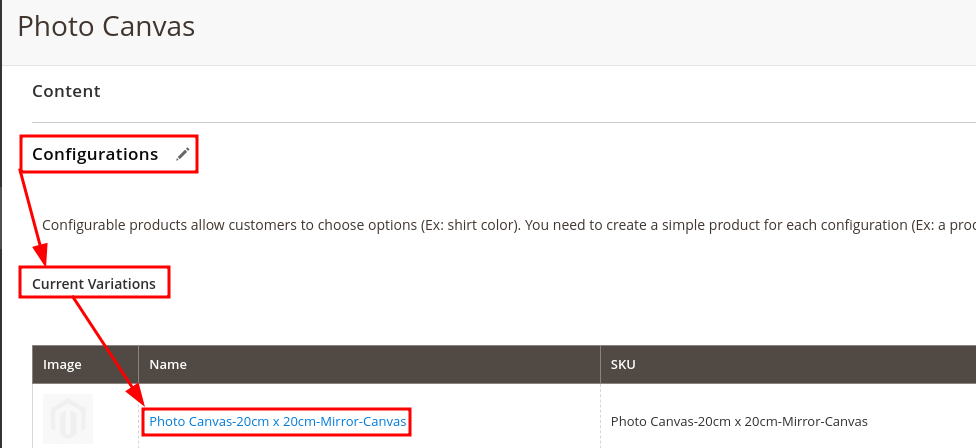
The final step is to link each of the 24 created variants to the corresponding form field using the form field mappings explained above. Open each of the variations and edit the template mapping value inside the Printess configuration section (other settings are controlled by the main product and does not need to be configured).
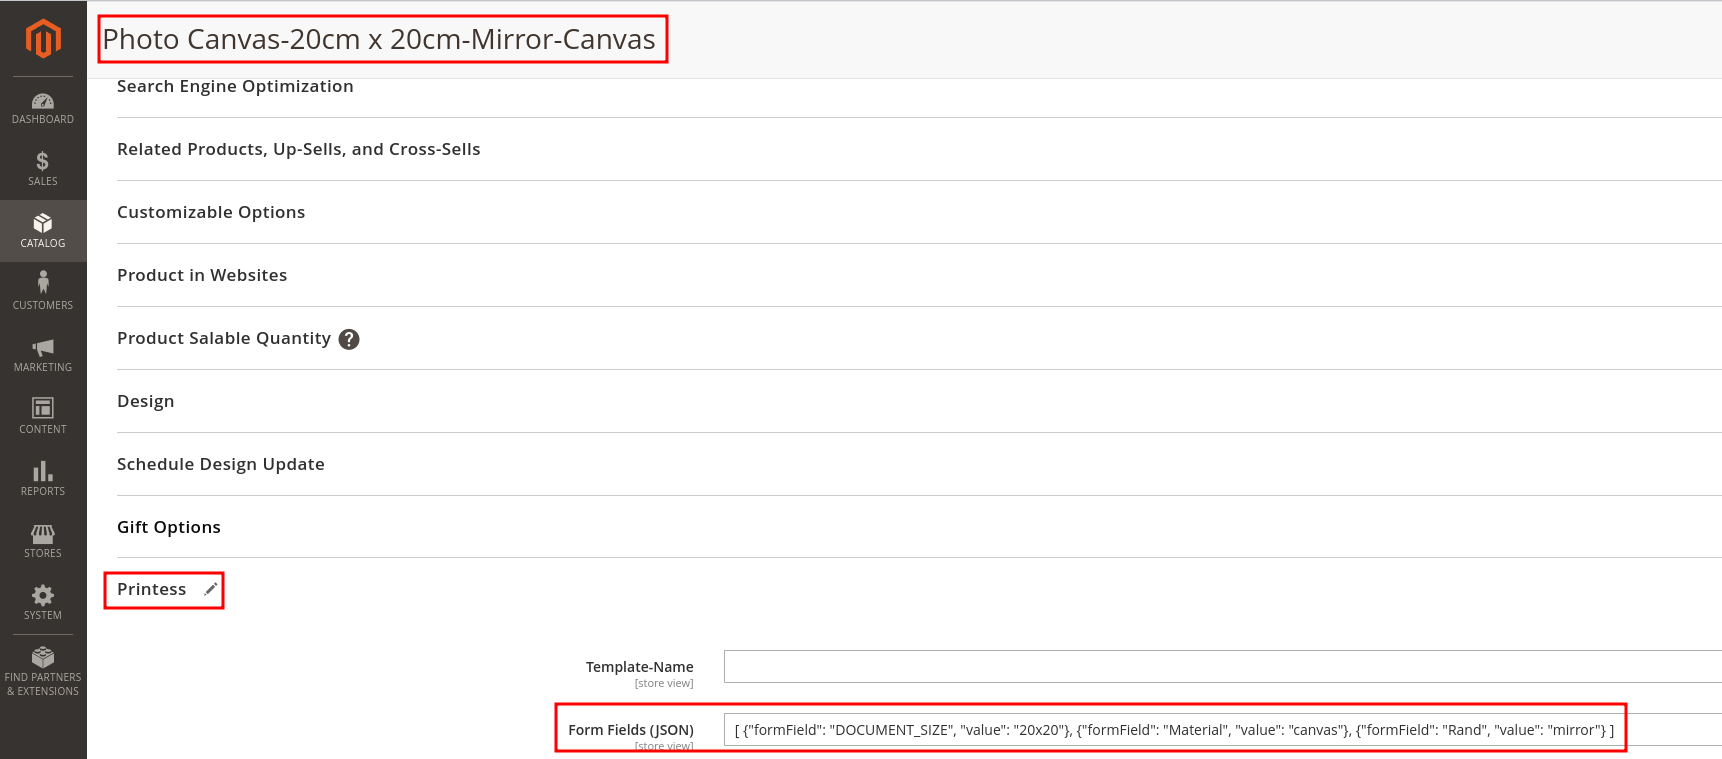
The form field mappings for all 24 products (One line per product variant):
[ {“formField”: “DOCUMENT_SIZE”, “value”: “20x20”}, {“formField”: “Material”, “value”: “canvas”}, {“formField”: “Rand”, “value”: “mirror”} ]
[ {“formField”: “DOCUMENT_SIZE”, “value”: “20x20”}, {“formField”: “Material”, “value”: “alu”}, {“formField”: “Rand”, “value”: “mirror”} ]
[ {“formField”: “DOCUMENT_SIZE”, “value”: “20x20”}, {“formField”: “Material”, “value”: “glass”}, {“formField”: “Rand”, “value”: “mirror”} ]
[ {“formField”: “DOCUMENT_SIZE”, “value”: “20x20”}, {“formField”: “Material”, “value”: “canvas”}, {“formField”: “Rand”, “value”: “color”} ]
[ {“formField”: “DOCUMENT_SIZE”, “value”: “20x20”}, {“formField”: “Material”, “value”: “alu”}, {“formField”: “Rand”, “value”: “color”} ]
[ {“formField”: “DOCUMENT_SIZE”, “value”: “20x20”}, {“formField”: “Material”, “value”: “glass”}, {“formField”: “Rand”, “value”: “color”} ]
[ {“formField”: “DOCUMENT_SIZE”, “value”: “40x30”}, {“formField”: “Material”, “value”: “canvas”}, {“formField”: “Rand”, “value”: “mirror”} ]
[ {“formField”: “DOCUMENT_SIZE”, “value”: “40x30”}, {“formField”: “Material”, “value”: “alu”}, {“formField”: “Rand”, “value”: “mirror”} ]
[ {“formField”: “DOCUMENT_SIZE”, “value”: “40x30”}, {“formField”: “Material”, “value”: “glass”}, {“formField”: “Rand”, “value”: “mirror”} ]
[ {“formField”: “DOCUMENT_SIZE”, “value”: “40x30”}, {“formField”: “Material”, “value”: “canvas”}, {“formField”: “Rand”, “value”: “color”} ]
[ {“formField”: “DOCUMENT_SIZE”, “value”: “40x30”}, {“formField”: “Material”, “value”: “alu”}, {“formField”: “Rand”, “value”: “color”} ]
[ {“formField”: “DOCUMENT_SIZE”, “value”: “40x30”}, {“formField”: “Material”, “value”: “glass”}, {“formField”: “Rand”, “value”: “color”} ]
[ {“formField”: “DOCUMENT_SIZE”, “value”: “30x40”}, {“formField”: “Material”, “value”: “canvas”}, {“formField”: “Rand”, “value”: “mirror”} ]
[ {“formField”: “DOCUMENT_SIZE”, “value”: “30x40”}, {“formField”: “Material”, “value”: “alu”}, {“formField”: “Rand”, “value”: “mirror”} ]
[ {“formField”: “DOCUMENT_SIZE”, “value”: “30x40”}, {“formField”: “Material”, “value”: “glass”}, {“formField”: “Rand”, “value”: “mirror”} ]
[ {“formField”: “DOCUMENT_SIZE”, “value”: “30x40”}, {“formField”: “Material”, “value”: “canvas”}, {“formField”: “Rand”, “value”: “color”} ]
[ {“formField”: “DOCUMENT_SIZE”, “value”: “30x40”}, {“formField”: “Material”, “value”: “alu”}, {“formField”: “Rand”, “value”: “color”} ]
[ {“formField”: “DOCUMENT_SIZE”, “value”: “30x40”}, {“formField”: “Material”, “value”: “glass”}, {“formField”: “Rand”, “value”: “color”} ]
[ {“formField”: “DOCUMENT_SIZE”, “value”: “100x50”}, {“formField”: “Material”, “value”: “canvas”}, {“formField”: “Rand”, “value”: “mirror”} ]
[ {“formField”: “DOCUMENT_SIZE”, “value”: “100x50”}, {“formField”: “Material”, “value”: “alu”}, {“formField”: “Rand”, “value”: “mirror”} ]
[ {“formField”: “DOCUMENT_SIZE”, “value”: “100x50”}, {“formField”: “Material”, “value”: “glass”}, {“formField”: “Rand”, “value”: “mirror”} ]
[ {“formField”: “DOCUMENT_SIZE”, “value”: “100x50”}, {“formField”: “Material”, “value”: “canvas”}, {“formField”: “Rand”, “value”: “color”} ]
[ {“formField”: “DOCUMENT_SIZE”, “value”: “100x50”}, {“formField”: “Material”, “value”: “alu”}, {“formField”: “Rand”, “value”: “color”} ]
[ {“formField”: “DOCUMENT_SIZE”, “value”: “100x50”}, {“formField”: “Material”, “value”: “glass”}, {“formField”: “Rand”, “value”: “color”} ]
Thats it, you can now control Printess form field mappings via product variants. By activating the Price relevant option inside the form fields, form field value changes within the printess designer on the shop buyer side are fed back to magento and the corresponding variant is selected automatically