
You can invite additional team members on the Subscription page if you have enough available seats. With any paid plan, additional seats can be added at any time by clicking the Buy Additional Seats button.
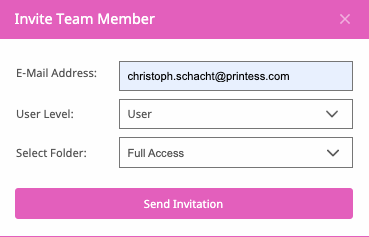
Once a seat is available you can invite a new team member by selecting the Invite Member button. A dialog will open asking for the name, email address, and access settings of the new team member.

Name: The name of the new team member.
E-Mail Address: This is the email address of the new team member (one address cannot be used for multiple accounts).
User Level: Select a level with the intended privileges. Our different access levels are detailed below:
External Designer
Can create, open, modify, and save Templates.
User
Can publish and delete Templates, log in to the account portal, view usage data, and view print jobs.
Buyerside User
For corporate applications where employees should only be able to customize and print templates.
Buyerside Users cannot modify templates or even open Designer Side.
Buyerside Users will always see a “Create PDF”-Button instead of the “Add to Basket”-Button.
Owner
Full access. Can change account data, Buyer Side themes, colors, translation settings, offensive word settings, and plans. Additionally, owners can add team members, view the service token, and download invoices.
Select Folder: Here team members can be limited to only accessing a certain folder(s) within your repository.
Once all settings are confirmed, select the Invite button and your new team member will receive an invitation email directing them to set up their Printess account and log in!
As Printess waits for your new friend to finish the account creation process, their seat will be shown as Pending in the Team Member view. In case a wrong email address was entered for the invitation, you can easily cancel it by selecting Remove in the Team Member view.
Owners can change the user level and folder(s) accessible to a team member at any time. Change settings and select Save to apply changes. Certain changes may require the member to log out and in again to be made effective.
Owners can also revoke the membership of team members by clicking Remove. Once the team member is removed one can assign a new team member to the seat or remove the seat altogether (if it was an extra booked seat).